How to Use Line Trace (Raycast) for Shooting in UE5: Fix Bullet Glitches
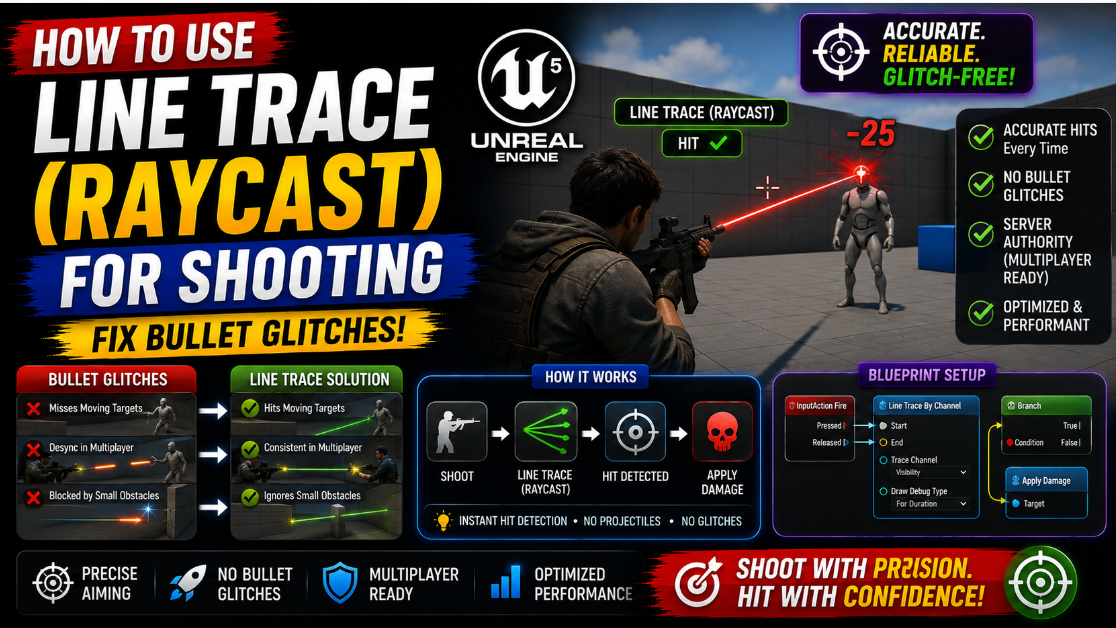
Building a shooting mechanic in UE5 and using an actual physical bullet projectile sounds like the obvious choice until you actually try it. The bullet phases through thin walls at high speed, it feels slightly delayed compared to when the player pulled the trigger, and on mobile the performance cost of spawning dozens of projectile actors per second adds up fast. Most shooting games, especially fast paced ones, do not actually use physical bullets at all. They use Line Traces, also called raycasts, which check instantly whether a straight line from the gun hits something.
A Line Trace is essentially a way of asking the world a question. If I draw an invisible line from point A to point B does it hit anything along the way. For shooting mechanics this line goes from the gun’s muzzle outward and whatever it hits first is what gets shot. There is no actual bullet object traveling through the world, just an instant check, which is why it feels responsive and why it never has projectile related glitches.
In this article I will show you how to build a complete Line Trace shooting system in UE5 and fix the common glitches that show up when developers set this up incorrectly the first time.
Why Line Traces Are Better Than Physical Bullets for Most Games
Before getting into the implementation it is worth understanding when this approach actually makes sense.
A physical bullet actor needs to be spawned, needs collision, needs to move every frame and needs to be destroyed afterward. All of this has a performance cost and on mobile hardware where every bit of CPU time matters this adds up quickly if your game has fast firing weapons. A Line Trace by comparison is a single instant calculation. There is no ongoing per frame cost since the check happens once and is immediately resolved.
Line Traces also completely eliminate a category of bugs that physical projectiles are prone to. A fast moving projectile can tunnel through thin geometry if it moves further in a single frame than the thickness of the wall it is supposed to collide with. A Line Trace does not have this problem because it checks the entire path between two points in one calculation rather than moving incrementally and potentially skipping over a collision.
The tradeoff is that Line Traces are instant which means they do not work well for slow visible projectiles like a grenade or a rocket that the player needs to actually see traveling through the air. For hitscan weapons like pistols, rifles and most automatic weapons Line Traces are the standard approach used in the vast majority of shooting games.
Step 1: Set Up the Basic Line Trace
Open your weapon Blueprint or your character Blueprint, wherever you handle your firing logic. Create a custom event called FireWeapon.
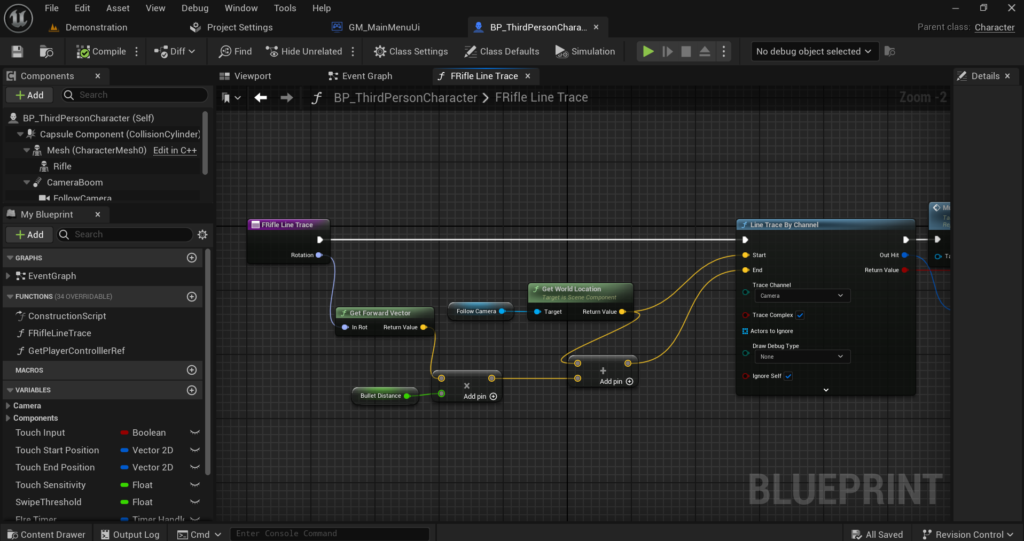
The core node you need is Line Trace By Channel. This node takes a Start location and an End location and returns whether it hit anything along that line plus details about what it hit.
For the Start location use Get Socket Location on your weapon’s mesh with the socket name set to wherever your muzzle socket is placed, or simply use the camera’s location if you want the trace to originate from the player’s view rather than the gun barrel itself.
For the End location you need to calculate a point far ahead along the direction the player is aiming. Get the Forward Vector from your camera or weapon, multiply it by a large distance like 10000 units, and add this to your Start location using a Vector + Vector node. This gives you an end point far enough away to cover essentially any realistic shooting range in your game.
Set the Trace Channel to Visibility for most basic setups, though you can create a custom trace channel later if you need more control over exactly what the trace can and cannot hit.
Step 2: Handle the Hit Result
The Line Trace By Channel node has a Return Value boolean output that tells you whether the trace hit anything at all, and a Out Hit output containing all the details about what was hit if anything.
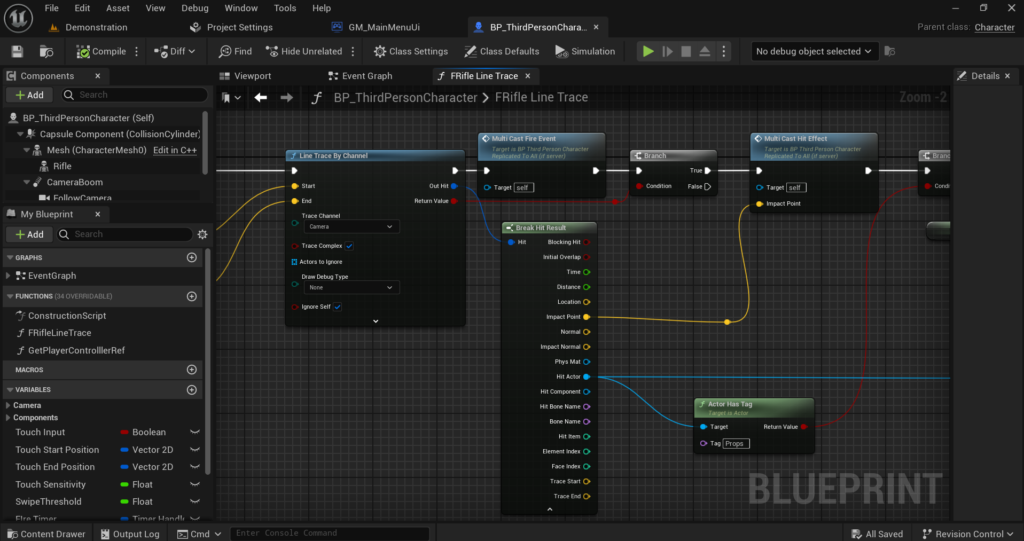
Connect the Return Value into a Branch node. If True something was hit and you need to process it. If False the trace went all the way to its end point without hitting anything, meaning the shot missed everything entirely.
Break the Out Hit struct using Break Hit Result. This gives you access to several useful pieces of information. Hit Actor tells you exactly which actor was hit. Location gives you the precise world position where the hit occurred. Impact Normal gives you the direction the surface was facing at the point of impact, which is essential for spawning impact effects that face the right way.
Step 3: Apply Damage to the Hit Actor
From your Hit Actor output check if it has a Health Component, similar to how damage systems normally work in UE5. Cast the Hit Actor or use Get Component by Class to retrieve its Health Component if one exists.
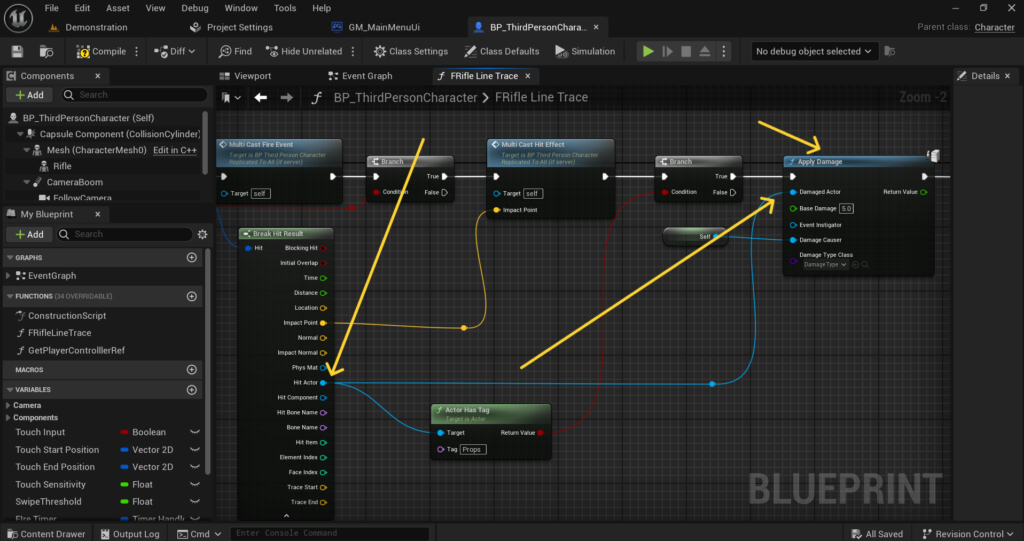
If a valid Health Component is found call your TakeDamage function on it, passing in whatever damage value your weapon deals. If no Health Component is found on the hit actor, meaning the player shot a wall or some other non-damageable object, simply skip the damage step and move on to spawning impact effects instead.
This check matters because not everything your Line Trace hits will be a character. Walls, props and terrain do not have health and trying to call TakeDamage on them without checking first would either do nothing harmlessly or cause an error depending on how your Blueprint is structured, so it is best practice to always verify the component exists before calling anything on it.
Step 4: Spawn Impact Effects at the Hit Location
A Line Trace that deals damage with absolutely no visual feedback feels broken even if the underlying logic works perfectly. Players need to see something happen at the point of impact.
Using the Location and Impact Normal values from your broken Hit Result, spawn a particle effect or Niagara system at that exact location using Spawn Emitter at Location. Use the Impact Normal as the rotation for your spawned effect so impact sparks or dust particles face outward from the surface correctly rather than facing an arbitrary direction.

You can also use the Hit Actor and Physical Material information from the hit result to spawn different effects depending on what surface was hit. A bullet hitting metal should spark differently than a bullet hitting dirt or wood. Get the Phys Mat from your hit result and branch your effect spawning logic based on which physical material was returned.
Step 5: Add a Visible Tracer Effect
Since the actual damage calculation happens instantly with no visible bullet, you typically want to add a fast visual tracer so the player can actually see something traveling from the gun to the target, even though no real projectile exists.
Spawn a thin beam particle effect or a simple stretched mesh that goes from your Start location to either the hit Location, or the trace’s End location if nothing was hit. A Niagara Ribbon effect works well for this and many UE5 starter content packs include a basic tracer effect you can reuse directly.
Set this tracer to destroy itself after a very short lifetime, something like 0.05 to 0.1 seconds, since a tracer that lingers too long looks unnatural for a fast moving bullet. The goal is a quick visual flash that sells the illusion of a bullet traveling at high speed even though the actual hit was already calculated instantly.
Fixing Common Line Trace Glitches
Glitch 1: The Trace Hits the Player’s Own Character
A very common issue when first setting this up is the Line Trace immediately hitting the player’s own character mesh since the trace starts from very close to or even inside the character’s collision.
Fix this using the Actors to Ignore input on the Line Trace By Channel node. Add your own character as an entry in this array so the trace skips over it entirely and only registers hits on other actors in the world.
Glitch 2: The Trace Hits Something Slightly Off From Where the Camera Is Aiming
If your trace starts from the gun’s muzzle socket rather than the camera, you can run into a problem where the gun is aimed slightly differently from where the camera is actually pointing, especially at close range. This causes shots to visually miss things the player was clearly aiming directly at on screen.
The standard fix used in most shooting games is to actually trace from the camera’s location and forward vector rather than the gun muzzle, then visually draw the tracer effect from the gun muzzle to the hit location instead. This way the damage calculation always matches exactly what the player sees through their crosshair, while the tracer visual still appears to originate from the weapon itself.
Glitch 3: Bullets Pass Through Thin Walls Anyway
While Line Traces solve the tunneling problem that physical projectiles have, you can still encounter situations where a trace passes through geometry that has collision disabled on certain channels, or where a wall’s collision mesh does not match its visual mesh correctly.
Check that your wall or obstacle’s collision settings have Block set for the Visibility channel specifically, since this is the channel your Line Trace is checking against. If a wall’s collision is set to Ignore on the Visibility channel specifically, even though it blocks other channels like Pawn collision, your Line Trace will pass straight through it without registering a hit.
Glitch 4: Multiple Hits Registering From a Single Shot
If you notice a single shot sometimes applying damage more than once, this is usually because the Line Trace event itself is being triggered multiple times rather than an issue with the trace logic. Check your input binding for the fire action and make sure you are not accidentally calling FireWeapon from more than one input event simultaneously, which can happen if you have both a button press event and a separate Tick based check both triggering fire logic under certain conditions.
Glitch 5: The Trace Works in the Editor but Not on the Packaged Android Build
This happens occasionally due to differences in how collision channels are configured between editor testing and a packaged mobile build, particularly if you created a custom trace channel.
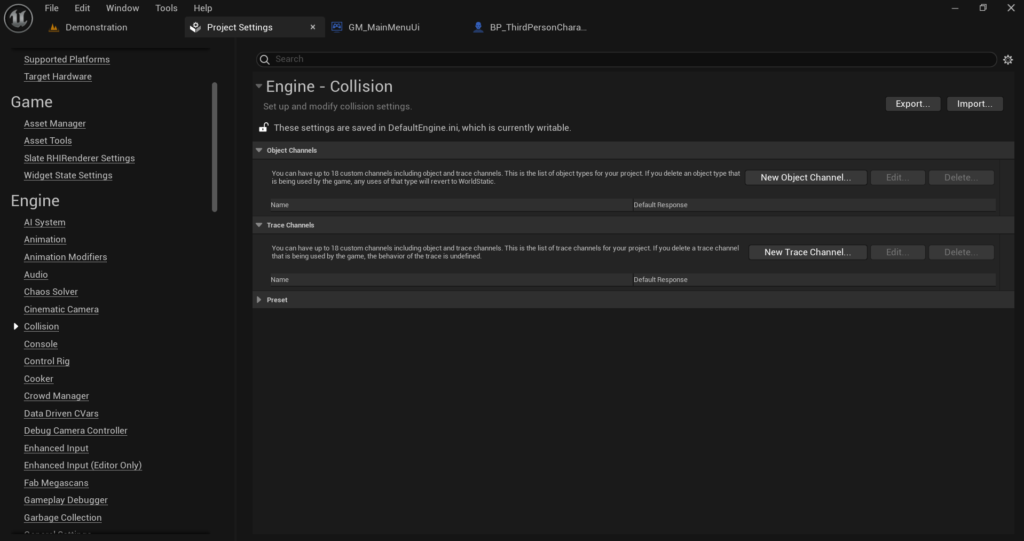
Double check your custom trace channel setup in Edit > Project Settings > Engine > Collision and confirm every object you expect your Line Trace to interact with has its collision response for that specific channel explicitly set, since a channel that defaults correctly in editor preview can sometimes behave differently once cooked into a packaged build if any object’s response was left on the channel default rather than being explicitly configured.
Step 6: Optimize for Mobile Performance
While Line Traces are already efficient compared to physical projectiles, a few additional considerations matter specifically for Android performance.
Avoid running Line Traces every single Tick if your weapon fires continuously, like a hitscan minigun. Instead trigger the trace only on the actual fire rate interval using a Timer rather than checking every frame, since this means you are only doing the trace calculation exactly as often as bullets are actually fired rather than far more frequently than necessary.
If your game has many enemies that also use Line Trace based attacks, consider using a simpler or shorter trace distance for AI controlled shooters compared to the player’s own weapon, since AI enemies typically do not need to trace across the entire level the way a player’s sniper rifle might.
Final Thoughts
Line Traces are the backbone of nearly every shooting mechanic in modern games for good reason. They are fast, they are precise and they completely avoid the tunneling and performance issues that come with physical bullet projectiles, especially important on mobile hardware where every bit of performance matters.
The core system covered in this article, tracing from the camera, checking the hit result, applying damage and spawning effects, will work as the foundation for nearly any hitscan weapon you want to build, from a basic pistol to a fully automatic rifle. Add the visual tracer and impact effects on top and your shooting will feel responsive and satisfying even though there is technically no real bullet flying through your game world at all.
If your Line Trace is not registering hits correctly or you are running into one of the glitches covered in this article that is still not resolving, reach out at Admin@KaliPress.fun with details about what you are seeing and I will help you track down exactly what is going wrong.

Solo Indie Game Developer and Unreal Engine (UE4 & UE5) Specialist with over 5 years of experience building optimized Android games from scratch.
I specialize in handling the full development pipeline independently taking mobile titles from concept to high-performance, publishing ready APK/AAB builds. Highly focused on rendering optimization for low-to-mid range devices, Blueprint scripting, and custom mechanics.
Through this blog, I share my practical knowledge and tutorials to help aspiring developers master the Unreal Engine mobile ecosystem.