How to Fix the “Black Screen on Startup” in UE5 Android – Splash Screens & Async Loading
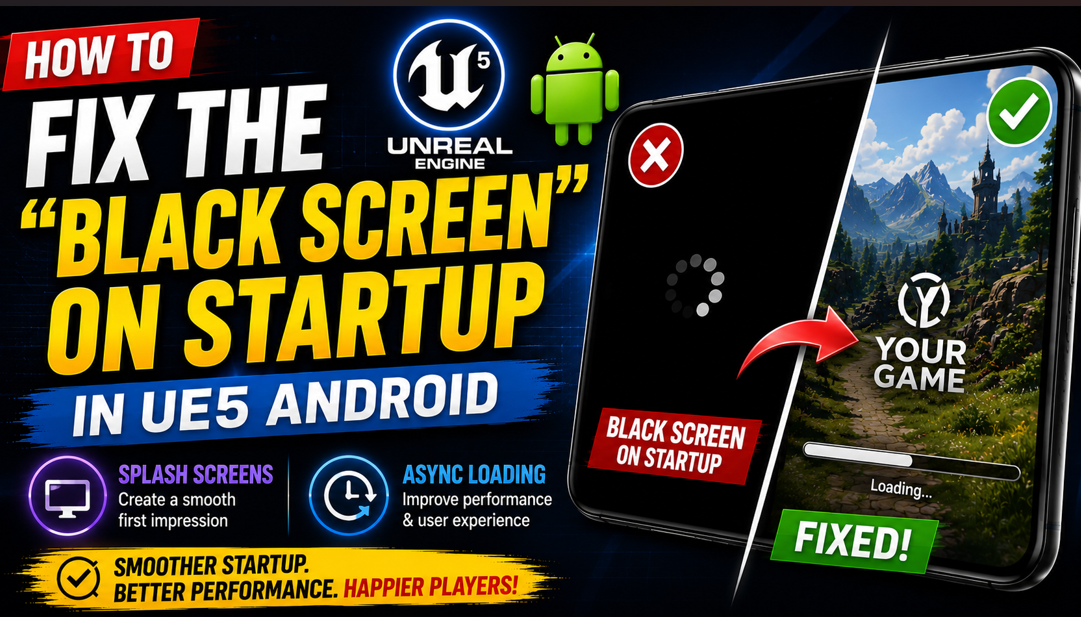
You package your UE5 game, install it on your Android phone and tap the icon. The phone sits there for a few seconds and then nothing. Just a black screen. No logo, no loading bar, no sign that anything is happening. Ten to fifteen seconds later the game finally shows up.
This problem makes your game look broken even when everything is technically working fine. Players on the Play Store will not sit through 15 seconds of black screen. They will close the app and leave a bad review before your game even loads.
In this article I will explain exactly why this happens and show you how to fix it using Splash Screens and Async Level Loading so your game starts smoothly every time.
Why Does the Black Screen Happen
Before we fix the problem you need to understand why it happens in the first place.
When a player launches your game on Android the operating system starts the UE5 engine first. The engine needs to initialize itself, load the rendering system, connect to audio, set up input and do a hundred other things before it can show anything on screen. All of this happens before your first level even begins loading.
On a high end PC this initialization takes less than a second so you never notice it. On a mobile phone especially a mid range or low end Android device this can take anywhere from 5 to 20 seconds. During all of that time the screen is completely black because the engine has not rendered a single frame yet.
On top of that if your first level is large and has a lot of assets to load you get another wave of black screen or freezing after the engine initializes while the level itself is streaming in.
The solution has two parts. The first part is adding a Splash Screen that appears immediately while the engine initializes so the player sees something right away. The second part is setting up Async Level Loading so your game loads levels in the background without freezing the screen.
Part 1: Setting Up the Splash Screen
A Splash Screen in UE5 Android is a static image that the Android operating system itself displays before the UE5 engine even starts. This is not a UE5 feature. It is a native Android feature which is why it can appear instantly with zero loading time.
Step 1: Prepare Your Splash Screen Image
First you need to prepare the image you want to show. This should be your game’s logo or a simple branded image. Keep it clean and simple because it will be stretched to fit different screen sizes.
The recommended format is a PNG file. For best results prepare your image at 1920×1080 pixels for landscape games or 1080×1920 for portrait games. Make sure the important content like your logo is centered because Android will crop the edges on some screen sizes.
Name the file something simple like splash.png and keep it somewhere easy to find on your computer.
Step 2: Add the Splash Screen in Project Settings
Go to Edit > Project Settings > Platforms > Android and scroll down until you find the Launch Images section. This is where you configure everything related to startup images on Android.
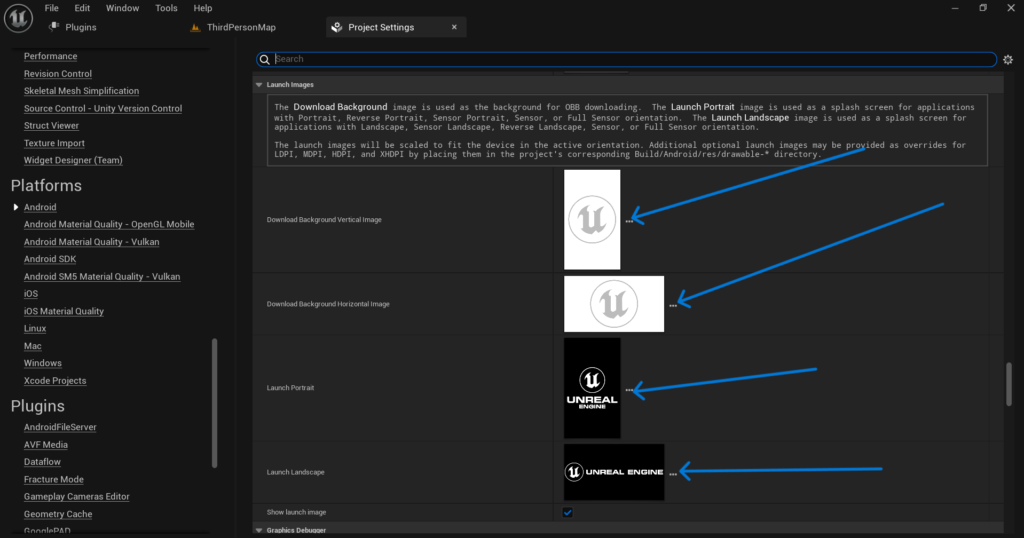
You will see several fields for different screen orientations and resolutions. The main ones you need to fill are Landscape Splash Screen and Portrait Splash Screen depending on your game’s orientation.
Click the folder icon next to the relevant field and import your splash image. UE5 will ask you to import it as a texture. Accept and let it import.
Once imported make sure the texture is set correctly. Go to the imported texture in your Content Drawer, open it and in the Details panel set the Compression Settings to UserInterface2D and make sure Never Stream is enabled. Save the texture.
Now go back to Project Settings > Platforms > Android > Launch Images and assign this texture to the appropriate splash screen field.
Step 3: Configure the Splash Screen Display Settings
In the same Launch Images section you will find a few important settings to configure.
Show Launch Image must be checked. This is sometimes off by default and if it is off your splash screen will never appear no matter what image you assign.
Download Background Vertical Image and Download Background Horizontal Image are used for the OBB download screen if your game uses expansion files. You can leave these for now if your game does not use OBB files.
Splash Screen Scale controls how your image fits the screen. The options are usually Fill, Fit and Center. For most games Fill works best because it ensures the entire screen is covered with no black bars on the sides.
After setting all of this save your Project Settings and do a test package. Install it on your device and you should now see your splash image appear immediately when the player taps the game icon instead of a black screen.
Part 2: Adding an In-Engine Loading Screen
The Android splash screen handles the black screen before the engine starts. But there is a second black screen problem that happens after the engine starts but while your first level is loading. For this you need an in-engine loading screen.
Step 4: Create a Loading Screen Widget
Go to your Content Drawer and create a new Widget Blueprint. Name it WBP_LoadingScreen.
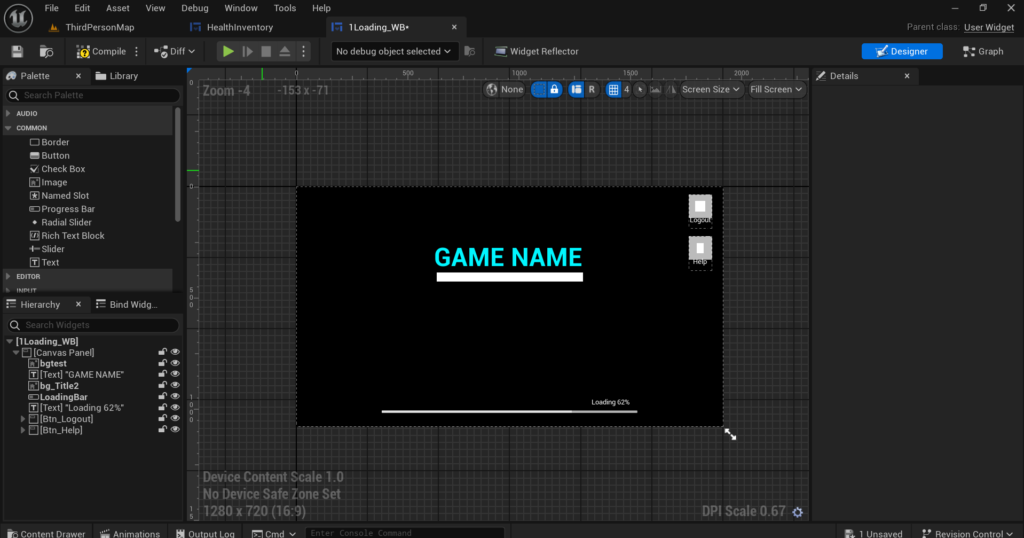
Inside this widget design a simple loading screen. A dark background with your game’s logo in the center and a loading bar or spinning animation at the bottom works well. Keep it simple. This screen only needs to exist for a few seconds.
If you want an animated loading spinner add a Circular Throbber widget from the widget palette. It spins automatically without any Blueprint logic needed.
Add a text element that says something like Loading or Please Wait so the player knows the game is working and not frozen.
Step 5: Show the Loading Screen Before Level Transition
Whenever you are about to load a new level you need to show this loading screen first so the player sees something instead of a black screen during the transition.
In your Blueprint wherever you trigger a level load create the WBP_LoadingScreen widget using Create Widget and immediately call Add to Viewport with a high Z-Order value like 100 so it appears on top of everything else.
Then call Open Level to start loading your target level. The loading screen will remain visible while the level loads in the background. In your target level’s Game Mode Blueprint on Event BeginPlay add a small delay of about 0.5 seconds and then remove the loading screen widget from the viewport. The delay gives the level a moment to finish rendering its first frame before the loading screen disappears so the player does not see a brief black flash.
Part 3: Using Async Level Loading to Prevent Freezing
The standard Open Level node in UE5 is a synchronous operation. When you call it the game completely stops rendering everything while the new level loads.
On Android this means the screen freezes or goes black until loading is complete. For large levels this can take many seconds. The solution is to use UE5’s Async Level Loading system which loads levels in the background while the game keeps rendering your loading screen smoothly.
Step 6: Load Levels Asynchronously
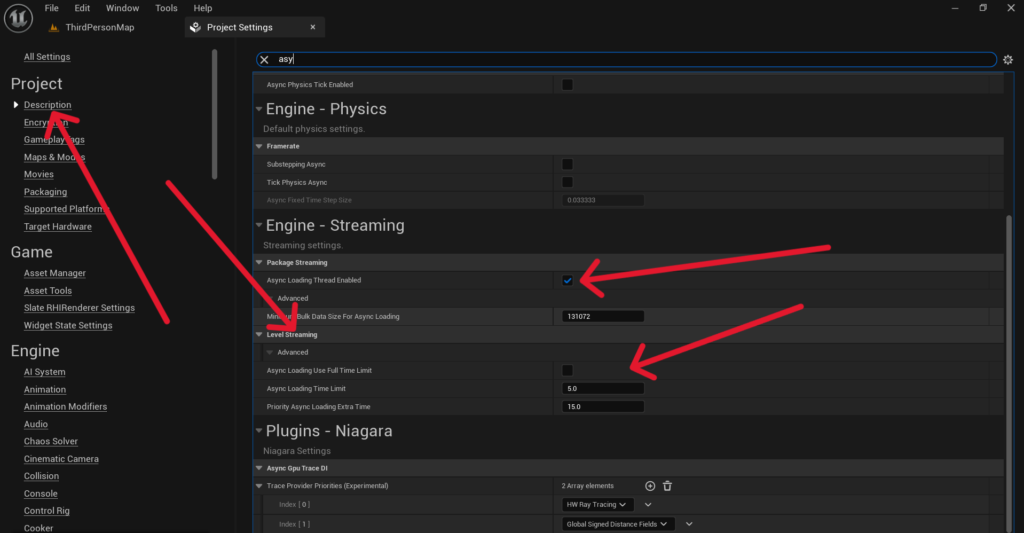
Instead of using the standard Open Level node use the Load Stream Level node combined with a World Composition or Level Streaming setup. The cleanest approach for most mobile games is to use Async Load Primary Asset for individual assets or to set up your levels as Streaming Levels in the World Partition or Level Streaming system.
For a simple two level setup where you have a Main Menu level and a Gameplay level here is how to set it up. In your Main Menu level open the Levels panel by going to Window > Levels. Click Add Existing and add your Gameplay level as a streaming level. Set its initial state to Unloaded.
Now in your Blueprint when the player taps the Play button first show your loading screen widget. Then call Load Stream Level with your gameplay level’s name. Enable the Make Visible After Load checkbox.
This node has a callback called On Level Loaded which fires when the streaming level has completely finished loading. From this callback hide your loading screen widget and the gameplay level will be fully visible with no black screen or freeze.
Step 7: Preload Your First Level on Startup
Another powerful technique is to start loading your gameplay level in the background as soon as the main menu appears. This way by the time the player taps Play the level might already be partially or fully loaded.
In your Main Menu Game Mode Blueprint on Event BeginPlay call Load Stream Level for your gameplay level with Make Visible After Load unchecked. This loads the level into memory silently without showing it.
Then when the player taps Play you just make the already loaded level visible which happens almost instantly. Your loading screen might only need to appear for half a second before the level is ready.
This technique works best for games with a single main gameplay level. If your game has many levels you cannot preload all of them so use it selectively for the most commonly accessed levels.
Part 4: Additional Tips to Reduce Startup Time
Even with a splash screen and async loading you can do more to make your game start faster.
Reduce Your Default Map Complexity
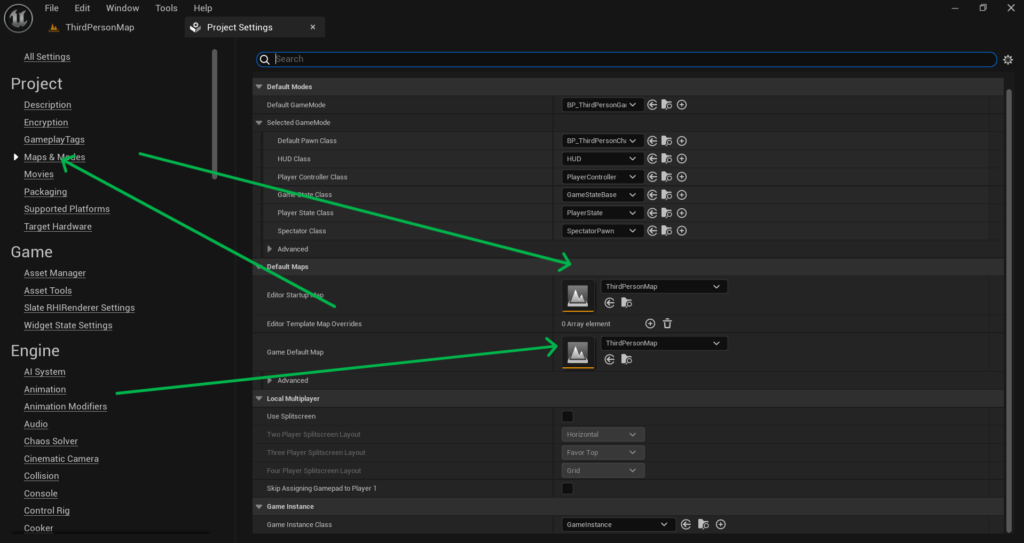
Go to Edit > Project Settings > Project > Maps and Modes and check what your Default Map is set to. Many developers accidentally set their main gameplay level as the default map which means UE5 tries to load the entire game immediately on startup.
Instead set your Default Map to a very simple empty level or a minimal loading level that contains almost nothing. From this minimal level you then load your actual main menu using async streaming. This dramatically reduces initial startup time because the first thing UE5 loads is nearly empty.
Disable Unused Startup Modules
Go to Edit > Project Settings > Project > Packaging and look at the list of plugins and modules that are enabled. Every plugin that is enabled adds to your startup time even if you never use it. Disable any plugins you are not actively using in your project.
Optimize Your Asset Loading
Large assets that are referenced directly in your first level force UE5 to load them all before the level can appear. Use Soft References instead of Hard References for assets that are not needed immediately on startup. Soft references allow assets to be loaded on demand later rather than all at once at the beginning.
In Blueprint you can convert a hard reference to a soft reference by changing your variable type from a direct object reference to a Soft Object Reference. Then use Async Load Asset to load it in the background when you actually need it.
Checklist Before You Package
Before you build your next APK go through this checklist to make sure everything is in place.
Make sure Show Launch Image is enabled in Project Settings and your splash image is correctly assigned. Make sure your splash texture has Never Stream enabled. Make sure your Default Map is a lightweight level and not your main gameplay level. Make sure level transitions use a loading screen widget before calling any level load. Make sure your gameplay level is set up as a Streaming Level if you are using async loading.
Final Thoughts
The black screen on startup is one of those problems that makes a polished game look unfinished. Players have no patience for it and first impressions matter enormously on the Play Store where thousands of other games are competing for their attention.
Fixing it is a combination of two things working together. The Android splash screen handles the very first seconds before UE5 even starts. The in-engine loading screen and async level loading handle everything after that. Together they give your player a smooth continuous visual experience from the moment they tap your game icon to the moment they are in the game.
Take the time to implement both parts properly. Your players will not notice when it works correctly and that is exactly the point. A smooth startup is invisible. A black screen is not.
If you run into any issues with your splash screen not appearing or your async loading behaving unexpectedly reach out at Admin@KaliPress.fun and I will help you get it sorted out.

Solo Indie Game Developer and Unreal Engine (UE4 & UE5) Specialist with over 5 years of experience building optimized Android games from scratch.
I specialize in handling the full development pipeline independently taking mobile titles from concept to high-performance, publishing ready APK/AAB builds. Highly focused on rendering optimization for low-to-mid range devices, Blueprint scripting, and custom mechanics.
Through this blog, I share my practical knowledge and tutorials to help aspiring developers master the Unreal Engine mobile ecosystem.