Stop Using Destroy Actor! How to Use Object Pooling in UE5 Android
Every mobile game developer hits this wall eventually. You are spawning bullets enemies particle effects or pickups constantly. You call Destroy Actor on each one when it is no longer needed. Everything works fine in the editor. Then you test on an actual Android device and notice small hitches and frame drops every time something gets destroyed especially when a lot of actors are being destroyed close together.
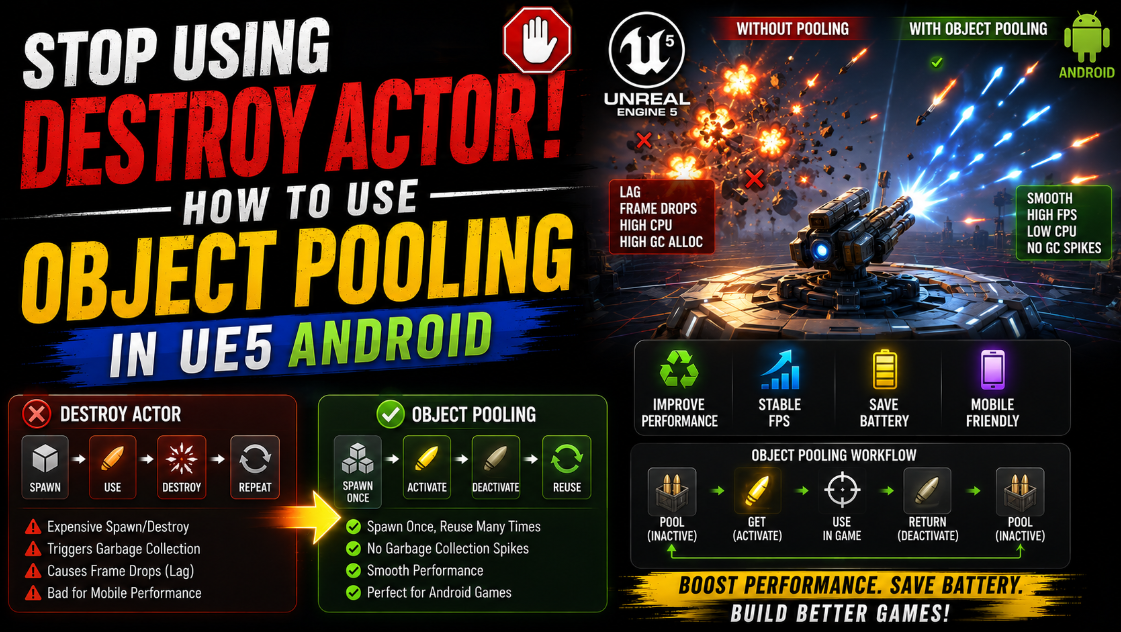
The problem is that Spawn Actor and Destroy Actor are both expensive operations. Every spawn means UE5 has to allocate memory run construction scripts and initialize components. Every destroy means UE5 has to deallocate that memory and clean everything up. On a PC this cost is small enough that you rarely notice it. On mobile hardware with far less CPU headroom this constant allocation and deallocation adds up into real visible stutter.
Object Pooling solves this completely. Instead of destroying an actor when you are done with it you simply hide it and disable it. Then you reuse that exact same actor the next time you need one instead of spawning a brand new one. In this article I will show you how to build a complete object pooling system in UE5 that eliminates this performance cost entirely.
Why Spawn and Destroy Are So Expensive
Before building the pooling system it helps to understand exactly what is happening under the hood every time you call Spawn Actor or Destroy Actor.
When you spawn an actor UE5 needs to allocate memory for it register it with the level initialize every component attached to it run any construction script logic and register it with physics and rendering systems. When you destroy an actor all of this needs to be undone and the memory needs to be freed. None of this is instant and all of it adds up when it happens repeatedly in a short window such as a weapon firing rapidly or a wave of enemies dying close together.
Object Pooling avoids almost all of this cost by doing the expensive allocation work once upfront before it actually matters during gameplay. After that initial cost is paid reusing an already existing actor is dramatically cheaper than spawning and destroying a new one every single time.
Step 1: Understand the Core Pooling Concept
Before writing any Blueprint logic here is the mental model behind how pooling actually works.
Instead of spawning a bullet when the player fires and destroying it when it hits something you spawn a fixed number of bullets once right when the game starts or the level loads and keep them all hidden and inactive in an array. When the player fires a shot you grab one of these already existing bullets from the array move it to the muzzle position make it visible and enable its collision. When that bullet needs to disappear instead of destroying it you simply hide it disable its collision and put it back into the pool so it is ready to be reused the next time a shot is fired.
The actor itself never actually gets destroyed during normal gameplay. It just gets recycled over and over which is exactly what avoids the repeated allocation and deallocation cost that was causing the stutter in the first place.
Step 2: Build a Reusable Object Pool Component
Rather than writing separate pooling logic for every single actor type in your game build one reusable Object Pool Component that can manage a pool of any actor class you assign to it.
Go to your Content Drawer right click and go to Blueprints > Blueprint Class. Under Actor Component select it and name it BC_ObjectPool.
Inside this component add the following variables.
PooledActorClass as an Actor Class Reference defining exactly which Blueprint this specific pool instance will manage.
PoolSize as an Integer defining how many instances to pre spawn. Something like 20 to 50 depending on how many of this actor type you realistically expect to need active at once.
AvailableActors as an Array of Actors storing references to pooled instances that are currently inactive and ready to be reused.
ActiveActors as an Array of Actors storing references to pooled instances that are currently in use in the world.
Step 3: Pre-Spawn the Pool
Create a custom event called InitializePool. This should run once typically on Event BeginPlay in whatever actor owns this component such as your weapon or your Wave Manager from the enemy spawning system.
Use a For Loop running from 0 to PoolSize. Inside the loop call Spawn Actor from Class using PooledActorClass as the class to spawn at a default location such as far below the level or simply at the world origin. These actors will be repositioned properly the moment they are actually needed.
Immediately after spawning each actor set its visibility to hidden using Set Actor Hidden In Game with the value True and disable its collision using Set Actor Enable Collision with the value False. Add each spawned actor to your AvailableActors array.
This entire loop runs once during a loading moment such as level start or a brief pause before a wave begins. The actual expensive spawning cost gets paid upfront during a moment where a small hitch is unnoticeable or expected rather than during fast paced gameplay where a hitch would be very obvious and disruptive.
Step 4: Retrieve an Actor From the Pool
Create a custom event called GetPooledActor with an Output of type Actor. This function’s job is to hand back a usable actor from the pool whenever something in your game needs one.
Check if AvailableActors has any entries remaining using a Length node on the array connected into a Branch checking if it is greater than 0.
If True meaning at least one inactive actor is available get the last entry from AvailableActors using Get (a copy) with an index of Length minus 1. Remove it from AvailableActors using Remove Index and add it to ActiveActors. Set its visibility back to visible using Set Actor Hidden In Game with False and re enable its collision using Set Actor Enable Collision with True. Return this actor as the function’s output.
If False meaning every pooled actor is currently in use and none are available you have a design decision to make. The next step covers this in detail.
Step 5: Handle the Pool Running Out
Running out of available pooled actors happens when your PoolSize was set too small for how many are actually needed simultaneously during intense gameplay moments. You have two reasonable ways to handle it.
The simplest option is to just spawn a brand new actor the normal way in this specific overflow situation. You accept the small performance cost only in this rare edge case rather than in the common case. This new actor can even be added to the pool afterward once it eventually gets recycled. This effectively grows your pool size dynamically over time based on actual gameplay demand rather than a fixed number you had to guess correctly upfront.
The more aggressive option generally better for a mobile game where performance matters most is to simply forcibly reclaim the oldest active actor from ActiveActors even if it has not naturally finished its purpose yet. For something like a background particle effect this is usually not noticeable. For something like an important currently visible enemy this would look wrong and should generally be avoided.
For most gameplay objects like bullets and simple pickup effects choose a PoolSize generously large enough that you rarely if ever hit this overflow case in the first place. Combine this with the simple new spawn fallback just in case. This is the most practical approach.
Step 6: Return an Actor to the Pool
Create a custom event called ReturnToPool with an input parameter called ActorToReturn of type Actor.
Remove this actor from ActiveActors using Remove Item and add it back into AvailableActors. Set its visibility to hidden using Set Actor Hidden In Game with True and disable its collision using Set Actor Enable Collision with False.
This is the function you call instead of Destroy Actor anywhere in your game logic that previously called Destroy Actor. A bullet that hits something an enemy that dies or a pickup effect that finishes playing should all call this function on themselves rather than destroying themselves outright.
Step 7: Apply Pooling to a Bullet System
Using the Line Trace shooting system covered in an earlier article as context if your weapon spawns a visible tracer or impact effect actor for every single shot fired this is a perfect candidate for pooling since a fast firing weapon can easily generate dozens of these actors per second during sustained fire.
In your Weapon Blueprint add a BC_ObjectPool component. Set its PooledActorClass to your Tracer or Impact Effect Blueprint and call InitializePool on Event BeginPlay with a reasonable PoolSize like 30 accounting for a realistic maximum number of shots that might be visually active at once.
Every time the weapon fires instead of calling Spawn Actor for the tracer effect call GetPooledActor on your pool component position the returned actor at the muzzle location and let it play its visual effect. Instead of that tracer actor destroying itself once its effect finishes have it call ReturnToPool on the weapon’s pool component passing itself in as the actor to return.
Step 8: Apply Pooling to Enemy Spawning
Going back to the Wave Spawner system from an earlier article enemies are another strong candidate for pooling especially in a survival game where waves repeatedly spawn and fully clear dozens of enemies over the course of a play session.
In your BP_WaveManager instead of directly using Spawn Actor from Class inside SpawnNextEnemy add a BC_ObjectPool component for each distinct enemy type your waves use and call GetPooledActor on the appropriate pool instead.
When an enemy dies instead of the standard Destroy Actor call inside its OnDeath event call ReturnToPool on the Wave Manager’s relevant pool component. You will also want to reset the enemy’s state when it gets pulled back out of the pool for reuse in a later wave. Restore its CurrentHealth back to MaxHealth and reset any IsDead flags. A pooled enemy pulled out for wave 5 needs to start completely fresh even though it is physically the exact same actor instance that died back in wave 2.
Step 9: Reset Actor State Properly on Reuse
This is the step that catches most developers the first time they implement pooling. It is easy to forget that a reused actor carries over whatever state it had the last time it was active unlike a freshly spawned actor which always starts from a clean default state.
Create a custom event on your pooled actor itself such as ResetForPool and call this immediately after retrieving it from GetPooledActor and before actually positioning or activating it for its new use. Inside this event reset every piece of state that could carry over incorrectly such as health values animation states active Timers or Booleans tracking things like whether it has already dealt damage this activation.
Skipping this step is the single most common source of confusing pooling related bugs. An enemy that should be at full health on a later wave inexplicably dies in one hit simply because its CurrentHealth variable was never reset back to MaxHealth after being returned to the pool from a previous death.
Step 10: Test the Pooling System Properly
Before considering your pooling system finished test scenarios specifically designed to catch the kind of bugs that only pooling introduces since these do not exist at all in a normal spawn and destroy approach.
Fire a weapon rapidly enough to exceed your pool’s PoolSize and confirm your chosen overflow handling behaves correctly rather than silently failing to show any effect at all. Let enemies die and respawn across several full wave cycles and confirm each reused enemy correctly starts at full health and default state rather than carrying over damage or status effects from a previous life. Confirm that a pooled actor’s Timers or Delays from a previous activation are properly cleared during reset. A Timer still counting down from a previous use can fire at a completely wrong moment later and cause behavior that is very confusing to debug without knowing pooling is the underlying cause.
Compare your game’s performance profile on an actual Android device before and after implementing pooling for your highest frequency spawned actor using stat unit as covered in the mobile optimization article. Confirm you can actually see a measurable reduction in frame time spikes during moments of heavy spawning activity.
Final Thoughts
Object Pooling is one of those optimizations that feels like unnecessary complexity the first time you set it up since a simple Spawn Actor and Destroy Actor pair is genuinely easier to write and reason about. The moment your game has any system that spawns and destroys actors frequently such as bullets enemies or particle effects that upfront complexity pays for itself many times over in avoided frame stutter. This matters enormously on mobile hardware where you do not have the CPU headroom to hide inefficiency the way a gaming PC can.
Build the reusable BC_ObjectPool component once. Apply it to your highest frequency spawned actor first since that is where you will see the biggest performance benefit. Expand it to other systems in your game only as needed rather than trying to pool absolutely everything from the very start of development.
If your pooled actors are behaving strangely on reuse or your pool keeps running out during normal gameplay reach out at Admin@KaliPress.fun and I will help you figure out exactly what needs adjusting.

Solo Indie Game Developer and Unreal Engine (UE4 & UE5) Specialist with over 5 years of experience building optimized Android games from scratch.
I specialize in handling the full development pipeline independently taking mobile titles from concept to high-performance, publishing ready APK/AAB builds. Highly focused on rendering optimization for low-to-mid range devices, Blueprint scripting, and custom mechanics.
Through this blog, I share my practical knowledge and tutorials to help aspiring developers master the Unreal Engine mobile ecosystem.