How to Add AdMob Banner & Interstitial Ads in UE5 Android Project – With Plugin and Without Plugin
AdMob is Google’s mobile advertising platform and it is one of the best ways to earn money from your Android game. The tricky part is that UE5 does not have native AdMob support built in which leaves a lot of developers stuck at the very first step.
In this article I will show you three complete methods to integrate AdMob ads into your UE5 Android game. The first method uses a free plugin called Bansh Ads which makes the whole process much simpler. The second method uses UE5’s built-in Android settings which many developers do not even know exists. The third method is a manual approach for developers who want full control and do not want to rely on any third party tools.
Let us go through both methods properly so you can pick the one that works best for you.
What is AdMob and Why Should You Use It
AdMob is Google’s mobile ad network. It lets you show ads inside your Android game and earn revenue every time a player views or interacts with an ad. The two most common ad formats for mobile games are Banner Ads and Interstitial Ads.
A Banner Ad is a small rectangular ad that sits at the top or bottom of the screen while the player is playing. It is always visible and generates passive revenue without interrupting the game.
An Interstitial Ad is a full screen ad that appears at a natural break point in the game such as between levels or after a game over screen. These pay significantly more than banner ads because they take up the full screen and demand the player’s attention.
Before you do anything else you need a Google AdMob account. Go to admob.google.com and sign up if you do not have one already. Once you are in create a new app and get your App ID and create ad units for both banner and interstitial. Save those Ad Unit IDs because you will need them later in both methods.
Method 1: Using the Bansh Ads Plugin (Free and Recommended)
This is the easiest and most reliable way to add AdMob ads to your UE5 Android game. The Bansh Ads plugin is completely free and it handles all the complex Android SDK integration for you. You just call Blueprint nodes and the ads work.
Finding and Installing Bansh Ads
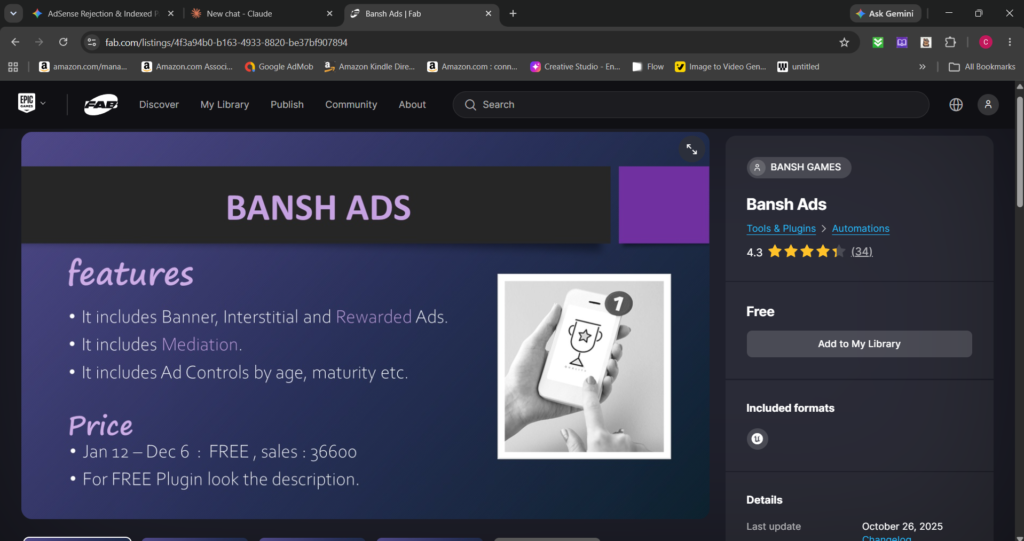
Go to fab.com and search for Bansh Ads. It is a free UE5 plugin specifically built for AdMob integration on Android. Add it to your account and then install it to your engine version from the Epic Games Launcher under the Library section in the Fab Plugins tab.
Once installed open your UE5 project and go to Edit > Plugins. Search for Bansh Ads and enable it. Restart the editor when prompted.
Configuring Your AdMob App ID
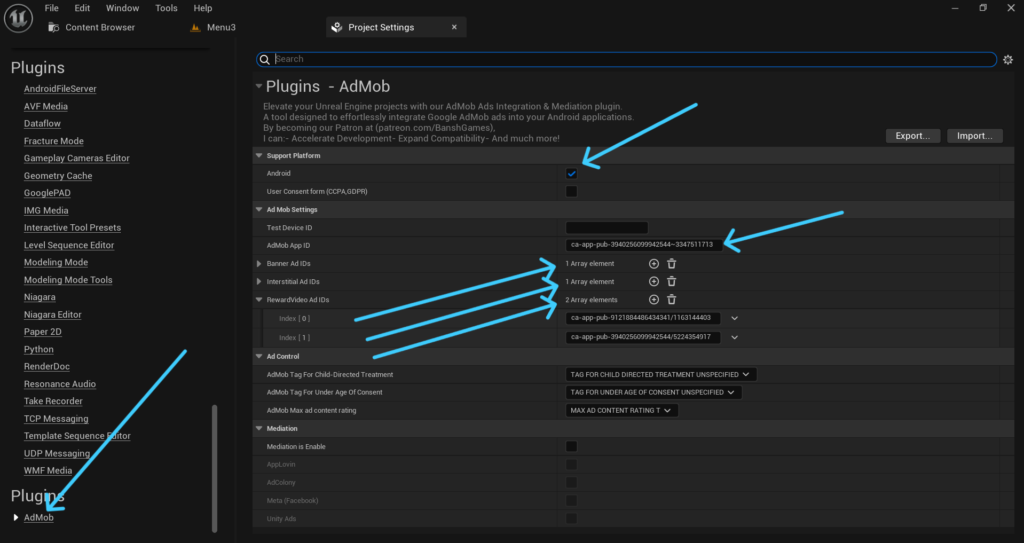
After the plugin is enabled go to Edit > Project Settings and scroll down until you find the Admob section in the left panel. Tick that Android. Here you will see a field for your AdMob App ID. Paste the App ID you got from your AdMob account here and as Well As Admob Ad Units. This step is mandatory. If you skip it your ads will not initialize and you will see errors during packaging.
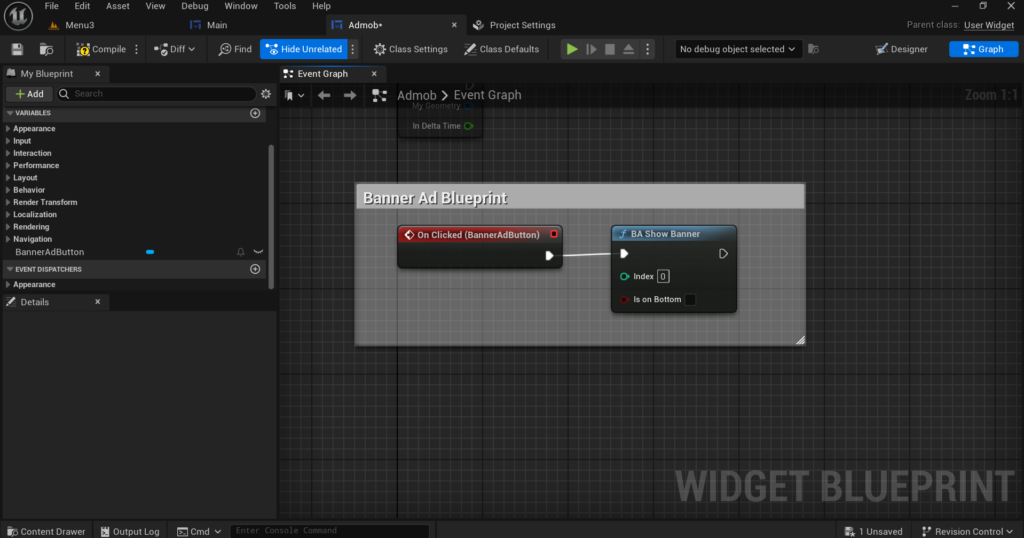
Showing a Banner Ad with Blueprint
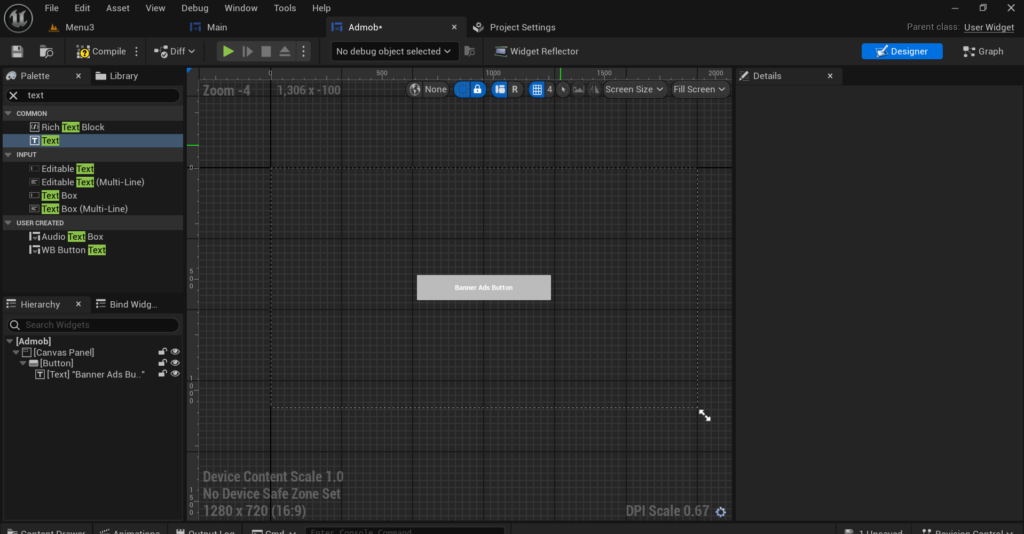
Now go to your User Widget Blueprint. As an example I will show you how to trigger a banner ad using a button.
Add a normal Button widget to your UI and give it a text label. Then in the Details panel scroll to the bottom and you will see an On Clicked event option. Keep in mind this option only appears when the button is set as a variable so make sure that is enabled in the Details panel first.
Now go to the Graph tab. Click on your button’s On Clicked event and drag out from it. Search for BA Show Banner and add that node. That is all you need. When you package the game for Android and tap that button the banner ad will appear on screen.
To close the banner ad add another button to your UI, make it a variable as well and on its On Clicked event drag out and add a node called BA Hide Banner. Connect it and you are done.
Now this button approach is fine for testing but it is not how real published games handle banner ads. Here is what most developers actually do in their live games.
Instead of using buttons they go to the Level Blueprint of the actual gameplay level where the player plays. Not the main menu level but the real game level. Inside that Level Blueprint they find Event BeginPlay and directly connect the Show Banner Ad node to it. This way the banner ad appears automatically as soon as the level starts without needing any button press.
Inside the Show Banner Ad node you will also find a Boolean option called is On Bottom. If you want the banner at the bottom of the screen tick that Boolean. If you want it at the top leave it unticked.
Showing an Interstitial Ad with Blueprint
Now we have the banner ad working. Let’s move on to interstitial and rewarded ads.
You can test interstitial ads the same way we tested the banner ad. Go to your User Widget, add a button and from its On Clicked event drag out and connect the BA Show Interstitial node. It will work fine for testing but this is not how a published game implements interstitial or rewarded ads.
Let me show you the right way using a real example from my own game.
The most important rule before anything else is to not spam ads. If you show an ad every 30 seconds your players will get irritated and uninstall the game. Every time you decide to show an ad give the player something in return. Show a rewarded ad when they want to revive after a game over. Show an interstitial when they want to double their coins. Show ads when they are about to start a new run or want to unlock something. This way the player does not feel forced and they are much more likely to keep playing.
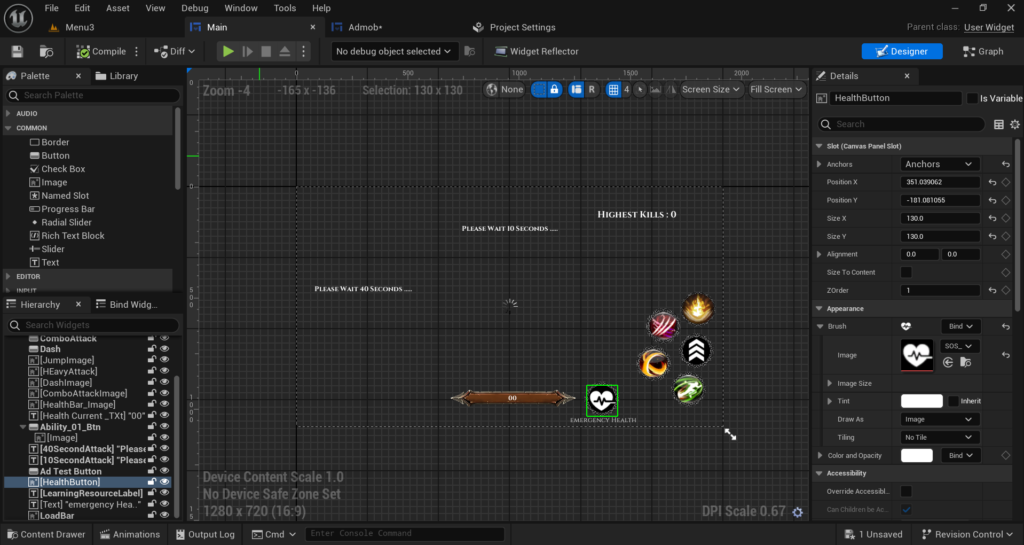
In my game I added a Health Regeneration Button at the bottom of the screen. Whenever the player’s health drops below 20 the button becomes active and the player can tap it to watch an ad and regain full health. Here is exactly how I implemented it.
The Blueprint Logic
First go to your User Widget Blueprint where your health regeneration button is. Make the button a variable and create its On Clicked event in the Graph. From the On Clicked event add a Sequence node.
Then 0 connects to your loading animation logic. This is important because rewarded ads sometimes take a second to load and the player needs to know something is happening. Play a loading spinner or a small animation here so the player does not think the button is broken.
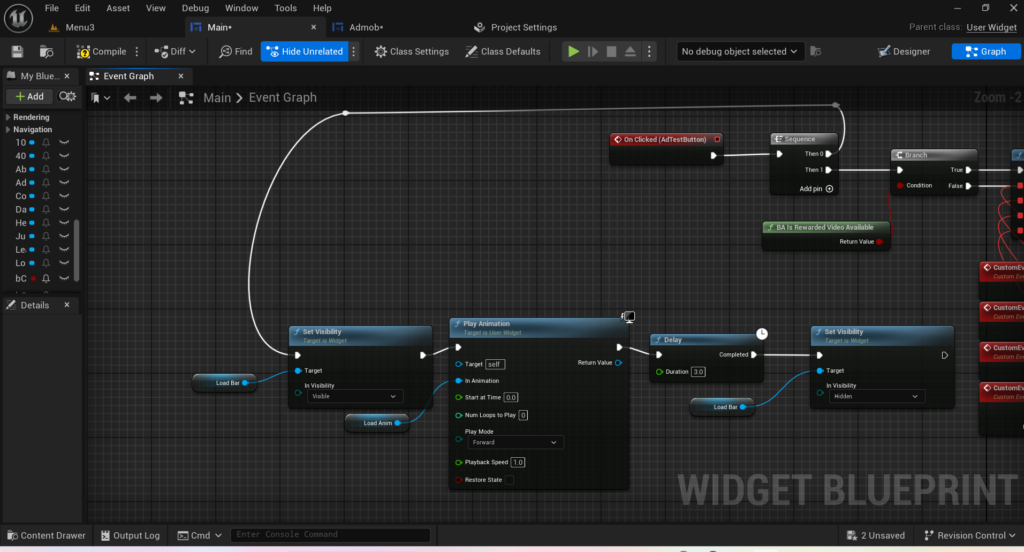
Then 1 connects to the full rewarded ad logic which works like this.
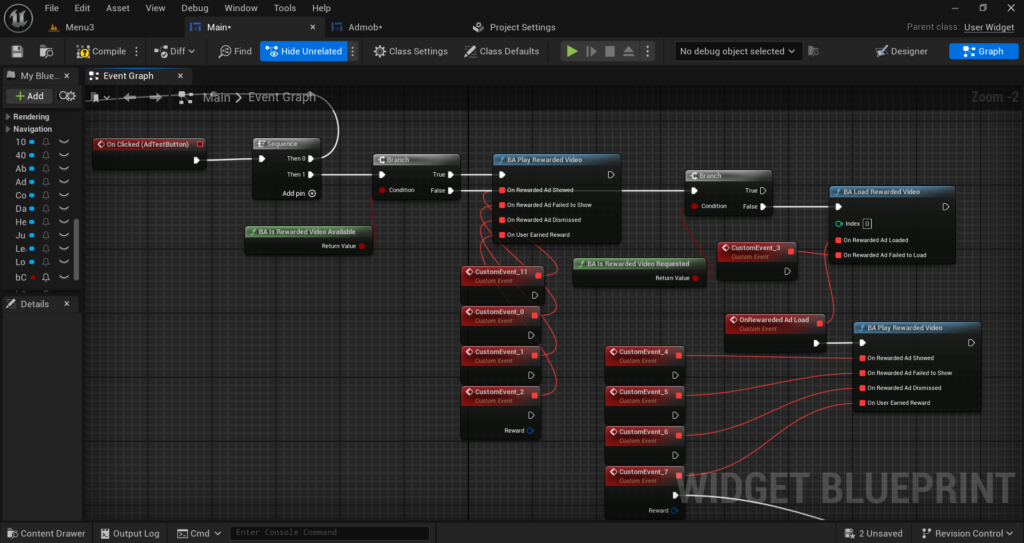
First add a BA Is Rewarded Video Available node. This checks whether an ad is already loaded and ready to play. Its Return Value goes into the Condition pin of a Branch node.
If the Branch is True meaning the ad is ready connect it to BA Play Rewarded Video. This node has four callbacks.
On Rewarded Ad Showed fires when the ad appears on screen. You can stop your loading animation here.
On Rewarded Ad Failed to Show fires if something went wrong. Connect this to a small error message or just silently hide the loading animation.
On Rewarded Ad Dismissed fires when the player closes the ad.
On User Earned Reward is the most important one. This fires only when the player has watched enough of the ad to qualify for the reward. Connect your health regeneration logic here and set the player’s health back to full or whatever your game requires. This is the only place you should give the reward. Never give the reward on Dismissed because the player may have closed the ad before finishing it.
After the ad plays connect the flow to another Branch node that checks BA Is Rewarded Video Requested. If False immediately call BA Load Rewarded Video with Index 0 to load the next ad in the background so it is ready the next time the player needs it.
If the first Branch is False meaning no ad is loaded yet connect it to BA Load Rewarded Video directly. Once the ad finishes loading the On Rewarded Ad Loaded callback fires. From there call BA Play Rewarded Video immediately so the ad shows right after loading without the player needing to tap the button again.
If loading fails On Rewarded Ad Failed to Load fires. Connect this to a message telling the player to check their internet connection or simply hide the loading animation gracefully.
Adding Required Permissions
Before you package your game make sure these two permissions are added in your project. Without these AdMob will not be able to load or show any ads on the device.
Go to Edit > Project Settings > Platforms > Android > Advanced APK Packaging and find the Extra Permissions section. Add these two permissions:
android.permission.INTERNETThis allows your game to connect to the internet and communicate with AdMob servers to fetch ads.
android.permission.ACCESS_NETWORK_STATEThis allows your game to check whether the device has an active internet connection before attempting to load an ad.
Both of these are considered normal permissions in Android which means the device will not show any popup asking the player to grant them. They are silently added to your app and work automatically in the background.
Testing with Test Ad IDs
While you are developing never use your real Ad Unit IDs. Google will flag your account for invalid traffic if you click your own real ads during testing. Instead use Google’s official test Ad Unit IDs.
- For Banner use: ca-app-pub-3940256099942544/6300978111
- For Interstitial use: ca-app-pub-3940256099942544/1033173712
Switch to your real Ad Unit IDs only when you are ready to release your game on the Play Store.
Method 2: Without Plugin: Manual AdMob Integration
This method is more complex but it gives you complete control and does not depend on any third party plugin. You will be directly modifying the Android project files that UE5 generates during packaging.
Step 1: Add the AdMob SDK to Your Android Build
UE5 generates a Gradle-based Android project when you package your game. You need to add the AdMob dependency to this project.
Go to your project folder and navigate to Build > Android. Find the file called AndroidEngine.ini or create one if it does not exist. You can also use the UPL (Unreal Plugin Language) system to inject dependencies into the Gradle build.
Create a file called MyProject_APL.xml in your project’s Build folder. Inside this file add the following structure to inject the AdMob dependency into the Gradle build:
<gradleProperties>
    <insert>
        android.useAndroidX=true
    </insert>
</gradleProperties>

<buildscriptGradlePluginDependencies>
    <insert>
        implementation 'com.google.android.gms:play-services-ads:23.0.0'
    </insert>
</buildscriptGradlePluginDependencies>
This tells Gradle to download and include the Google AdMob SDK when your project is built.
Step 2: Add Your AdMob App ID to the Android Manifest
The AdMob SDK requires your App ID to be declared in the Android Manifest. Without this the app will crash on startup.
In the same APL file add a manifest section that injects your App ID into the manifest:
<androidManifestUpdates>
    <addPermission android:name="android.permission.INTERNET"/>
    <meta-data
        android:name="com.google.android.gms.ads.APPLICATION_ID"
        android:value="YOUR_ADMOB_APP_ID_HERE"/>
</androidManifestUpdates>
Replace YOUR_ADMOB_APP_ID_HERE with your actual AdMob App ID from your AdMob dashboard.
Step 3: Create a Java Class to Handle Ads
Since Blueprint cannot call the AdMob SDK directly you need to write a small Java class that acts as a bridge between UE5 and AdMob. This Java class will handle loading and showing ads and UE5 will call it through JNI (Java Native Interface).
In your APL file use the gameActivityImportAdditions and gameActivityClassAdditions sections to inject Java code directly into the main Game Activity that UE5 generates.
Your Java code should initialize the AdMob SDK on startup, create a BannerAd view and attach it to the game’s view layout and create an InterstitialAd object with a load callback.
// Initialize AdMob
MobileAds.initialize(this, initializationStatus -> {});

// Banner Ad setup
AdView bannerAdView = new AdView(this);
bannerAdView.setAdSize(AdSize.BANNER);
bannerAdView.setAdUnitId("YOUR_BANNER_AD_UNIT_ID");
AdRequest bannerRequest = new AdRequest.Builder().build();
bannerAdView.loadAd(bannerRequest);

// Add banner to layout
RelativeLayout.LayoutParams params = new RelativeLayout.LayoutParams(
    RelativeLayout.LayoutParams.WRAP_CONTENT,
    RelativeLayout.LayoutParams.WRAP_CONTENT
);
params.addRule(RelativeLayout.ALIGN_PARENT_BOTTOM);
addContentView(bannerAdView, params);
For the interstitial ad create a load method and a show method that Blueprint can call through JNI.
Step 4: Call Java Methods from Blueprint Using JNI
To trigger your Java methods from Blueprint you use the Execute Java approach through UE5’s Android JNI bridge. In Blueprint use the Execute Console Command node or create a custom Blueprint Function Library in C++ that calls JNIEnv functions to invoke your Java methods.
If you are not using C++ in your project the simplest approach is to use the AndroidPermission plugin that ships with UE5 as a reference for how JNI calls are structured and replicate the same pattern for your AdMob calls.
This method requires a solid understanding of Android development and UE5’s build system. If you are a solo developer or a beginner I strongly recommend using the Bansh Ads plugin from Method 1 instead. The result is the same but without hours of debugging build errors.
Common Mistakes to Avoid
There are a few mistakes that almost every developer makes the first time they set up AdMob in UE5.
The first one is forgetting to initialize AdMob before calling any ad functions. Always call the initialize function first on BeginPlay before attempting to load or show any ads.
The second one is calling Show Interstitial before the ad has finished loading. If the ad is not loaded yet nothing will show. Always wait for the load callback to confirm the ad is ready before showing it.
The third one is using real Ad Unit IDs during testing. As mentioned earlier this can get your AdMob account suspended. Use Google’s test IDs during development.
The fourth one is not adding the AdMob App ID to the manifest. This will cause your app to crash immediately on startup on any device. Double check that the App ID is correctly entered in your Project Settings if using Bansh Ads or in your APL file if going manual.
Final Thoughts
AdMob integration in UE5 is one of those things that seems intimidating at first but is actually very manageable once you know the steps. If you are just getting started with monetization use the Bansh Ads plugin from fab.com. It is free, it works reliably and you can have ads running in your game in under an hour.
If you need a custom integration or you want to handle ad logic in a very specific way the manual method gives you that level of control but expect to spend more time on setup and debugging.
Either way once your ads are working correctly you have a working monetization system in your game that earns revenue every time someone plays. That is a big deal for an indie developer and it is absolutely worth setting up properly.
If you get stuck at any point or something is not working as expected reach out at Admin@KaliPress.fun and I will help you get it sorted out.

Solo Indie Game Developer and Unreal Engine (UE4 & UE5) Specialist with over 5 years of experience building optimized Android games from scratch.
I specialize in handling the full development pipeline independently taking mobile titles from concept to high-performance, publishing ready APK/AAB builds. Highly focused on rendering optimization for low-to-mid range devices, Blueprint scripting, and custom mechanics.
Through this blog, I share my practical knowledge and tutorials to help aspiring developers master the Unreal Engine mobile ecosystem.