How to Shoot a Projectile in Unreal Engine 5
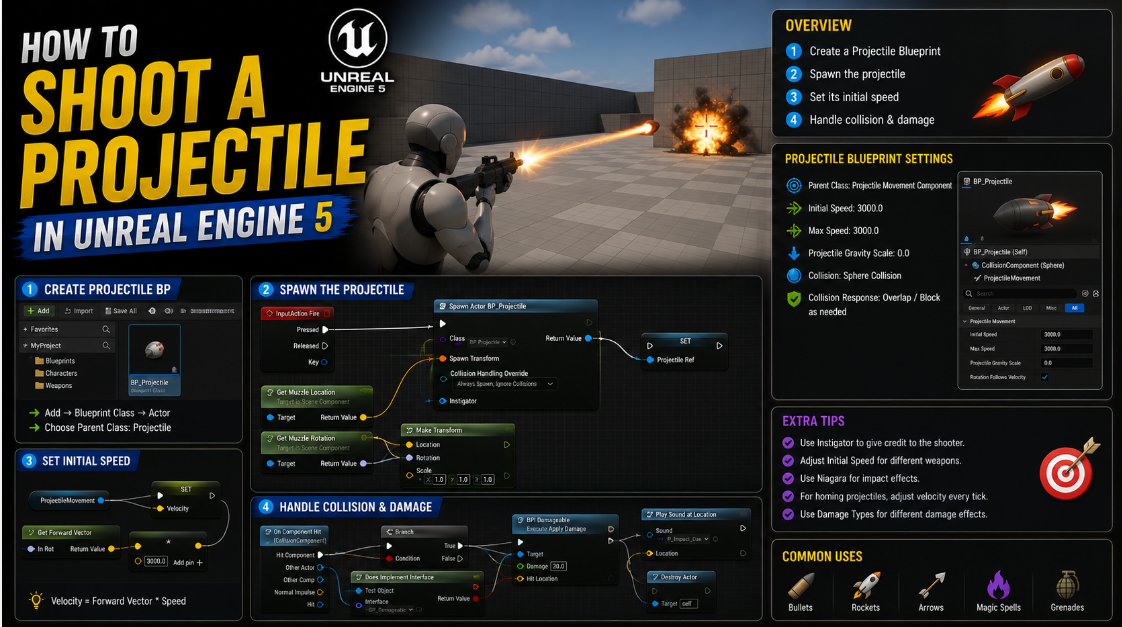
Shooting a bullet or a projectile is one of the most common mechanics you will build in any action game. The good news is Unreal Engine already comes with a built in system that makes this surprisingly simple to set up. In this article I will walk you through building a complete projectile from scratch including making it destroy things it hits and making sure it never accidentally destroys the player who fired it.
Step 1: Create the Projectile Blueprint
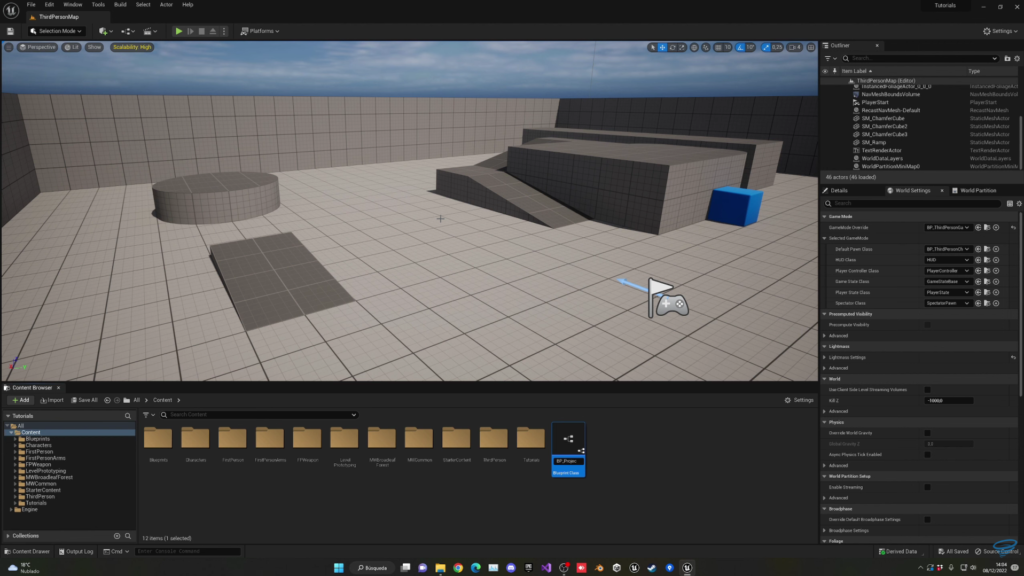
Start by creating a new Blueprint Class and set its type to Actor since we are going to spawn this directly into the scene whenever the player fires. Name it something like BP Projectile and open it up.
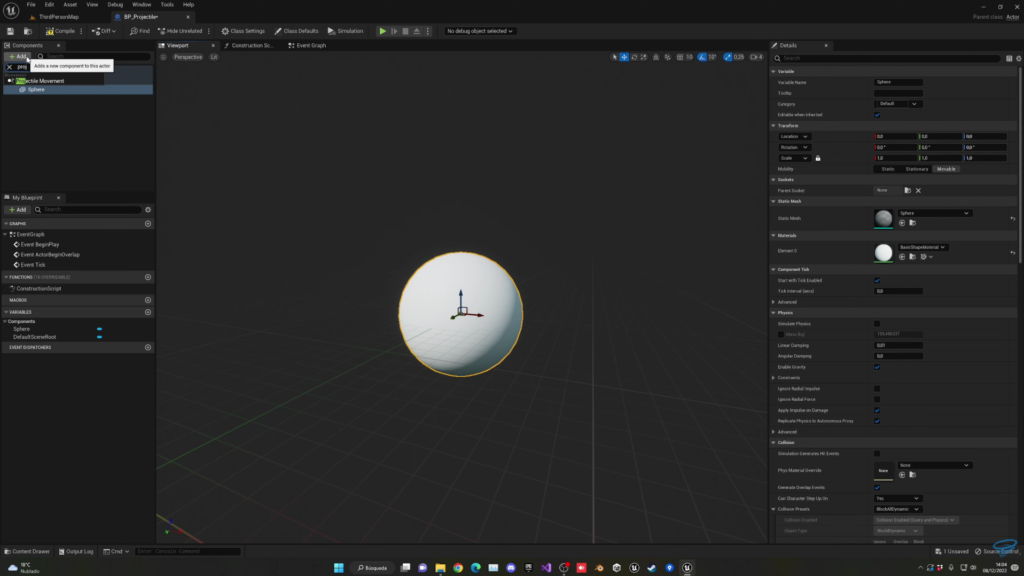
The first component we need is a simple mesh to actually represent the bullet visually. A Sphere works perfectly fine for this and if you have an actual bullet model or any other projectile shaped mesh you can plug that in instead. For this tutorial a sphere is more than enough to demonstrate how everything works.
Step 2: Add the Projectile Movement Component
Now add a Projectile Movement Component to this Blueprint. This is a built in component in Unreal Engine specifically designed to handle everything about how a projectile moves through the world which makes building this system much easier than writing all the movement logic yourself.
There are two main settings you need to focus on here. Initial Speed and Max Speed. Set Initial Speed to something like 3000 and Max Speed to something like 3500. This means the projectile starts moving at 3000 units per second and can accelerate up to a maximum of 3500. These are just example values so feel free to experiment with different numbers depending on how fast you want your projectile to travel.
There are several other settings available on this component such as how rotation follows velocity how much friction affects the projectile and how bouncy it is. We are not going to cover every single one of these in detail but know that they exist if you want to fine tune the behavior further later.
Compile and save this Blueprint once you have set your speed values.
Step 3: Spawn the Projectile From Your Character
Open your character Blueprint. It does not matter whether you are using a third person first person or any other character setup since this logic works the same way regardless.
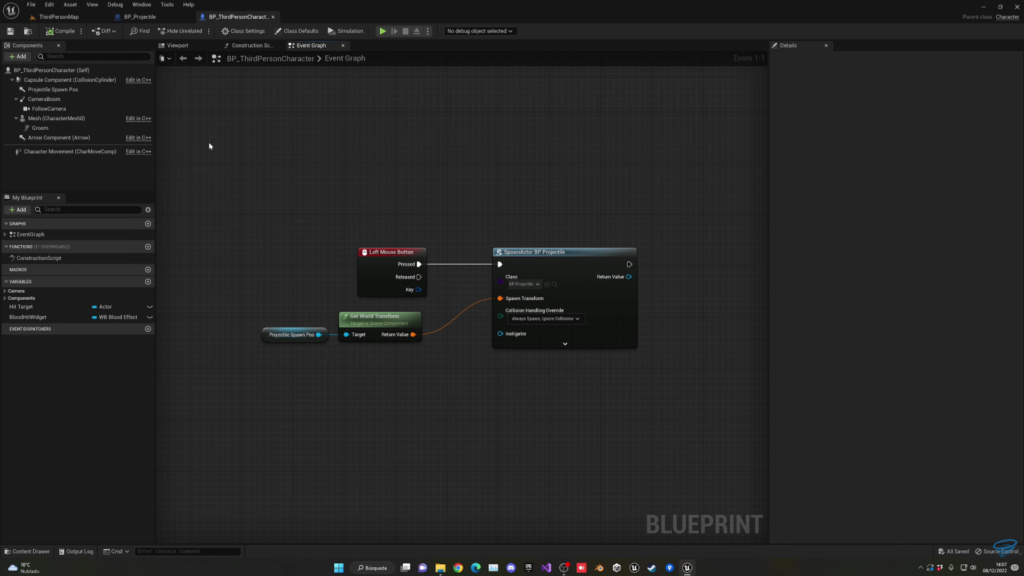
We want the projectile to spawn whenever the player presses the left mouse button. Bind this input and add a Spawn Actor From Class node. Set the class to spawn as your BP Projectile Blueprint.
For the spawn position we need a specific point in front of the character rather than spawning the bullet inside the character itself. Add a new Arrow Component to your character Blueprint and name it something like Projectile Spawn Point. An arrow component is useful here because it visually shows you exactly which direction the bullet will travel once spawned, letting you clearly see it is positioned right in front of the character and facing forward.
Get this Arrow component and pull its World Transform. Plug this directly into the Spawn Transform input of your Spawn Actor From Class node. This ensures the projectile spawns exactly at this arrow’s location and facing the same direction it points.
One more setting worth adjusting here is the Spawn Collision Handling option. Set this to Always Spawn Ignore Collisions so that even if there happens to be an obstacle right at the spawn point the projectile still spawns properly rather than failing silently.
Step 4: Test and Fix the Scale
Press play and test firing by left clicking. You should see a projectile appear in front of your character and it should actually work correctly at this point. The only issue is it will likely appear absolutely massive on screen since a default sphere mesh is much larger than an actual bullet should be.
Go back into your projectile Blueprint select the sphere mesh component and reduce its Scale significantly, down to something very small. Test again and you should now see a properly sized small bullet flying forward instead of a giant sphere.
Step 5: Enable Bouncing and Fix Collision
At this point you might notice the projectile is not actually colliding with anything in the world at all. It just passes straight through walls. Go back into the sphere component and check its collision settings. Make sure collision is enabled and set to something like Block All Dynamic so it can actually detect and react to hitting other objects.
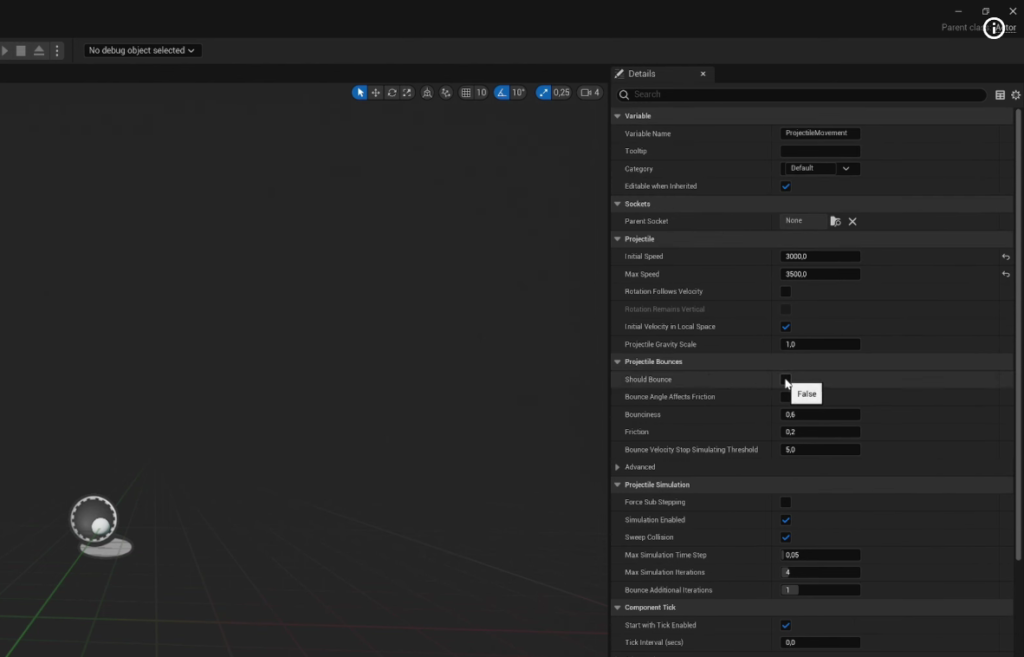
We also need to tell the Projectile Movement Component that the projectile is allowed to interact with surfaces it hits. Find the setting called Should Bounce and enable it.
One more important fix here. Make sure your sphere mesh component is set as the actual Root Component of this Blueprint, meaning it is the parent of everything else rather than sitting underneath some other default root. Doing this makes sure scale changes and physics interactions behave correctly and consistently.
Test again and get close to a wall while firing. You should now see the projectile actually bounce off the wall correctly.
Step 6: Fixing a Scale Related Bug
You might notice something odd happen here. Even though we shrunk the projectile’s scale earlier inside its own Blueprint, once it spawns from the character it sometimes reverts back to looking huge again. This happens because of how the Spawn Transform is being passed in from the character, since the transform includes scale information that can override what you set inside the projectile Blueprint itself.
To fix this go back to the projectile’s default scale settings and leave them at the normal value of 1 in all directions inside the Blueprint itself. Then go back to your character Blueprint where you are spawning the projectile. Right click on the World Transform you are feeding into the Spawn Actor node and select Split Struct Pin. This breaks the transform into its individual Location Rotation and Scale components separately.
Keep Location and Rotation exactly as they were, coming from the arrow component. But for Scale manually set a custom small value here instead, such as 0.05 or whatever value worked well for you earlier. This way the scale is controlled explicitly at the moment of spawning rather than depending on whatever the arrow component’s transform happens to be.
Test this again near a wall and you should now see a properly small projectile that also bounces correctly. If it feels a little too small feel free to adjust this value slightly, something like 0.1 often looks better depending on your specific mesh and game scale.
Step 7: Destroy Whatever the Projectile Hits
Now let us make the projectile actually do something meaningful when it hits something rather than just bouncing around forever. Go to your projectile Blueprint’s Event Graph and find the On Component Hit event on your sphere mesh. From this event get the Other Actor reference, the actor that was just hit, and call Destroy Actor on it.
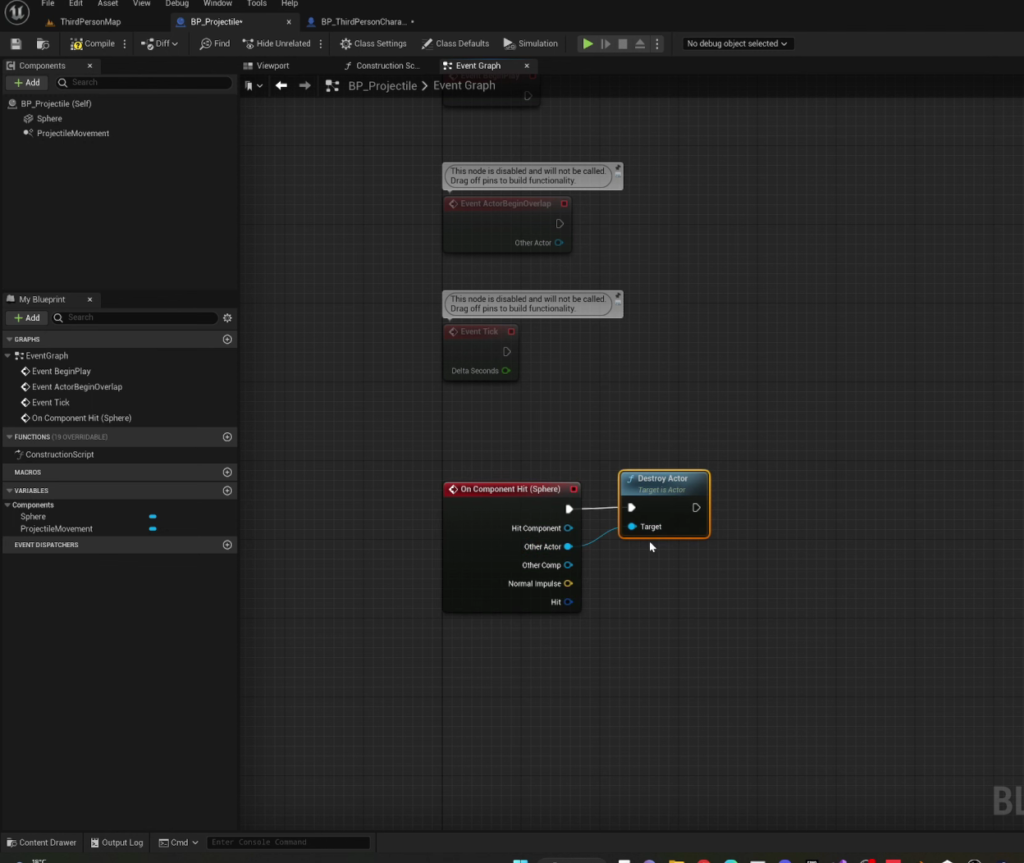
Test this and fire at something in your level. You should see whatever you hit get destroyed immediately. However you will likely notice a problem here as well. Since the projectile is set to bounce it might hit something, immediately try to destroy it, and in some cases end up destroying itself or even the player character if the collision detection triggers unexpectedly.
Step 8: Prevent the Projectile From Destroying the Player
This is an important safety check to add. We do not want the player accidentally destroying themselves just because their own projectile happens to collide with them at some point, for example right at the moment it spawns very close to their own character.
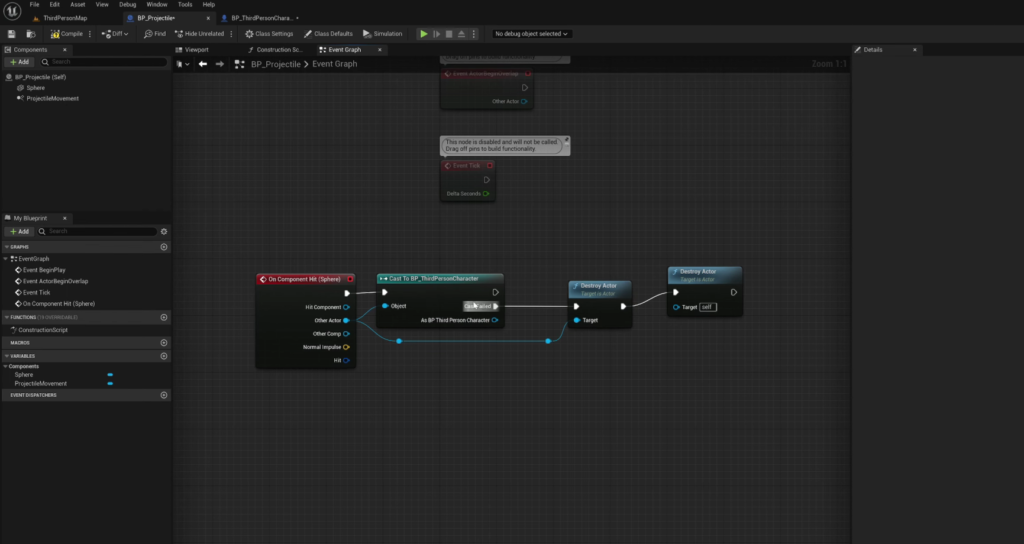
In your On Component Hit logic add a Cast to your character Blueprint, using the Other Actor as the object you are casting. If this cast succeeds it means the projectile hit the player character specifically. If the cast fails it means the projectile hit something else entirely, which is exactly what we want to destroy.
Wire your Destroy Actor call to only run when this cast fails, meaning the target hit was not the player character. This way if the projectile happens to touch the player nothing happens to them, but if it hits an actual target or obstacle in the world that object gets properly destroyed as intended.
Test this final version now. Fire at a wall or an object and it should be destroyed correctly. Try to somehow have the projectile touch your own character and you will see the player remains completely unaffected while everything else still works exactly as expected.
Final Thoughts
At this point you have a complete working projectile system. It spawns from a specific point in front of your character travels forward at a speed you control bounces off surfaces realistically and destroys whatever it hits while safely ignoring the player who fired it in the first place.
This same foundation can be expanded easily depending on what your specific game needs. You could add damage values that get applied to whatever gets hit instead of simply destroying it outright. You could swap the sphere mesh for an actual bullet or arrow model. You could add a trail particle effect behind the projectile as it travels or an impact effect at the moment it hits something. All of these additions build naturally on top of the core system you just created here without needing to change any of the fundamental logic.

Solo Indie Game Developer and Unreal Engine (UE4 & UE5) Specialist with over 5 years of experience building optimized Android games from scratch.
I specialize in handling the full development pipeline independently taking mobile titles from concept to high-performance, publishing ready APK/AAB builds. Highly focused on rendering optimization for low-to-mid range devices, Blueprint scripting, and custom mechanics.
Through this blog, I share my practical knowledge and tutorials to help aspiring developers master the Unreal Engine mobile ecosystem.