How to Create an Optimized Day/Night Cycle in UE5
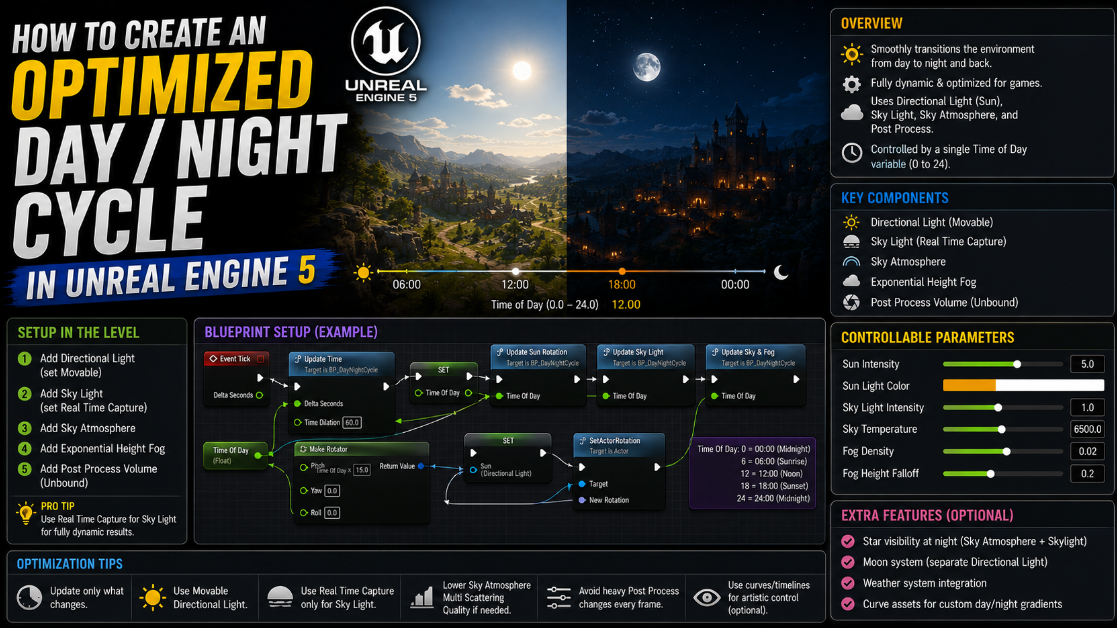
A sky that changes from morning to afternoon to night on its own makes a game world feel alive. Add moving clouds a rising sun a rising moon and stars appearing at night and suddenly your game looks like something out of a proper studio production. In this article I will show you how to build this entire system from scratch inside a single Blueprint that controls the sun the moon fog and the sky appearance all through one simple time variable.
We are going to build this in its simplest working form so it is easy to follow and understand completely.
Step 1: Create the Actor Blueprint and Add Core Components
Start by creating a new Actor Blueprint. This single Blueprint is going to hold every component needed for our sky system. Add the following components to it.
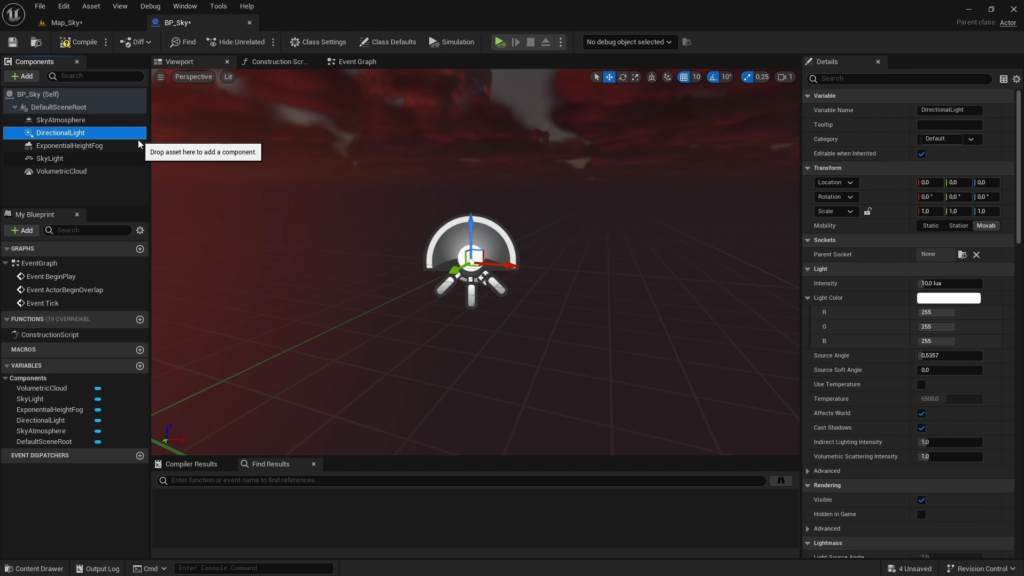
A Sky Atmosphere component. A Directional Light which will represent the sun. An Exponential Height Fog component. A Sky Light. And a Volumetric Cloud component, which you can add directly from the component list.
Compile this Blueprint and drag it into your level. At this point you already have a working sky. If you press Control L and drag your mouse you can rotate the sun manually and watch the entire sky update in real time.
This works because of a feature introduced in Unreal Engine called the Sky Atmosphere component. It automatically updates the entire atmosphere based on wherever your directional light representing the sun is currently pointing. This means our whole day and night cycle really just comes down to one simple idea. Rotate the sun over time and the sky updates itself automatically.
If rotating the sun does not seem to affect the sky at all for you check that your Directional Light has the option to affect the atmosphere enabled. This is usually on by default but it is worth double checking.
Step 2: Adjust the Volumetric Clouds
Before setting up the actual day and night logic let us make the clouds look a bit nicer since the default look is fairly plain. Select your Volumetric Cloud component open its material and experiment with the parameters until you find a style you like. A more stylized simplified cloud look often works better visually than the fully realistic default settings. Feel free to play around here until it matches the mood of your game.
Step 3: Create a Variable to Track Time
Now let us make time actually pass in our game. Create a Float variable and call it something like Time Of Day. On Event Tick add the incoming Delta Seconds value to this variable every single frame.
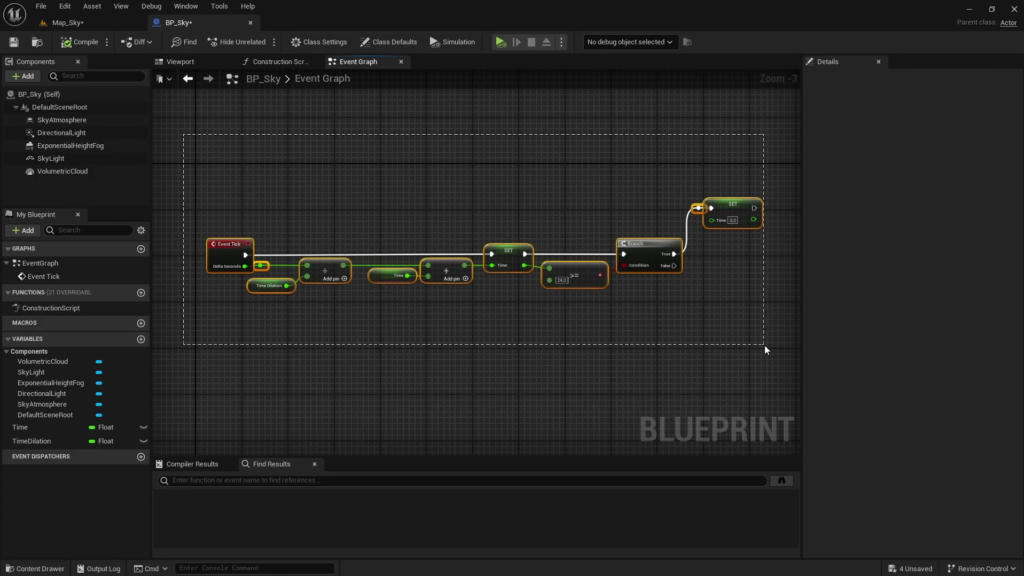
If you print this variable to the screen right now you will notice it just keeps growing forever without ever resetting. We need to fix that. Add a check so that whenever this value reaches or exceeds 24 it resets back down to zero. We use 24 here to represent the 24 hours in a full day. This means a value of 6 represents 6 in the morning and a value of 18 represents 6 in the evening.
To control how long each full day actually lasts in real time create another variable called something like Time Dilation. Divide your Delta Seconds by this value before adding it to Time Of Day. Increasing this Time Dilation value makes each day last longer while decreasing it speeds up the whole cycle.
Step 4: Rotate the Sun Based on Time
Now that we have a value tracking the time of day let us actually use it to rotate the sun.
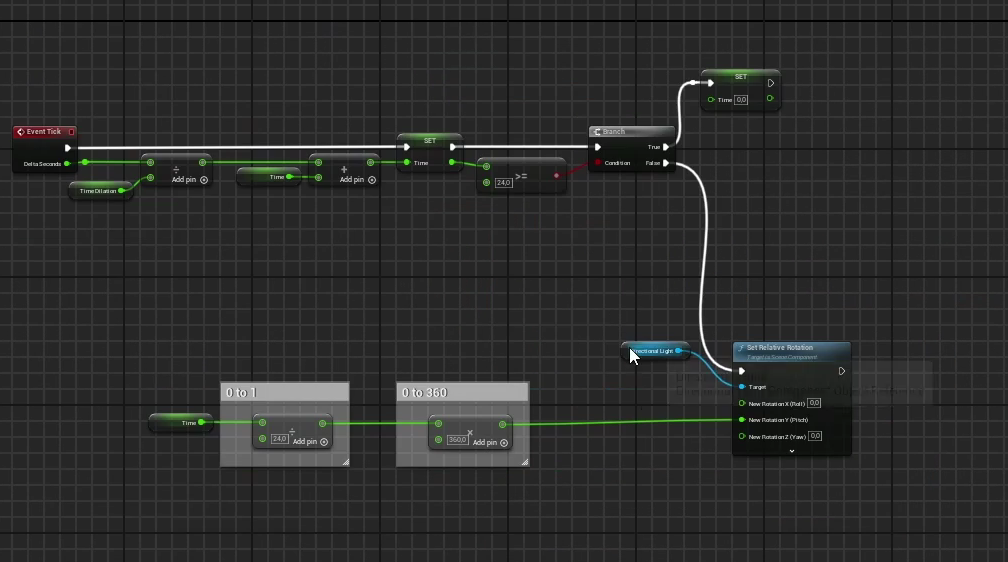
We want the sun to rotate a full 360 degrees over the course of a complete 24 hour cycle so that when the day fully resets the sun ends up back exactly where it started.
To calculate this take your Time Of Day value and divide it by 24. This gives you a value between 0 and 1 representing how far through the day you currently are. Multiply this result by 360 to convert it into a proper rotation angle.
Take this final calculated value and plug it into the Set Relative Rotation node’s Pitch input on your sun’s Directional Light component. Now if you simulate the game you will see the sun smoothly rotating and the sky updating exactly as expected.
Step 5: Fix the Sky Going Completely Black at Night
There is one obvious problem at this point. Once the sun goes below the horizon the entire screen goes completely black. This happens because the atmosphere is no longer receiving any sunlight at all once the sun has set.
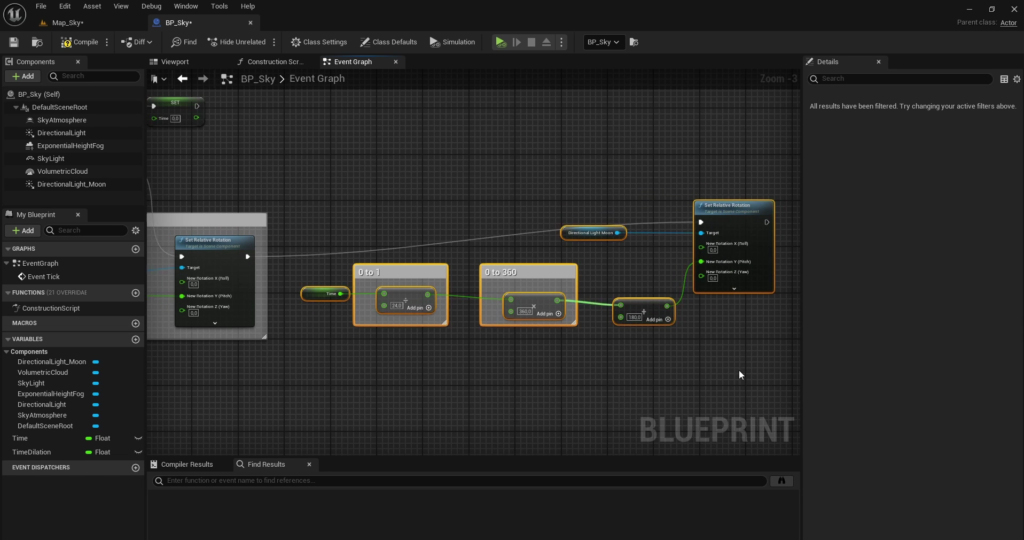
The fix for this is to add a second Directional Light representing the moon positioned exactly opposite the sun. This way the moment the sun sets the moon rises on the other side keeping the atmosphere lit at all times.
This works because the Sky Atmosphere component actually supports two separate directional lights at once. One acts as the primary light source and one acts as a secondary source. You control which one is which using a setting called Atmosphere Sun Light Index found on each directional light.
Add your new moon light with a lower intensity and a cool bluish tint compared to the sun. Set its Atmosphere Sun Light Index to 1 and make sure your original sun light keeps its index at 0.
For the moon’s rotation copy the exact same calculation you used for the sun but add 180 degrees to the final result. This ensures the moon is always positioned exactly on the opposite side of the sky from the sun at any given moment. Test this now and you will have a complete working day and night cycle with no more black screen issue.
Step 6: Add a Starry Night Sky
The Sky Atmosphere component alone does not support adding a custom material for things like stars. To add stars we need something called a Sky Sphere which is essentially a giant sphere with its normals flipped inward so we can see its inside surface from within the world, similar to being inside a globe.
You can build this sphere yourself using 3D software such as Blender by inverting the normals, or simply use the Sky Sphere mesh that already comes built into Unreal Engine under the Engine Content folder inside a Sky subfolder. If you cannot see this folder make sure Show Engine Content and Show Plugin Content are both enabled in your Content Browser settings.
Add a Static Mesh component to your Blueprint and assign this Sky Sphere mesh to it. Compiling will prompt you to assign a material since one does not exist yet. We are going to build this material next.
Step 7: Build the Sky Material
This material relies on a few special nodes built specifically to work with the atmosphere system. The Sky Atmosphere View Luminance node returns the natural color the atmosphere would normally show. The Sky Atmosphere Light Disk Luminance node returns the glowing appearance of whichever directional light you specify by index. And the Sky Atmosphere Light Direction node returns the direction vector of a specified directional light, which tells us where in the sky that light currently is.
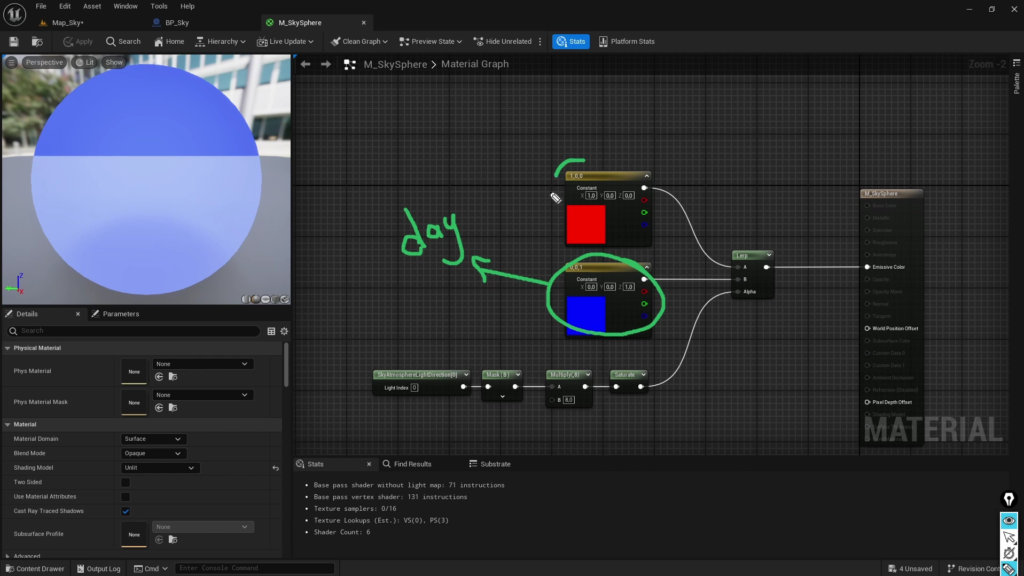
Set your material’s Shading Model to Unlit in the details panel since sky materials should not be affected by regular scene lighting.
First let us build a mask that tells us whether it is currently day or night. Use the Sky Atmosphere Light Direction node with index 0, which refers to the sun. Isolate its Blue channel using a Component Mask node. If you connect this directly to the material’s Emissive Color you will notice something interesting. The sky appears white when the sun is directly overhead and gradually darkens as the sun moves toward the horizon.
Multiply this isolated blue value by a number like 8 to make the transition between day and night sharper rather than overly gradual, then run it through a Saturate node to keep the final value cleanly between 0 and 1. This gives us a reliable day and night mask we can use to blend between two completely different looks.
Step 8: Blend Between Day and Night Sky Colors
Use a Lerp node with this mask controlling the blend between two inputs. For the daytime sky simply add together the Sky Atmosphere View Luminance and Sky Atmosphere Light Disk Luminance nodes, which recreates the same natural sky look we had before adding the Sky Sphere at all.
For the nighttime sky use a star texture, something with small bright points scattered across a dark background, as a mask inside another Lerp node. Set one input to a dark blue color representing the night sky itself and the other input to white representing the stars themselves.
One important detail here. Make sure you are using a Texture Coordinate node with its coordinate index set to 1 rather than the default 0. The Sky Sphere mesh has two separate UV maps and using the wrong one will cause your star texture to appear stretched and distorted.
Finally add the moon back into this night sky calculation using another Sky Atmosphere Light Disk Luminance node, this time with its light index set to 1 since that is the index we assigned to our moon earlier. Add this into your night sky result so the moon actually appears as a visible glowing object at night rather than just lighting the scene invisibly.
Connect your day and night results into the main Lerp node controlled by your earlier day and night mask, plug the final result into Emissive Color, save everything, and you now have a complete sky with a smooth transition between a bright daytime look and a starry moonlit night.
Step 9: Animate Other Parameters Over Time Using Curves
Beyond just the sky itself you can animate almost any other property in your scene based on the time of day using Curves. As an example let us make fog thicker at night and thinner during the day.
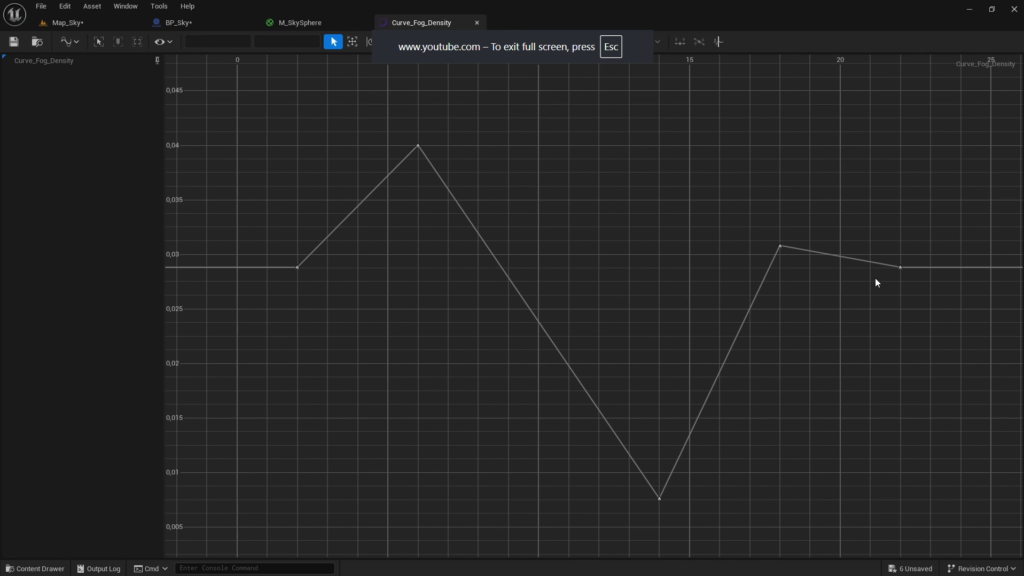
Right click in your Content Browser go to Miscellaneous and Curve, then select Float Curve since Fog Density is a float value. Open this new curve and right click to add keys at specific points. Each key has a Time value and an actual Value, which you can edit directly.
Since our day cycle covers a 24 hour range set the Time on these keys to match actual hours in your cycle. For example set the fog density value low, such as 0.2, from hour 6 through hour 18, representing daytime, and set it higher for the remaining nighttime hours.
Back in your Blueprint create a Curve Float variable referencing this curve. Use a Get Float Value node feeding in your current Time Of Day variable to retrieve the correct fog density for that exact moment. Plug this result into your Exponential Height Fog component’s Set Fog Density node and call this on Event Tick so it updates continuously as time passes.
This same curve based approach works for basically any parameter on any component in your scene as long as it is a float or color value. Just create the appropriate curve type and feed your current Time Of Day value into it.
Final Thoughts
At this point you have a complete working day and night cycle. The sun and moon rotate opposite each other keeping the atmosphere properly lit at all times. Stars appear naturally at night through the custom Sky Sphere material. And other elements like fog density can shift smoothly across the day using simple curves rather than complicated manual logic.
From here you can keep expanding this system further, adjusting the materials you built, tweaking timing values, or adding more curve driven parameters to other components in your scene until the atmosphere matches exactly the mood and feel you want your game world to have.

Solo Indie Game Developer and Unreal Engine (UE4 & UE5) Specialist with over 5 years of experience building optimized Android games from scratch.
I specialize in handling the full development pipeline independently taking mobile titles from concept to high-performance, publishing ready APK/AAB builds. Highly focused on rendering optimization for low-to-mid range devices, Blueprint scripting, and custom mechanics.
Through this blog, I share my practical knowledge and tutorials to help aspiring developers master the Unreal Engine mobile ecosystem.