
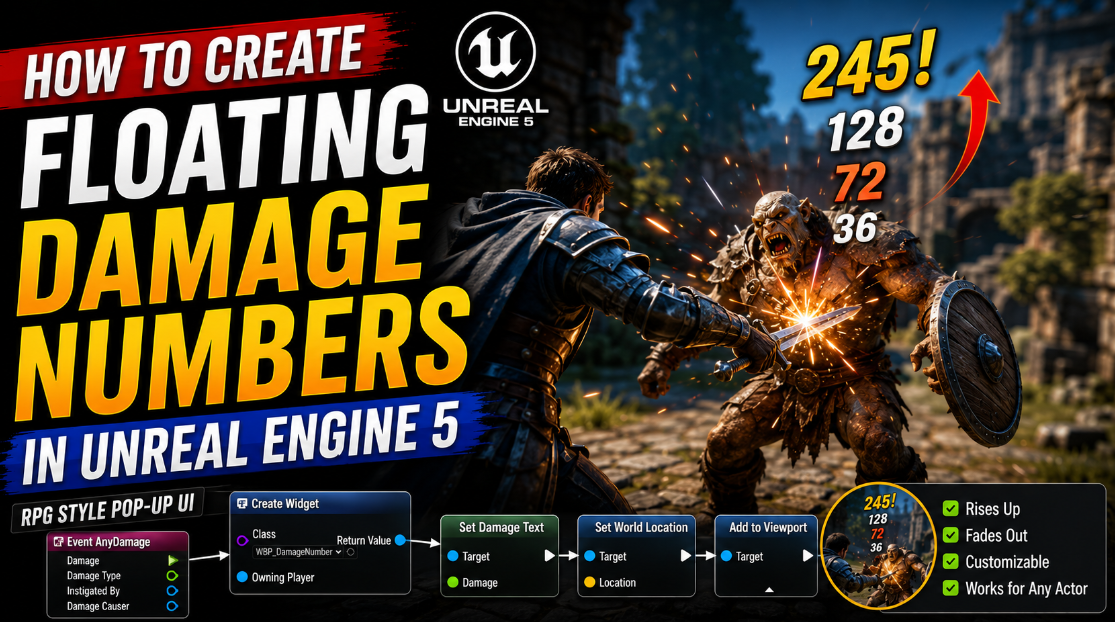
How to Create Floating Damage Numbers in UE5 (RPG Style Pop-up UI)
Hitting an enemy and seeing a number float up and fade away showing exactly how much damage you just dealt is one of those small details that makes combat feel satisfying and readable. Almost every RPG and action game uses this. In this article I will walk you through building this entire system from scratch including the animated widget the line trace detection and spawning the numbers correctly positioned right above the enemy in 3D space rather than as a flat overlay stuck on the screen.
Step 1: Create the Damage Number Widget
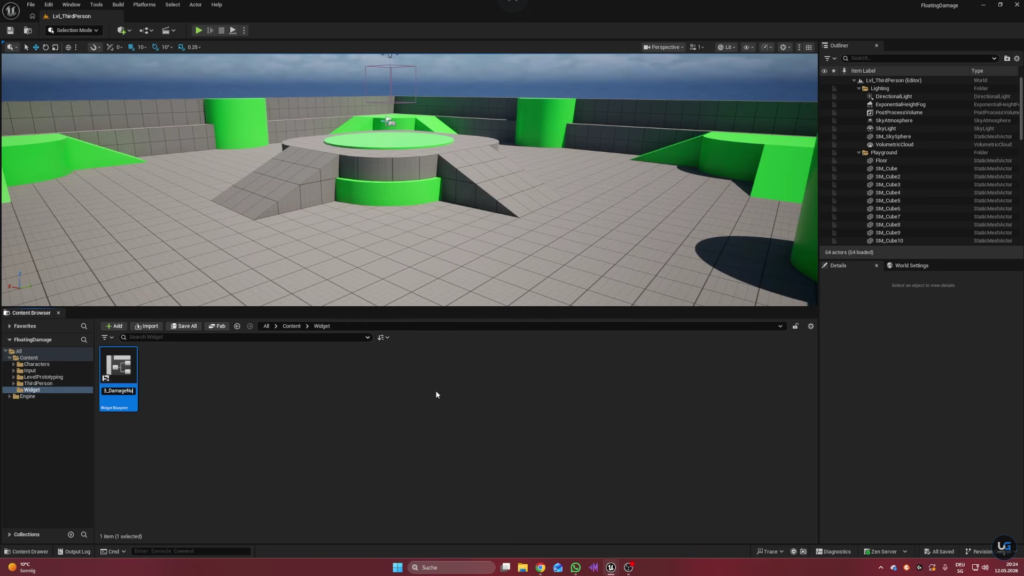
Start by making a new folder called Widget in your Content Browser. Inside this folder right click and create a new User Widget Blueprint. Name it something like WBP Damage Numbers and open it up.
Add a Canvas Panel as the base of this widget and inside it add a Text element. We want this text perfectly centered so select it hold Control and click on the anchor preset in the top left, which is the anchor that centers an element regardless of screen position. Set its Alignment values to 0.5 and 0.5 so the text sits exactly centered on its own position point. Also set its Size To Content option so the text box automatically fits whatever number is being displayed rather than staying a fixed size.
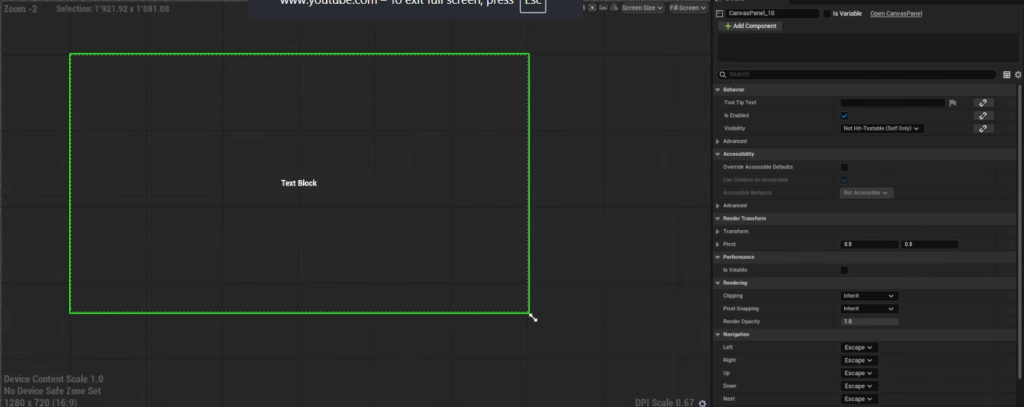
Rename this text element to something clear like Text Damage Number and make sure to check Is Variable so we can reference and modify it later from the Graph tab.
Step 2: Animate the Number Floating Upward
Now we need the actual floating and fading animation. If you do not see an Animations tab at the bottom of your widget editor go to the Windows menu and enable Animations from there.
Create a new animation and name it something like Floating Up. Select your Text Damage Number element and add it to this animation track. We are going to animate two separate properties on this text. Its Transform, meaning its position, and its Color and Opacity.
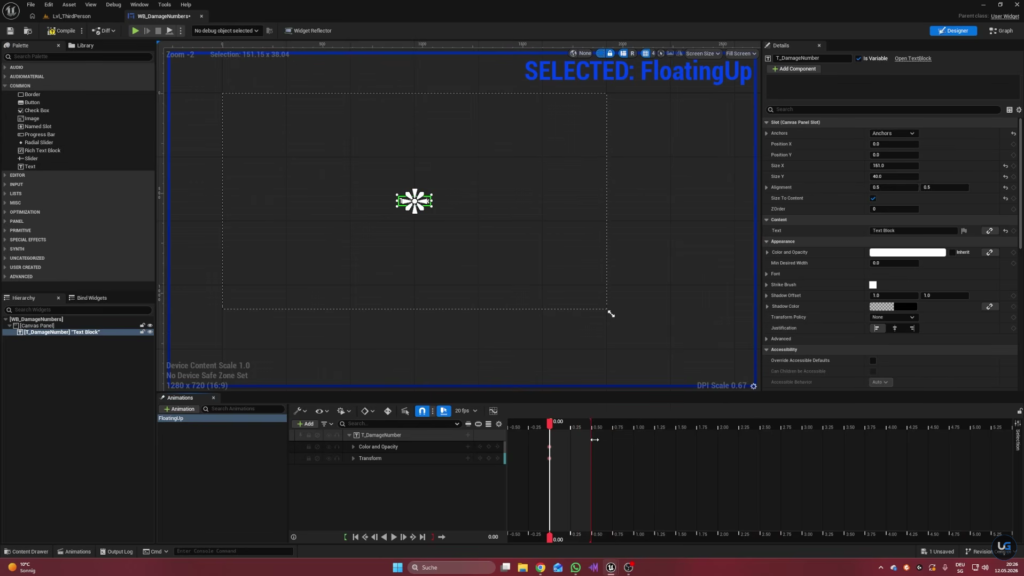
Choose whatever total length feels right for your animation. Something around 0.8 seconds works well for a quick satisfying pop up effect. At the very start of the timeline, position zero, click the plus icon next to both the Transform and the Color and Opacity properties to add a starting keyframe. By default this keeps the text fully visible and sitting in its normal position.
Move the timeline slider to the very end of your animation length. Here change the Transform so the text moves upward, something like negative 150 on its vertical position works nicely. For Color and Opacity change the Alpha value down to zero so the text fully fades out by the time the animation finishes.
Slide the timeline back to the start and press play on the animation preview. You should see the text rise upward while smoothly fading away. To make the damage numbers more visible you can also change the text color to red at this point, but if you do this remember to actually update your keyframes to reflect this new red color since keyframes only capture whatever values existed at the moment you created them.
Step 3: Set Up the Damage Value Variable
Go to the Graph tab of this widget and create a new variable. Name it something like Damage Number and set its type to Float. Very importantly check both Instance Editable and Expose On Spawn for this variable. This is what lets us actually pass in a specific damage value from outside the widget every single time we create a new instance of it.
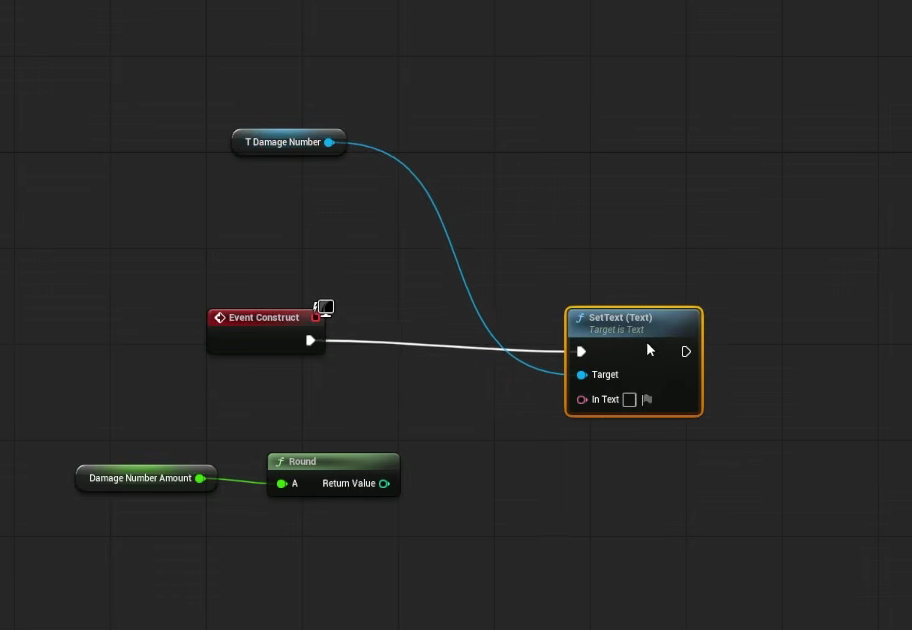
On the widget’s Event Construct, take this Damage Number variable and round it using a Round node, since we do not want the player seeing an ugly decimal number like 24.6789 float above an enemy’s head. A clean whole number looks far better in this context.
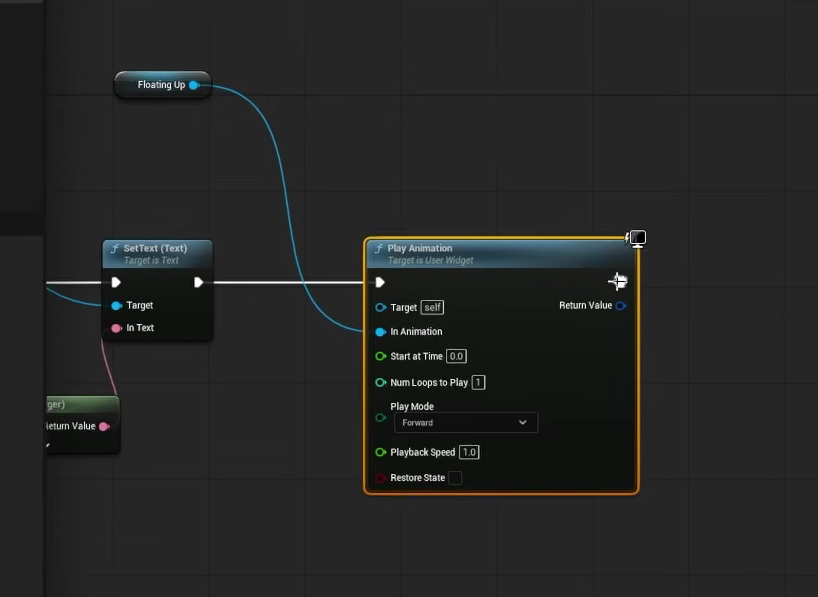
Take your Text Damage Number element and use Set Text, converting this rounded value into text and plugging it in. Right after this, get your Floating Up animation and call Play Animation on it, which starts the whole rising and fading effect the moment this widget appears.
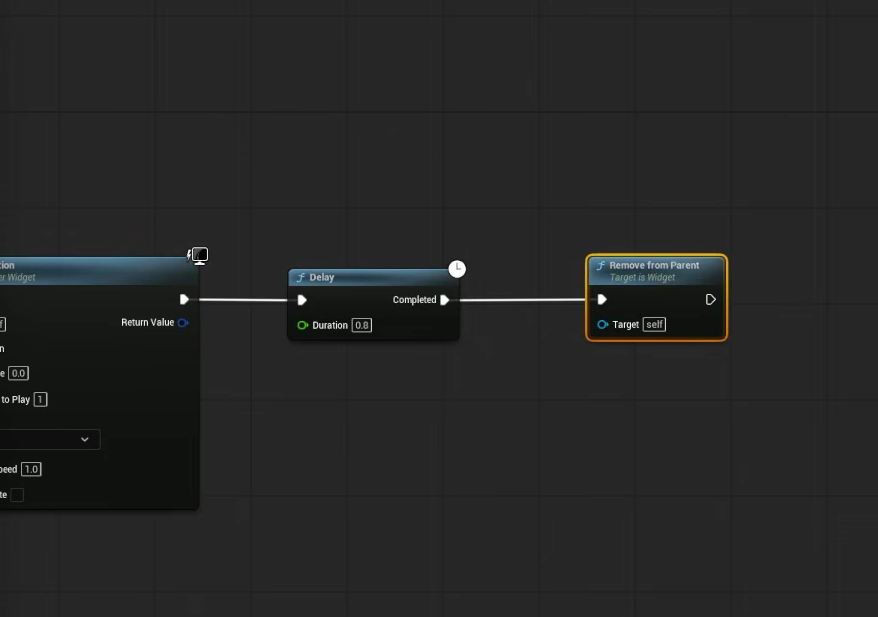
Finally add a Delay node set to match your animation’s length, 8 tenths of a second in this example, though adjust this to match whatever length you actually chose for your animation. After this delay completes call Remove From Parent, which cleans up and removes this widget completely once its animation has finished playing, rather than leaving invisible leftover widgets sitting around in memory.
Step 4: Set Up the Player’s Attack Detection
Now we need the player side logic that actually detects when an enemy has been hit. This example uses a simple Line Trace triggered by a left mouse click, which works well for melee or simple hitscan style attacks without needing an actual weapon or projectile system.
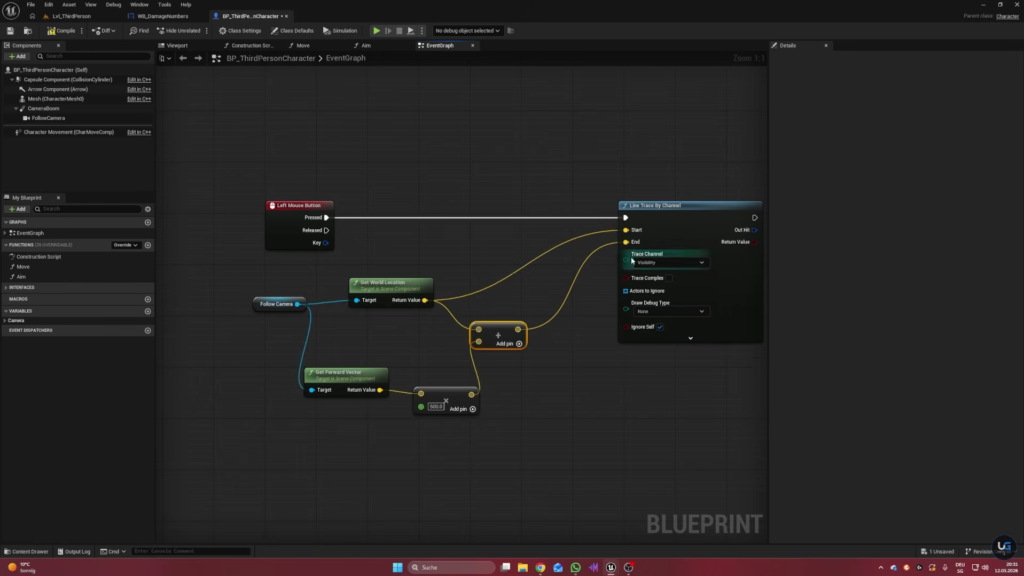
Bind the left mouse button click event in your Character Blueprint. On this event add a Line Trace By Channel node.
For the starting point of this trace get your Camera and pull its World Location. This works well for a third person game specifically. If you are using a different camera setup such as first person you may need to calculate your starting point slightly differently, but the overall logic covered here still applies.
For the end point get the camera’s Forward Vector and multiply it by a distance value such as 500 to start, though we will likely need to increase this later. Add this multiplied vector to your starting location to get the final End point for the trace. It is helpful to make this trace visible temporarily during testing so you can actually see how far it reaches in the level.
Step 5: Check What the Trace Actually Hit
From your Line Trace node add a Branch checking whether it actually hit something. If true, break the Hit Result to access details about whatever was hit.
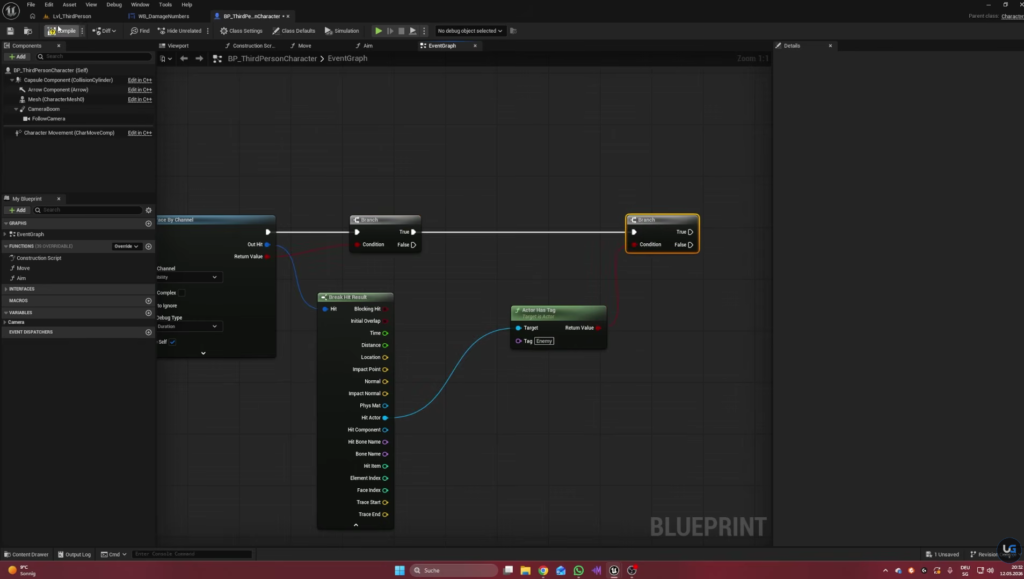
We only want to spawn damage numbers when we hit an actual enemy, not random level geometry like walls or the ground. To check this, get the Hit Actor and check whether it has a specific Tag, something like Enemy. Only if this tag matches should we proceed with creating and displaying a damage number.
Step 6: Create and Position the Damage Widget in 3D Space
Now create your WBP Damage Numbers widget using Create Widget. You should immediately see the Damage Number input field appear here as a parameter you can plug a value into, which confirms your Instance Editable and Expose On Spawn settings from earlier are working correctly. If this input does not appear go back and check those two settings on your variable.
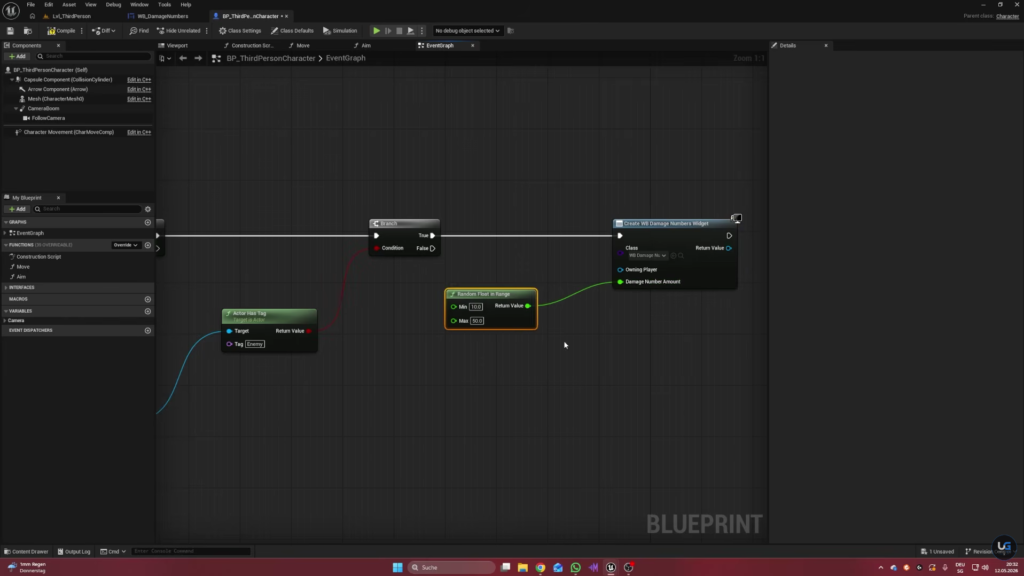
For the actual damage value, since this tutorial does not have a specific weapon system, use a Random Float In Range node between something like 10 and 50 as a placeholder value. In your own game you would plug in whatever your actual weapon or ability’s damage calculation produces instead.
Add this newly created widget to the viewport using Add To Viewport. If you test this right now you will notice the number simply appears as a flat overlay stuck to a corner of the screen, which is not what we want. We want it to appear as if it exists physically at the enemy’s location in the 3D world.
To fix this take the Return Value from Create Widget and use Set Position In Viewport instead of leaving it as a simple screen overlay. This lets us manually calculate exactly where on screen this widget should appear based on a real 3D world position, which is what makes it look like it exists inside the level rather than as flat UI.
Step 7: Calculate the Correct World Position
To figure out where exactly to place this widget get your Hit Actor from earlier and pull its Location, which gives us the enemy’s exact position in the world.
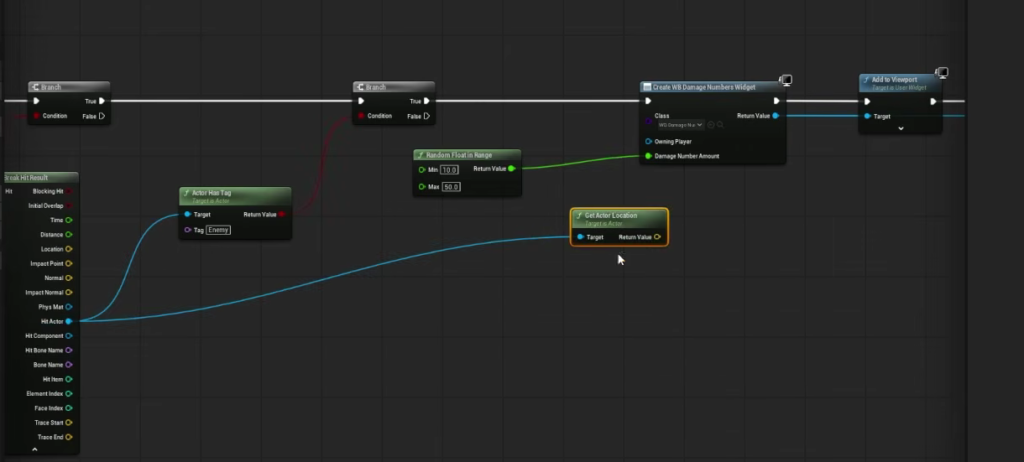
Add a vertical offset to this location so the number appears above the enemy’s head rather than at their feet or center mass. Something like 200 units upward works well depending on your character’s scale.
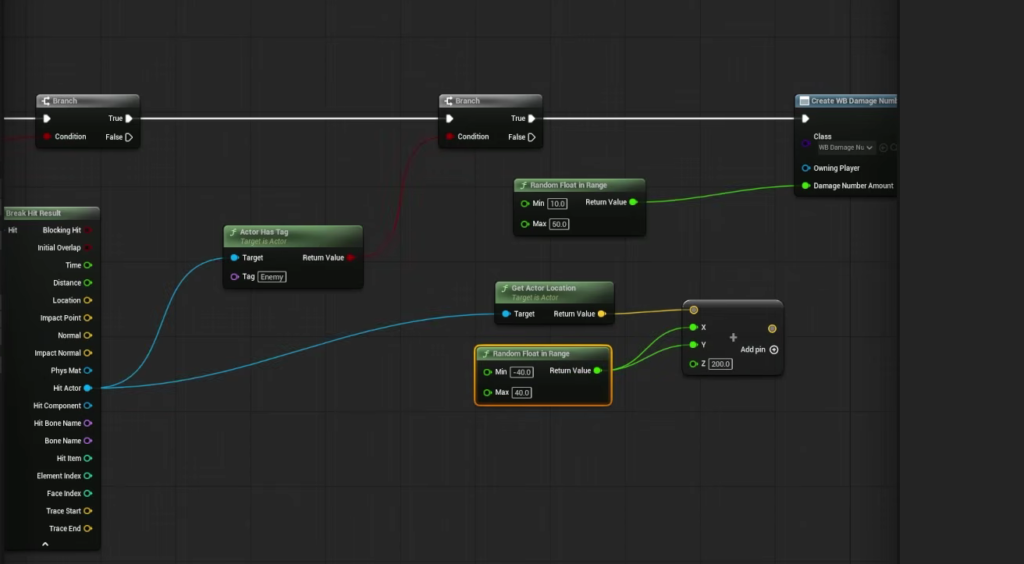
For a bit of visual variety rather than every damage number spawning at the exact same spot on the enemy, add a small random horizontal offset as well. Use a Random Float In Range between something like negative 40 and 40 for both the X and Y values of this offset. This creates a nice natural spread where multiple hits in quick succession do not all stack perfectly on top of each other.
Once you have this final calculated 3D world location you need to convert it into an actual 2D screen position, since your widget needs a screen coordinate to know where to actually render. Use a Project World To Screen node for this. Get your Player Controller, plug it in along with your calculated world location, and this node will return the correct 2D screen coordinate. Plug this result directly into the Position input of your Set Position In Viewport node from the previous step.
Step 8: Build a Simple Enemy to Test With
Create a new folder called Enemy and inside it create a new Actor Blueprint called BP Enemy.
Since this tutorial focuses purely on the damage number system rather than AI or enemy behavior, keep this enemy extremely simple. Just add a Skeletal Mesh component, any humanoid mesh works fine even something as simple as a basic mannequin, since it does not need to move or do anything on its own.
Make sure this mesh’s Collision is set to Block All, since your Line Trace needs something solid to actually detect and register a hit against. Without proper blocking collision your trace would simply pass straight through the enemy without registering anything.
Select the BP Enemy actor itself, not just the mesh component, and add a Tag matching exactly what you checked for earlier in your player’s hit detection logic, meaning Enemy. This tag is what confirms to your player’s Blueprint that whatever was hit should actually trigger a damage number popup.
Step 9: Test and Fine Tune
Place this enemy Blueprint into your level and press play. Walk toward it and left click to fire your line trace. If nothing happens at first, your trace distance is likely too short. Go back to your Line Trace setup and increase the multiplied distance value, something like 1000 instead of 500 usually gives enough range for a normal sized level.
Once your trace reaches far enough you should see damage numbers appearing correctly above the enemy’s head, each one showing a random number, rising upward and fading out smoothly exactly as designed.
If your damage numbers still look a little plain, revisit your widget’s Floating Up animation and make sure your color change to red is properly reflected inside the actual keyframes themselves rather than just changed as a default appearance outside of the animation, since only values captured in keyframes will actually animate correctly.
Final Thoughts
At this point you have a complete floating damage number system working from a single mouse click detection all the way through to a properly positioned 3D feeling popup that rises and fades cleanly on its own without leaving any leftover widgets behind. The core technique used here, converting a 3D world location into a 2D screen position using Project World To Screen, is incredibly useful far beyond just damage numbers. The exact same approach works for health bars floating above enemies, interaction prompts, or any other UI element you want to feel like it exists physically inside your game world rather than as a flat screen overlay.
From here you could expand this system further by giving critical hits a larger font size or a different color, adding a slight random rotation to each number for more visual variety, or triggering a small scale up pop effect right at the start of the animation before it settles into its normal rise and fade behavior.

Solo Indie Game Developer and Unreal Engine (UE4 & UE5) Specialist with over 5 years of experience building optimized Android games from scratch.
I specialize in handling the full development pipeline independently taking mobile titles from concept to high-performance, publishing ready APK/AAB builds. Highly focused on rendering optimization for low-to-mid range devices, Blueprint scripting, and custom mechanics.
Through this blog, I share my practical knowledge and tutorials to help aspiring developers master the Unreal Engine mobile ecosystem.

One Comment