How to Setup In-App Purchases (IAP) in UE5 Android – Blueprint Guide
Extra coins, removing ads, unlocking a premium character these are all In-App Purchases and they are one of the most effective ways to earn money from your Android game. Done right IAP can bring in significantly more revenue than ads alone.
Most developers either skip it completely because the setup looks intimidating or they rush through it and then wonder why purchases are failing on device. In this article I will walk you through the entire process from creating your products in the Google Play Console all the way to handling the purchase flow in Blueprint.
Understanding the Two Types of In-App Products
Before we touch anything in UE5 or the Play Console you need to understand the two types of IAP products you can sell.
The first type is a Consumable Product. This is something the player buys, uses and can buy again. Extra coins, extra lives and power ups are all consumable products. Once the player uses them they are gone and the player can purchase them again.
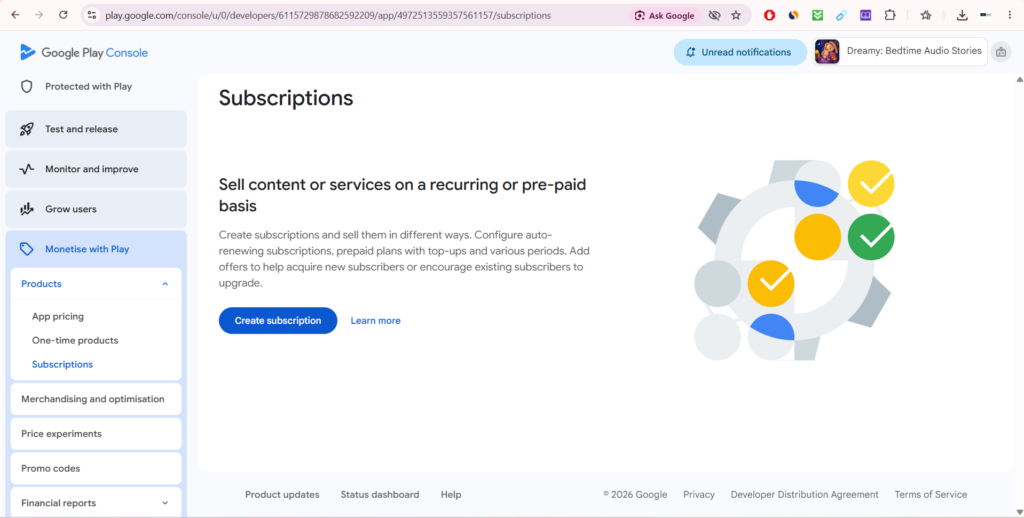
The second type is a Non-Consumable Product also called a One-Time Purchase. This is something the player buys once and keeps forever. Removing ads permanently, unlocking a premium character or buying a full game upgrade are all non-consumable products. Once purchased the player should never be charged again no matter how many times they reinstall the game.

Knowing which type your product is matters a lot because the Blueprint logic for handling them after purchase is different. Consumable products need to be acknowledged and consumed after purchase so the player can buy them again. Non-consumable products just need to be acknowledged and then permanently unlocked for that player.
Step 1: Prepare Your App in Google Play Console
IAP only works with a properly set up app in the Google Play Console. You cannot test real purchases on a random debug build. This is one of the most important things to understand going in.
Go to play.google.com/console and open your app. If you have not uploaded an APK yet you need to do that first. Go to Testing > Internal Testing and upload a signed APK of your game. It does not need to be a finished game but it needs to be a valid signed APK with your keystore.
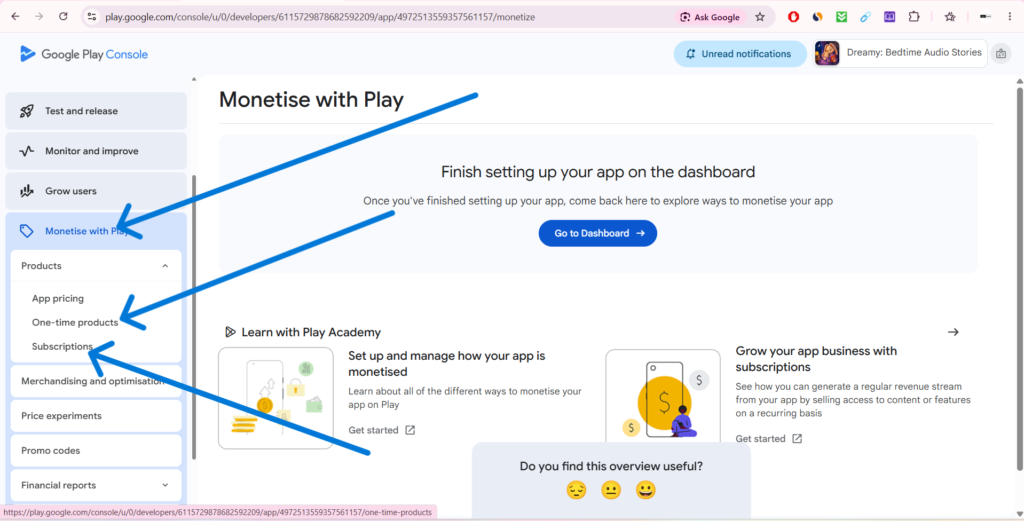
Once your APK is uploaded Google will activate the Monetize section of your app in the console.
Step 2: Create Your In-App Products
In the Play Console go to Monetize > Products > In-App Products and click Create Product.
Fill in the following details for each product.
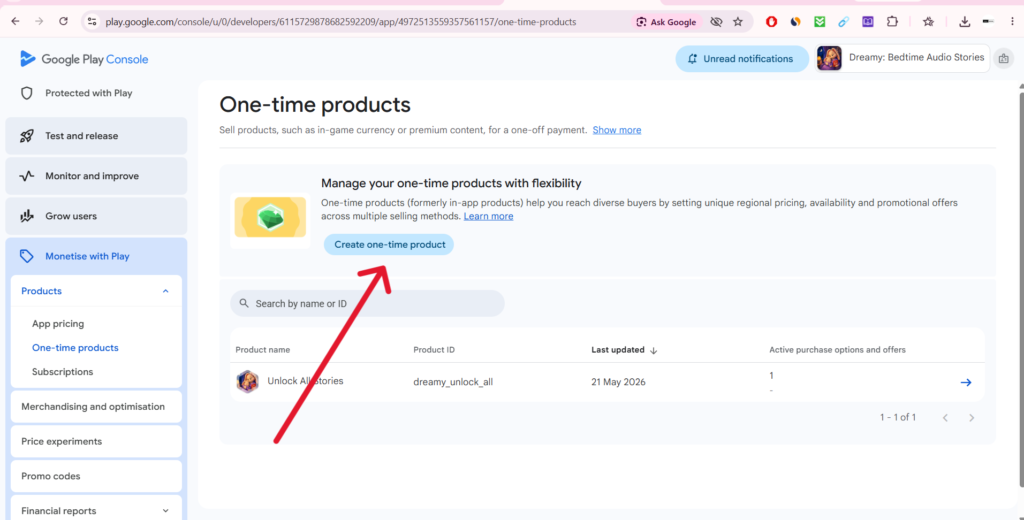
Product ID is the most important field. This is what you will use in your Blueprint to reference this product. Keep it simple and lowercase with no spaces. Something like coins_pack_100 or remove_ads works well. Write these IDs down because you will need them later. Name is what the player sees in the purchase dialog. Make it clear and descriptive like 100 Coins or Remove All Ads. Description is a short explanation of what the player gets.
Price is how much you want to charge. Google handles currency conversion automatically so you just set a price in your local currency and Google adjusts it for players in other countries.
After filling everything in set the product status to Active. If the product is not Active it will not appear when your game tries to fetch it. Create all the products your game needs before moving to UE5. You cannot test a purchase for a product that does not exist in the Play Console.
Step 3: Enable the Online Subsystem in UE5
UE5 handles In-App Purchases through its Online Subsystem which is a built-in system that abstracts platform-specific features like purchases, leaderboards and achievements behind a common interface.
Go to your project folder and open the Config folder. Find the file called DefaultEngine.ini and open it in any text editor.
Add the following lines at the bottom of the file:
[OnlineSubsystem]
DefaultPlatformService=GooglePlay

[OnlineSubsystemGooglePlay]
bEnabled=true

[OnlineSubsystemGooglePlay.Store]
bSupportsInAppPurchasing=true
This tells UE5 to use Google Play as the online subsystem and enables the in-app purchasing feature. Now go to Edit > Plugins in UE5 and search for Online Subsystem Google Play. Enable it and restart the editor.
Step 4: Query Available Products Directly in Blueprint
Go to your Game Mode Blueprint and on Event BeginPlay create a String Array variable called ProductIDs. In this array add all your product IDs exactly as you created them in the Play Console. So if you have coins_pack_100 and remove_ads add both as separate string entries in this array.
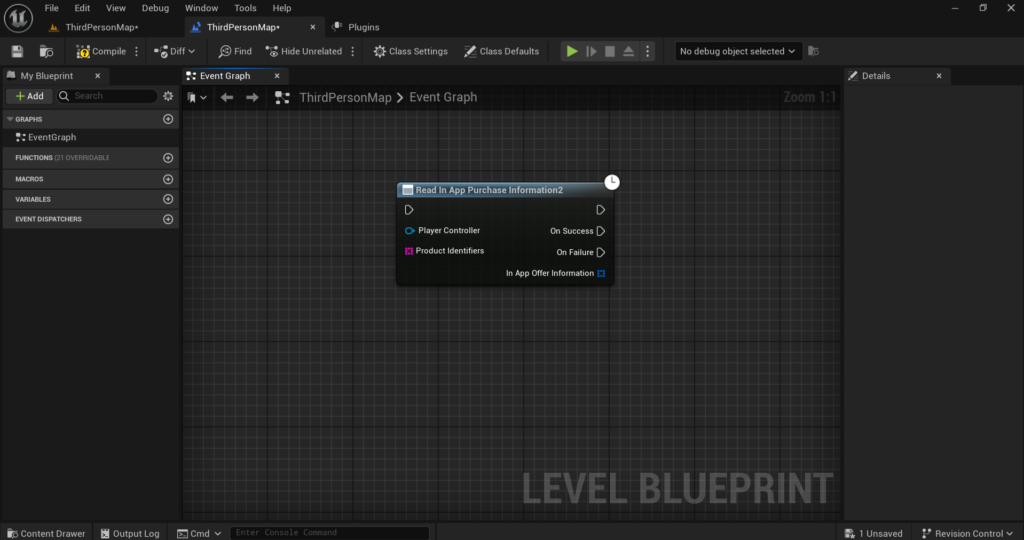
Now drag out from Event BeginPlay and add a node called Query In-App Purchases Information. Connect your ProductIDs array to the Product Identifiers input pin of this node.
This sends a request to Google Play to fetch the details of all your listed products. The On Query Completed callback fires when the results come back and returns an array of product objects containing the title, description and current price for each product. Store these in variables so you can display live prices in your shop UI.
Step 5: Query Available Products on Game Start
Before you can show any purchase UI you need to fetch the product details from Google Play. This includes the product name, description and price that Google has on file. You should do this early in your game, ideally on Event BeginPlay in your Game Mode Blueprint.
In your Game Mode Blueprint on Event BeginPlay add a node called Make In-App Purchase Query. This node takes an array of product IDs as input. Create an array and add all your product IDs to it exactly as they appear in the Play Console.
Connect this to a node called Query In-App Purchases Information. This sends a request to Google Play to fetch the details of all your products. This node has a callback called On Query Completed. When this fires it returns an array of product objects each containing the title, description and price of a product. Store these in variables so you can display the price dynamically in your shop UI instead of hardcoding it. This is important because prices can change and different countries see different prices.
Step 6: Trigger a Purchase in Blueprint
When the player taps a buy button in your shop UI here is the Blueprint logic to trigger the purchase.
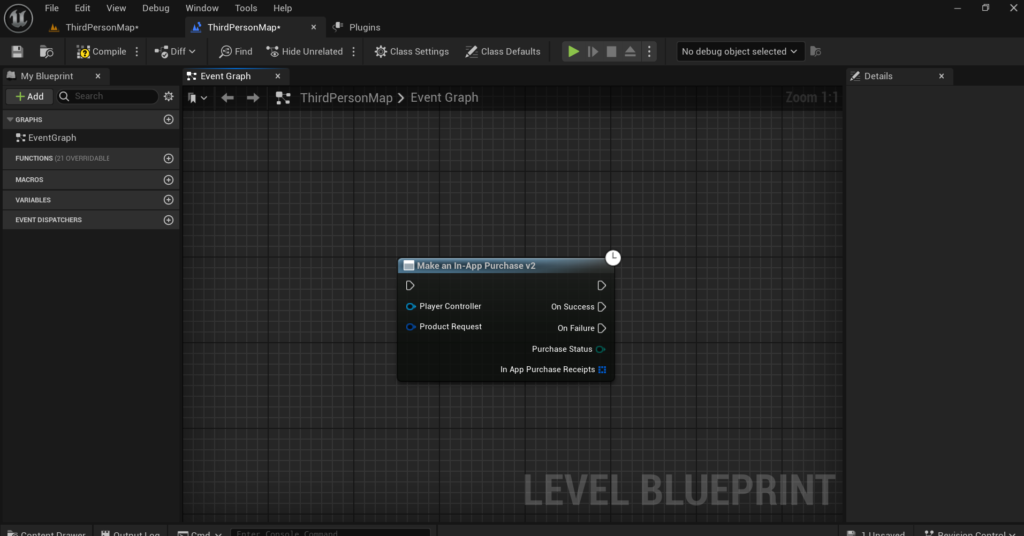
First add a node called Make In-App Purchase. This node takes a Product Identifier as input. Pass in the product ID of whatever the player is trying to buy such as coins_pack_100.
This node triggers Google Play’s native purchase dialog on the player’s device. The player will see a popup with the product name, price and a confirm button. You do not need to build this UI yourself. Google handles it completely.
The Make In-App Purchase node has a callback called On Purchase Complete. This fires after the purchase attempt finishes regardless of whether it succeeded or failed. It returns a Purchase Receipt object and a Purchase Status.
Add a Branch node and check if the Purchase Status equals Success. If it does the purchase went through and you need to handle it. If it does not the player either cancelled or something went wrong. Handle the failure gracefully by showing a message or simply closing the shop UI.
Step 7: Handle a Successful Purchase
This is the most important part and the step where most developers make mistakes.
When a purchase succeeds you need to do two things. First give the player what they paid for. Second tell Google that you have acknowledged the purchase. If you do not acknowledge the purchase Google will automatically refund it after three days.
For a Consumable Product like coins after the purchase succeeds first give the player their coins by updating the coin variable and saving it. Then add a node called Consume In-App Purchase. Pass in the purchase receipt from the On Purchase Complete callback. Consuming the purchase acknowledges it to Google and also allows the player to buy the same product again in the future.
For a Non-Consumable Product like remove ads you do not consume it. Instead you just acknowledge it by calling Finalize In-App Purchase with the purchase receipt. Then save a boolean variable like AdsRemoved as True and make sure this gets saved to your SaveGame object so it persists across sessions. Every time the game starts check this boolean and if it is True do not show any ads.
Step 8: Restore Purchases
This is a feature that many developers forget to implement and it causes a lot of negative reviews on the Play Store. If a player paid for remove ads and then reinstalls the game or switches to a new phone they should be able to restore their purchase without paying again.
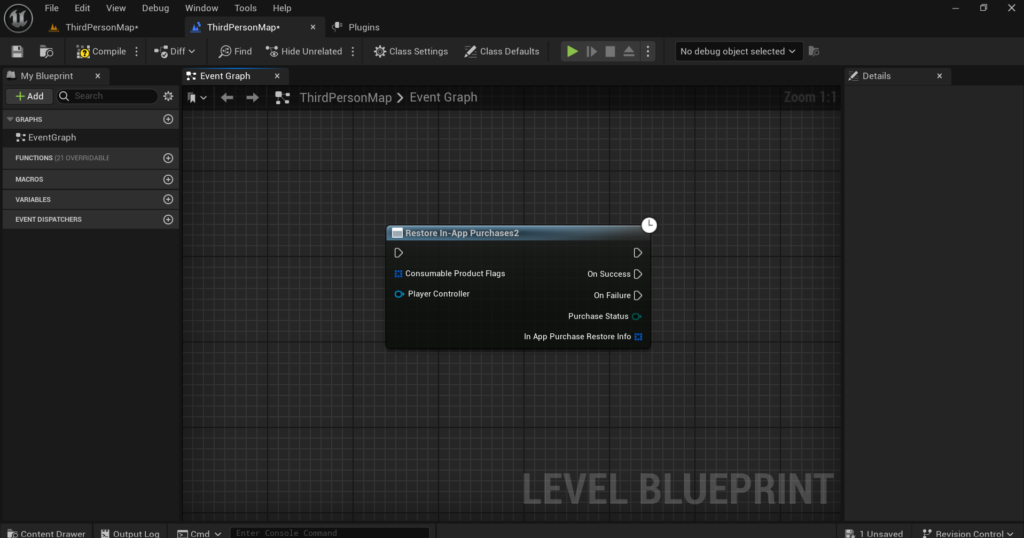
Add a Restore Purchases button somewhere in your settings menu. When the player taps it call the Restore In-App Purchases node. This queries Google Play for all previous purchases made by this player’s account.
The callback returns an array of previous purchase receipts. Loop through this array and for each receipt check the product ID. If it matches remove_ads set your AdsRemoved boolean to True and save it. If it matches any other permanent unlock re-grant those items as well.
Always implement restore purchases before submitting your game to the Play Store. Some regions require it by law and players who paid money and cannot restore their purchase will leave bad reviews.
Step 9: Testing IAP Correctly
Testing In-App Purchases requires a bit more setup than regular features.
First add your Google account as a License Tester in the Play Console. Go to Setup > License Testing and add your email address. License testers can make purchases without being charged real money. Google shows a test dialog instead of charging the actual card.
You also need to install a properly signed APK for IAP to work. A debug build from the editor will not communicate with Google Play correctly. Build a signed APK using your distribution keystore and install it manually on your test device.
After installing open the game and try making a purchase. If the product query returns successfully and the purchase dialog appears your integration is working. If the purchase dialog never appears check that your product IDs in UE5 exactly match the ones in the Play Console and that all products are set to Active.
One more important thing. Never use your own developer account to make test purchases in production. Always use the license tester setup so you are never charged and so Google does not flag your account for suspicious purchase patterns.
Step 10: Add Required Permissions
Go to Edit > Project Settings > Platforms > Android > Advanced APK Packaging and in the Extra Permissions section make sure these are added.
android.permission.INTERNET is required for all communication with Google Play servers.
android.permission.ACCESS_NETWORK_STATE allows the game to check connectivity before attempting a purchase.
com.android.vending.BILLING is the most critical permission for IAP. Without this Google Play will reject all purchase requests entirely. This is the permission that tells Android your app is allowed to make purchases through the Play Store billing system.
Copy all permission from here.
android.permission.INTERNET

android.permission.ACCESS_NETWORK_STATE

com.android.vending.BILLING
Common Mistakes to Avoid
The most common mistake is not consuming consumable purchases. If you give the player their coins but forget to call Consume In-App Purchase the player can never buy that product again because Google Play still considers it owned.
The second mistake is hardcoding prices in your UI. Always display the price from the query result. If you hardcode it and you change the price in the Play Console your UI will show the wrong amount.
The third mistake is not saving non-consumable purchases properly. If a player pays to remove ads and you only store that in a runtime variable it will be lost when the game closes. Always save it to your SaveGame object and load it on every game start.
The fourth mistake is testing with a debug APK. IAP will never work properly with a debug build. Always test with a signed APK installed manually from the Play Console internal testing track.
Final Thoughts
In-App Purchases done right are the single most effective way to monetize a mobile game. Players who genuinely enjoy your game are willing to spend money on it. Your job is to make the purchase experience smooth, fair and transparent.
The technical setup takes some effort especially the Play Console configuration and the signing requirements for testing. But once it is working you have a reliable revenue stream that scales with your player base.
Follow the steps in this article carefully especially the part about consuming purchases and restoring them. These two things alone will save you from the most common IAP problems that new developers face.
If anything is not working as expected or you are getting errors during testing reach out at Admin@KaliPress.fun and I will help you debug it.

Solo Indie Game Developer and Unreal Engine (UE4 & UE5) Specialist with over 5 years of experience building optimized Android games from scratch.
I specialize in handling the full development pipeline independently taking mobile titles from concept to high-performance, publishing ready APK/AAB builds. Highly focused on rendering optimization for low-to-mid range devices, Blueprint scripting, and custom mechanics.
Through this blog, I share my practical knowledge and tutorials to help aspiring developers master the Unreal Engine mobile ecosystem.