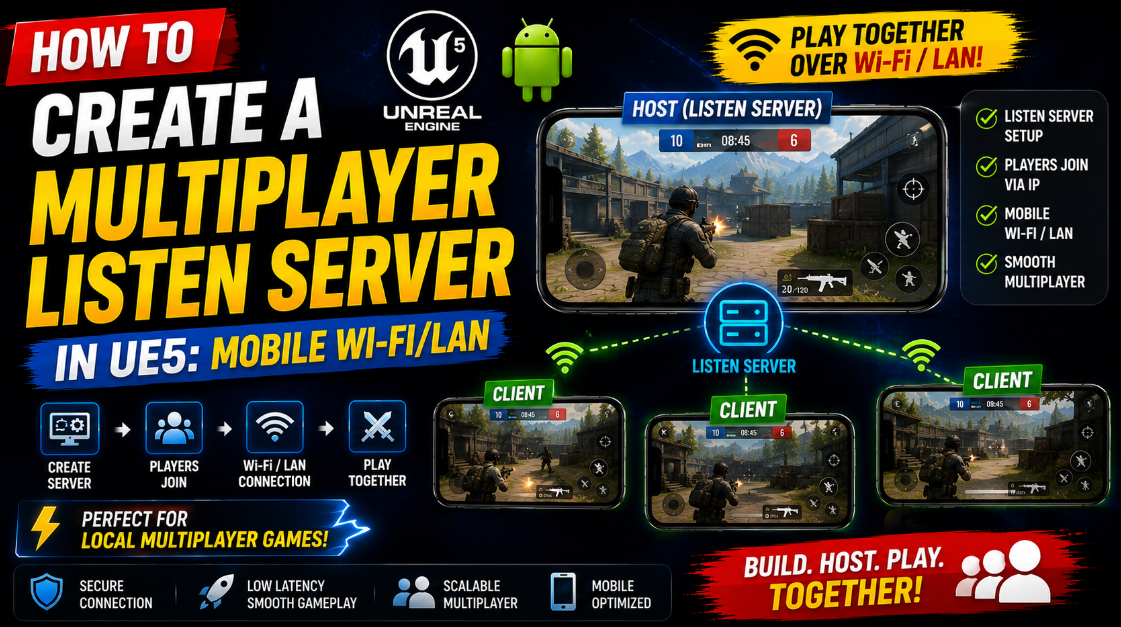
How to Create a Multiplayer Listen Server in UE5: Mobile Wi-Fi/LAN
Building a single player game in UE5 is challenging enough. Adding multiplayer on top of that and making it work on Android over a local Wi-Fi or LAN connection is something that stops most developers cold. The documentation is thin, the setup is not obvious and most tutorials only cover PC multiplayer which works differently from mobile.
A Listen Server is the simplest form of multiplayer networking in UE5. One player hosts the game and also plays in it at the same time. Other players on the same network connect to that host. There is no dedicated server, no cloud infrastructure and no ongoing costs. For a local multiplayer mobile game this is exactly what you need.
In this article I will walk you through the complete setup from enabling the right plugins all the way to connecting two Android devices over Wi-Fi and playing together.
What is a Listen Server and When Should You Use It
Before jumping into the setup it is worth understanding what a Listen Server actually is and where it makes sense.
In a Listen Server setup one device runs both the game and the server at the same time. That device is the host. Every other player connects to the host’s IP address over the network. The host has a slight advantage in terms of latency because their game logic runs locally but for casual local multiplayer this is completely acceptable.
A Listen Server is the right choice when your game is designed for local play where all players are on the same Wi-Fi network. Think couch co-op style games, party games or competitive games where friends play together in the same location. It is not the right choice for online multiplayer with players in different parts of the world because latency over the internet makes the host advantage significant and you would need a dedicated server for that.
For mobile LAN multiplayer a Listen Server is the standard approach and UE5’s networking system supports it very well out of the box.
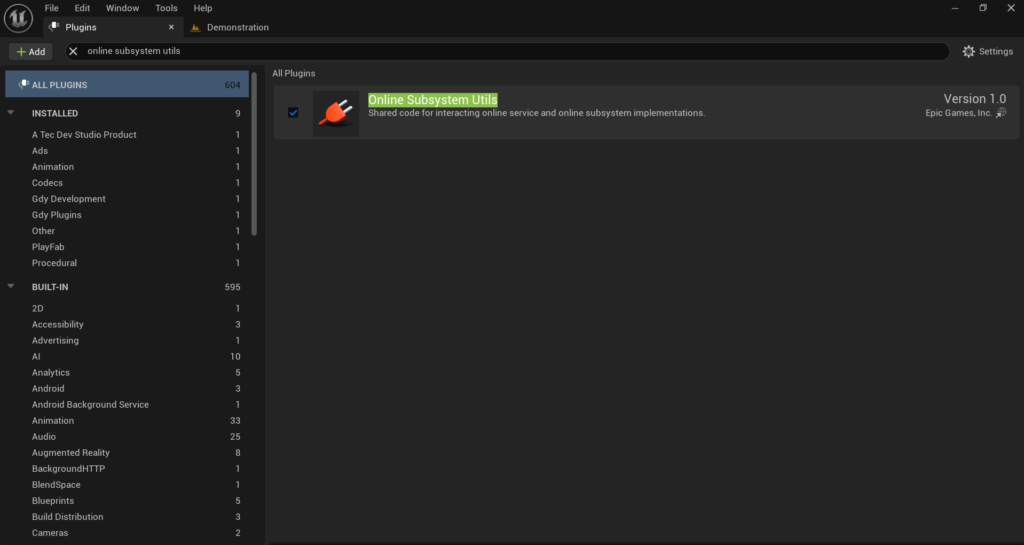
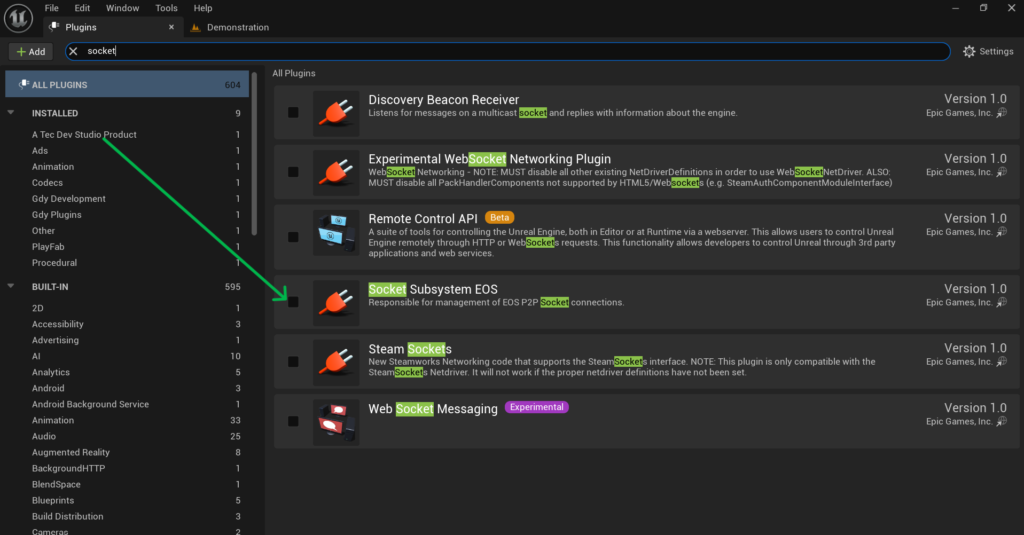
Step 1: Enable the Required Plugins
Open your UE5 project and go to Edit > Plugins. You need to make sure the following plugins are enabled.
Search for Online Subsystem and enable it. This is the base plugin that handles all networking functionality in UE5.

Search for Online Subsystem Utils and enable it as well. This plugin provides utility functions that make working with the online subsystem much easier in Blueprint.
Search for Sockets and make sure it is enabled. This handles the low level network socket connections that the multiplayer system uses under the hood. After enabling these plugins restart the editor when prompted.
Step 2: Configure the Online Subsystem for LAN
For local Wi-Fi and LAN multiplayer you need to configure the Online Subsystem to use the NULL subsystem which is designed for LAN connections without any external online service. Go to your project folder and open the Config folder. Find DefaultEngine.ini and open it in a text editor. Add the following lines:
[OnlineSubsystem]
DefaultPlatformService=Null

[OnlineSubsystemNull]
bEnabled=true
This tells UE5 to use the NULL online subsystem which handles LAN discovery and connections without needing any external servers or accounts. It works purely over local network which is exactly what you need for Wi-Fi multiplayer on Android. Save the file and go back to the editor.
Step 3: Set Up Your Game Mode for Multiplayer
Multiplayer in UE5 revolves around the Game Mode. The Game Mode only exists on the server which in a Listen Server setup means it only exists on the host device. Clients that connect to the host do not run the Game Mode themselves.
Open your Game Mode Blueprint or create one if you do not have a custom one. In the Class Defaults make sure your Default Pawn Class is set to the character Blueprint you want players to use.
In a multiplayer game UE5 automatically spawns a pawn for each player that connects. You do not need to manually spawn characters for connecting players. The Game Mode handles this automatically as long as your Default Pawn Class is set correctly.
Also make sure your Player Controller Class is set to your custom Player Controller if you have one. The Player Controller is the bridge between the player’s input and their character and in multiplayer each connected player gets their own Player Controller instance.
Step 4: Create the Host Session Logic in Blueprint
Now you need to build the Blueprint logic that creates the Listen Server session when the host player starts the game.
Open your Main Menu Widget Blueprint or wherever you handle your game’s start flow. Create a button called Host Game (Create a Session) and add its On Clicked event.
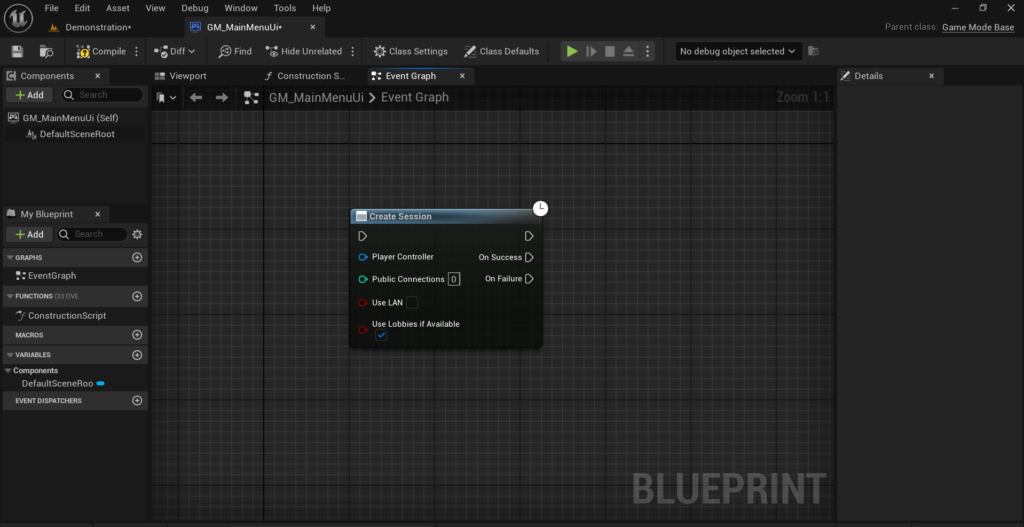
From the On Clicked event add a node called Create Session. This node creates a multiplayer session that other players can discover and connect to.
The Create Session node has several important inputs.
Set Number of Public Connections to the maximum number of players your game supports including the host. For a two player game set this to 2. For a four player game set it to 4.
Set bIs LAN Match to True. This is critical for local Wi-Fi multiplayer. If this is False UE5 will try to create an online session through external servers instead of a local LAN session and it will fail without a proper online service configured.
Set bShouldAdvertise to True so other players on the network can discover this session.
The Create Session node has two output callbacks. On Success fires when the session is created successfully. On Failure fires if something went wrong.
From On Success call Open Level by Name and pass in the name of your gameplay level. Add ?listen to the end of the level name. This is very important. The ?listen parameter is what tells UE5 to open this level as a Listen Server. Without it the level opens as a regular single player level and no one can connect to it.
So if your level is called GameLevel the string you pass into Open Level by Name should be GameLevel?listen.
Step 5: Create the Find and Join Session Logic
Now you need to build the logic for other players to find and join the host’s session.
In your Main Menu Widget Blueprint add a Find Game button and its On Clicked event.
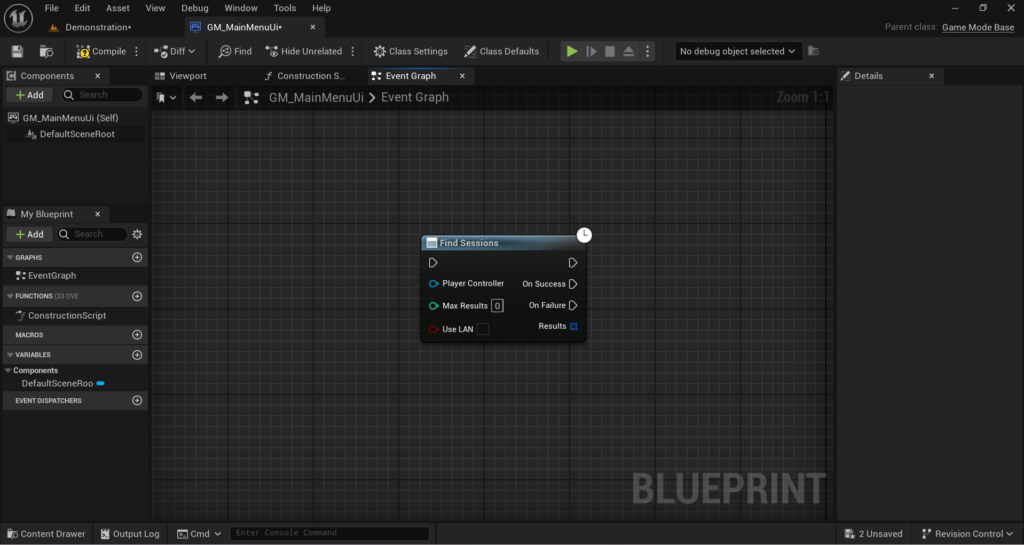
From this event add a node called Find Sessions. Set bIsLANQuery to True to search only for local network sessions. Set MaxResults to something like 10 which is more than enough for a LAN game.
This node has a callback called On Find Sessions Complete which returns an array of session search results. Each result represents a hosted game that was found on the network.
For a simple implementation take the first result from the array and pass it directly into a Join Session node. The Join Session node handles all the connection logic automatically.
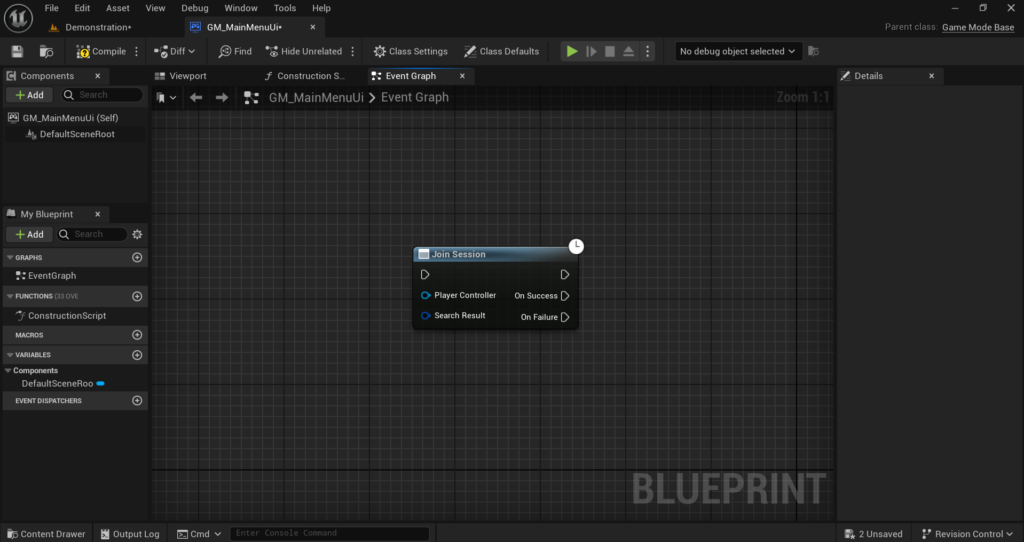
Join Session also has success and failure callbacks. On Join Session Complete fires when the connection is established. From this callback call Client Travel to move the client to the host’s level. The Join Session node provides the travel URL automatically in its output which you pass directly into Client Travel.
For a more polished game you would display all found sessions in a list and let the player choose which one to join. But for initial testing the direct approach of joining the first found session works perfectly.
Step 6: Handle Player Spawning and Replication
Multiplayer in UE5 uses a system called Replication to keep all connected players in sync. Variables and events that need to be shared across the network must be explicitly marked for replication.
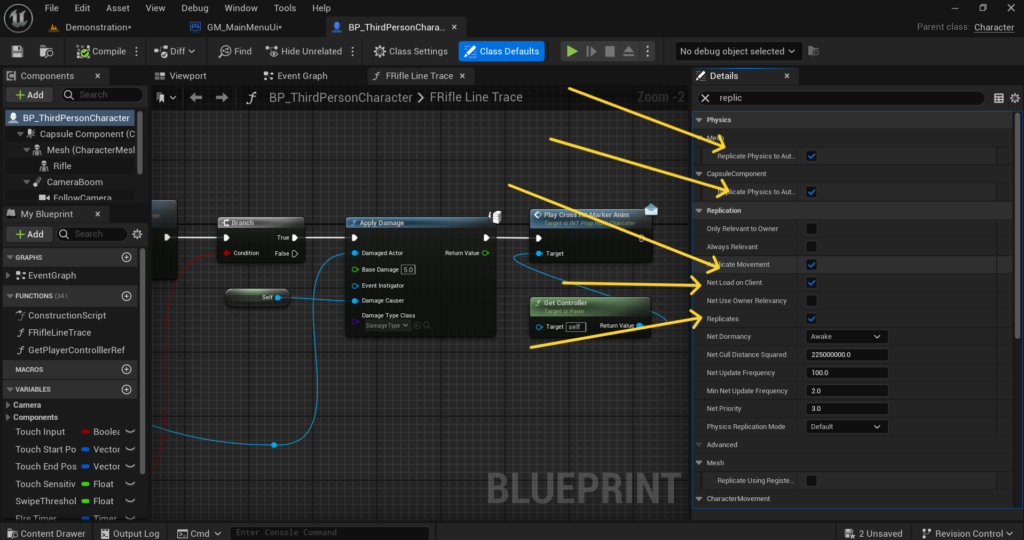
In your Character Blueprint open the Class Defaults and make sure Replicates is checked. This tells UE5 that this character exists on all connected clients and should be kept in sync. For variables that need to be visible to all players such as health, score or player name enable Replication on those variables individually. Click on the variable in the Blueprint panel and in the Details section find the Replication dropdown. Set it to Replicated for variables that should sync from server to all clients.
For movement replication open your Character Blueprint and make sure the Character Movement Component has Movement Replication enabled. This is usually on by default for characters that inherit from the standard Character class and it handles syncing player positions across all connected devices automatically.
Step 7: Use RPCs for Networked Events
Sometimes you need to trigger an event on the server or on all clients at the same time. For example when a player fires a weapon the server needs to know about it and all other clients need to see the visual effect. This is done using Remote Procedure Calls or RPCs.
In Blueprint you can create RPCs by creating a custom event and in its Details panel changing the Replicates setting.
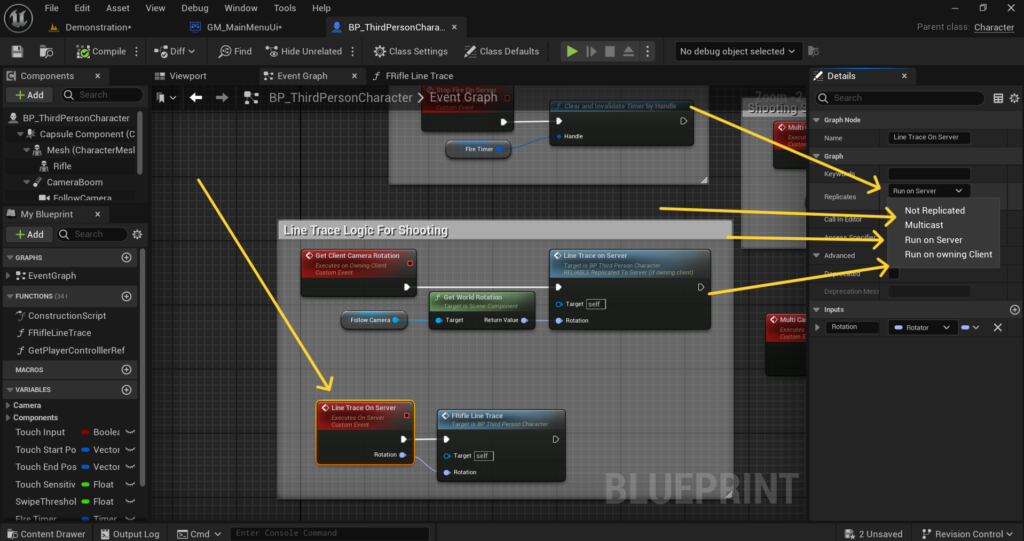
Run on Server means this event runs on the host when called by a client. Use this for any gameplay action that needs to be validated by the server like dealing damage, picking up items or changing game state.
Multicast means this event runs on all connected clients simultaneously when called. Use this for visual effects like explosions, hit reactions or any cosmetic event that all players should see.
Run on Owning Client means this event runs only on the specific client that owns the actor. Use this for UI updates or feedback that is only relevant to one specific player.
For a basic game the most important pattern is this. When a player does something that affects gameplay like shooting call a Run on Server RPC. Inside that server RPC apply the gameplay logic like dealing damage. Then call a Multicast RPC to trigger the visual effects on all clients.
Step 8: Get the Host IP Address for Manual Connection
Sometimes automatic session discovery does not work on certain network configurations. In that case you can allow players to connect manually by entering the host’s IP address directly. To get the host device’s IP address you can display it in your game’s UI. In Blueprint add a node called Get Local IP Address or use a Execute Console Command node with the command STAT NET to see network information while the game is running.
A simpler approach is to display connection instructions in your UI that tell the host to check their phone’s Wi-Fi settings for their IP address and share it with other players.
For manual connection from a client device you can add an IP address text input field in your join game UI. Take the entered IP address and pass it directly into an Execute Console Command node with the command open followed by the IP address. For example if the host’s IP is 192.168.1.5 the command would be open 192.168.1.5. This bypasses session discovery entirely and connects directly to that IP.
Step 9: Package and Test on Android Devices
Testing multiplayer requires real Android devices. You cannot fully test a Listen Server setup in the editor because the editor and a packaged APK behave differently on the network.
Package your game as a signed APK and install it on at least two Android devices. Make sure both devices are connected to the same Wi-Fi network. This is the most important requirement. If the devices are on different networks session discovery will not work and direct IP connections will fail.
On the first device tap Host Game. Wait for the gameplay level to load. On the second device tap Find Game. If session discovery works the second device should find the host’s session and connect automatically. The host should see a second player appear in the game.
If the connection fails check that both devices are on the same Wi-Fi network and that your router does not have client isolation enabled. Client isolation is a router setting that prevents devices on the same network from communicating with each other and it will completely block LAN multiplayer. Most home routers have it disabled by default but some public or office networks have it enabled.
Step 10: Common Multiplayer Problems and Fixes
The most common problem developers face is clients connecting but seeing their character in the wrong position or not seeing other players at all. This is almost always a replication issue. Go back to your Character Blueprint and make sure Replicates is checked and that Character Movement replication is enabled.
The second common problem is the session not being found by other devices. Make sure bIsLANMatch is set to True on the host and bIsLANQuery is set to True on the searching client. Both must be True for LAN discovery to work.
The third common problem is the game running well on the host but lagging significantly on clients. This usually means too much logic is running on the client that should be running on the server. Move gameplay logic to server-side RPCs and only send the results back to clients.
The fourth problem is clients getting disconnected randomly. This can happen if the host device’s screen locks or goes to sleep during the session. On the host device disable screen timeout while the game is running by using the Set Keep Screen On platform specific Blueprint node.
Final Thoughts
Local Wi-Fi multiplayer in UE5 Android is a genuinely powerful feature that most mobile games do not take advantage of. A well made local multiplayer game stands out on the Play Store because it offers something that most mobile games cannot.
The Listen Server approach covered in this article gives you a solid foundation. The host creates a session, clients discover and join it and UE5’s replication system keeps everything in sync. Start simple with basic player movement and position sync working correctly before adding more complex features like game state, scoring and win conditions.
Test on real devices as early and often as possible. Multiplayer bugs that are invisible in the editor become obvious immediately on real hardware and catching them early saves a lot of debugging time later.
If your multiplayer setup is not behaving the way it should reach out at Admin@KaliPress.fun and I will help you track down what is going wrong.

Solo Indie Game Developer and Unreal Engine (UE4 & UE5) Specialist with over 5 years of experience building optimized Android games from scratch.
I specialize in handling the full development pipeline independently taking mobile titles from concept to high-performance, publishing ready APK/AAB builds. Highly focused on rendering optimization for low-to-mid range devices, Blueprint scripting, and custom mechanics.
Through this blog, I share my practical knowledge and tutorials to help aspiring developers master the Unreal Engine mobile ecosystem.