
How to Optimize Unreal Engine 5 for Android (Fix Low FPS & Lag)- Kali Press
The editor looks great. Smooth framerates, beautiful lighting, everything working perfectly. Then you install the APK on your Android phone and the game drops to 15 FPS. Characters are stuttering, the UI is lagging and you have no idea where to start.
This article covers every optimization step that actually works for Android. Not generic advice but real settings that make a real difference on mobile hardware.
Why UE5 is Heavy on Android by Default
Before we jump into the fixes, you need to understand one thing. Unreal Engine 5 is built for high-end hardware. Features like Lumen, Nanite and high resolution shadow maps are designed for PC and console. When you package your game for Android without changing anything. UE5 sends all of that to your phone as well.
Your phone is not a PlayStation 5. It has a mobile GPU with limited memory bandwidth and a battery that will throttle performance after a few minutes of heavy load. So the goal of Android optimization is simple turn off everything your phone cannot handle and replace it with lighter alternatives that still look good.
Step 1: Disable Lumen Completely
This is the first thing you should do. Lumen is UE5’s dynamic global illumination system and it is absolutely not ready for mobile. It will destroy your frame rate on any Android device.
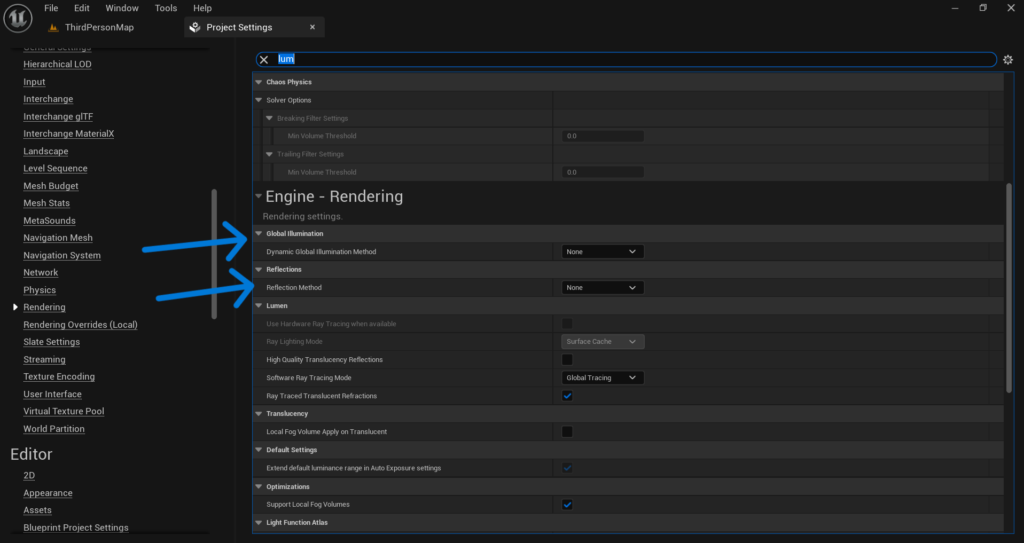
Go to Edit > Project Settings > Engine > Rendering and look for the Global Illumination section. Change the method from Lumen to None. Then go to the Reflections section and change it from Lumen to None as well.
After doing this you will likely notice an immediate improvement in performance during your next test build. You can use Sky Light and Directional Light with baked lighting to keep your game looking decent without Lumen.
Step 2: Disable Nanite on All Your Meshes
Nanite is UE5’s virtualized geometry system. Again it is a PC and console feature. On Android it either falls back to a non-optimized path or causes serious performance problems.
Go through your Static Meshes in the Content Drawer. Open each one and in the Details panel find the Nanite section. Make sure Enable Nanite Support is turned off for every mesh you are using.
If you imported assets from the Epic marketplace or Fab and they came with Nanite enabled by default, you need to manually disable it on each one. This step is tedious but it is worth the effort.
Step 3: Set the Right Rendering Settings for Mobile
Go to Edit > Project Settings > Engine > Rendering and make these changes:
- Set Anti-Aliasing Method to FXAA or TAA. Do not use TSR on mobile as it is too heavy.
- Turn off Ambient Occlusion. Mobile GPUs struggle with screen space effects and ambient occlusion is one of the most expensive ones.
- Turn off Bloom or set it to a very low intensity. It looks nice but it costs performance.
- Turn off Motion Blur. On a mobile game this rarely looks good anyway and it costs GPU time on every frame.
- Turn off Lens Flare and Auto Exposure if your game does not specifically need them.
- Each one of these settings alone might not seem like a big deal. But together they add up to a significant performance boost on Android hardware.
Step 4: Use Mobile HDR Wisely
In Project Settings > Engine > Rendering you will find an option called Mobile HDR. This enables high dynamic range rendering on mobile.
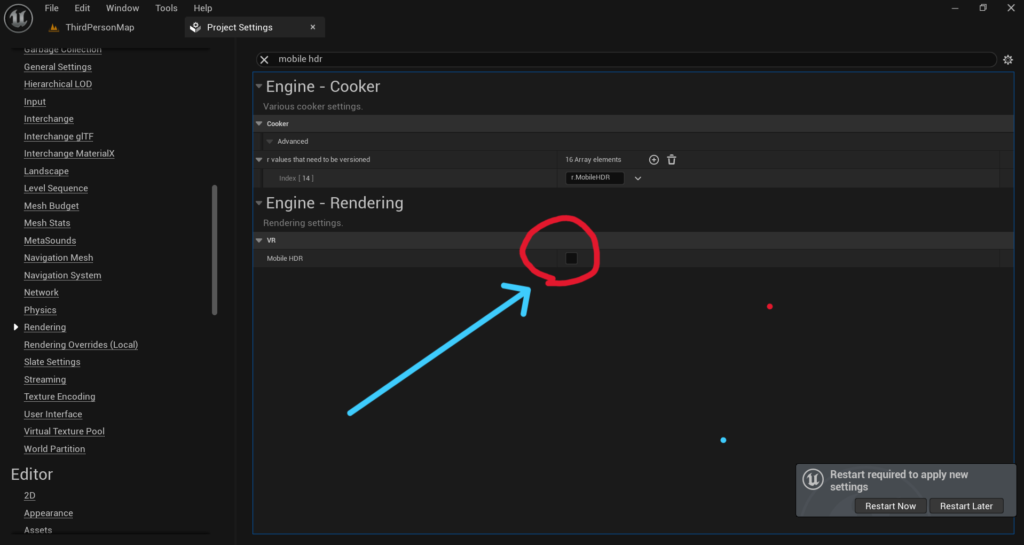
If your game does not specifically need HDR visuals turn this off. Disabling Mobile HDR puts the renderer into a much lighter mode that is significantly faster on low to mid range Android devices.
Keep in mind that turning this off will change how your lighting and post process effects look. Test it and see if the visual difference is acceptable for your game. For many mobile games especially ones with a stylized or cartoon art style the difference is barely noticeable but the performance gain is real.
Step 5: Optimize Your Textures for Mobile
Texture memory is one of the biggest reasons Android games lag and crash on lower end devices. Go to your textures in the Content Drawer and make sure the following is set correctly. Open each texture and in the Details panel check the Compression Settings. For most textures you want to use Default (DXT1/DXT5). For UI textures use UserInterface2D. For normal maps use Normalmap.
If you have more than 50 to 100 textures, select them all, right-click and go to Asset Actions > Edit Selection in Property Matrix.
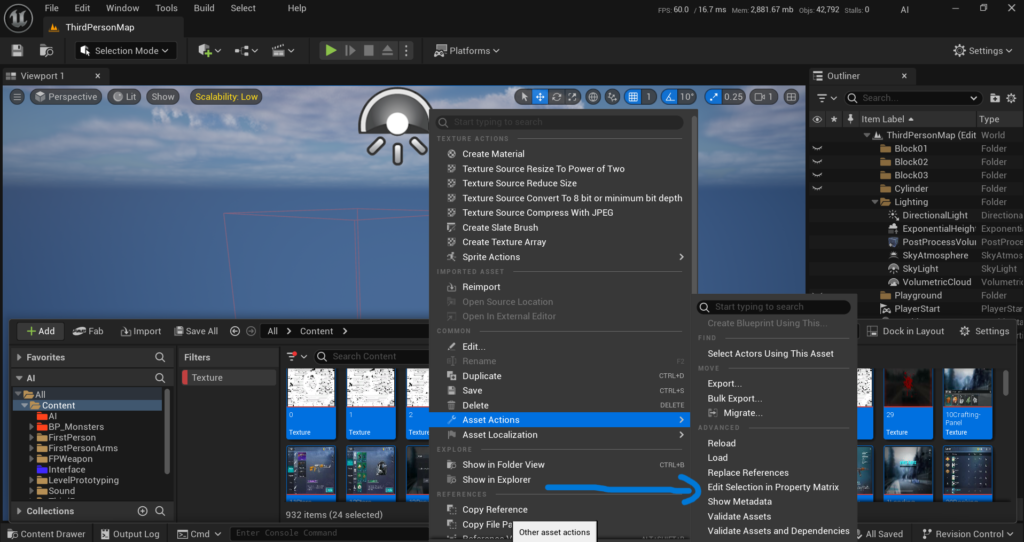
A window will open where you can select all textures by pressing Ctrl + A and then change the compression settings for all of them at once from the right side panel.
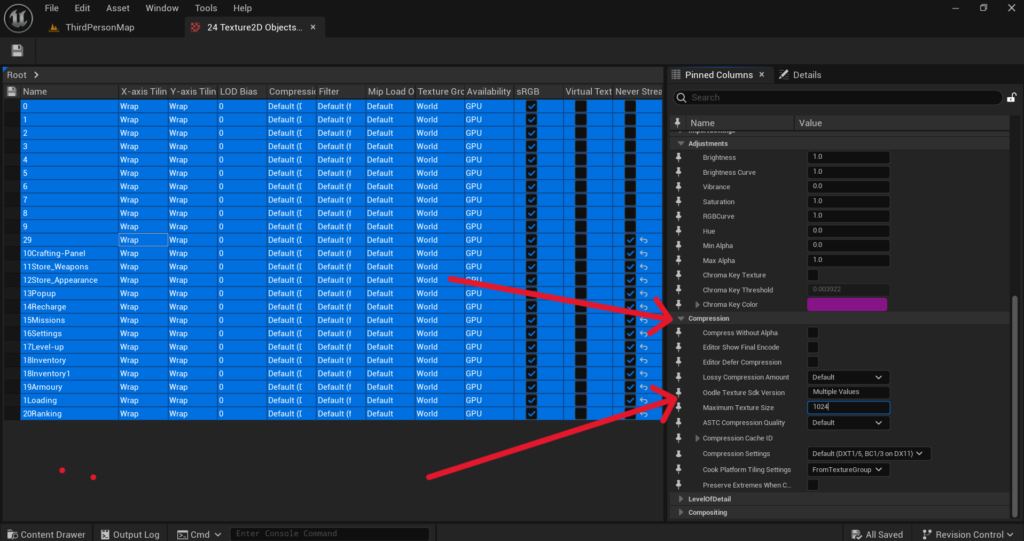
More importantly check the Maximum Texture Size. For mobile you rarely need textures above 1024×1024. If you have 2K or 4K textures in your project and they are being used on small objects or UI elements reduce them down. Large textures eat VRAM very fast on mobile.
Also make sure Generate Mipmaps is enabled on your textures. Mipmaps allow the engine to use lower resolution versions of textures when objects are far away which saves GPU bandwidth.
Step 6: Set Up Level of Detail (LOD) on Your Meshes
LOD means the engine uses a simpler version of your 3D model when it is far away from the camera. This is one of the most effective optimization techniques for any game but most beginners skip it entirely.
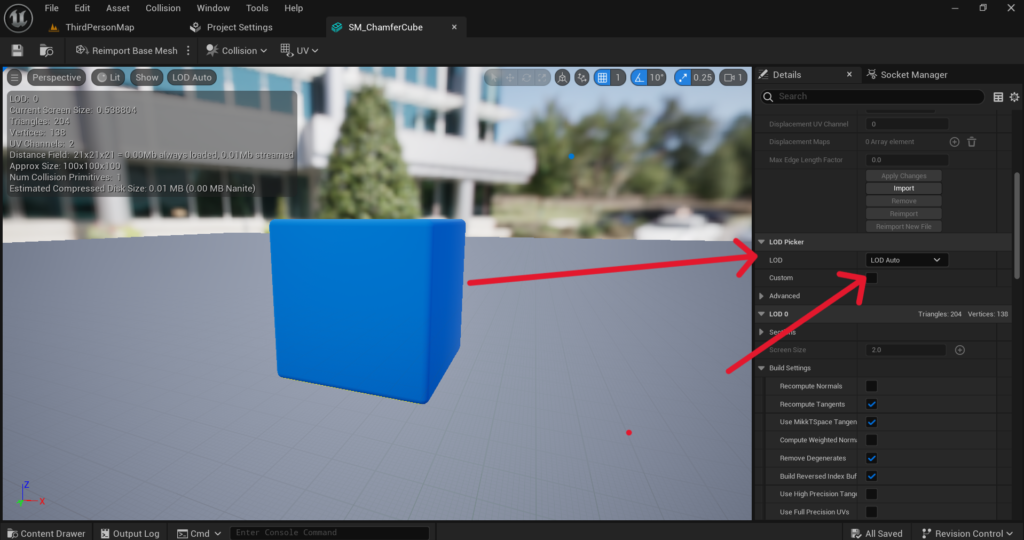
Open a Static Mesh from your Content Drawer. In the LOD settings panel you will see options to add LOD levels. You can either auto-generate them by clicking Auto LOD or create them manually.
A basic setup would be LOD 0 as your full quality mesh for close up view, LOD 1 at around 50 percent of the original triangles for medium distance and LOD 2 at around 25 percent for far distances.
For a mobile game this step alone can cut your draw call cost dramatically if you have many objects in your level.
Step 7: Reduce Draw Calls with Instanced Static Meshes
Every unique object your game renders on screen costs a draw call. The more draw calls you have the slower your game runs. On Android this limit is much lower than on PC.
If you have repeated objects in your level like trees, rocks, fences or buildings use Instanced Static Mesh Components instead of placing individual Static Mesh Actors. Instanced meshes group all copies of the same mesh into a single draw call which is much more efficient.
You can convert existing actors to instanced meshes through the editor or set them up in your Blueprint. This is especially useful for environments with a lot of repeating elements.
Step 8: Control Your Shadow Quality
Shadows are beautiful but they are extremely expensive on mobile. The default shadow settings in UE5 are way too high for Android.
Go to Project Settings > Engine > Rendering > Shadows and reduce the Dynamic Shadow Distance values. Also lower the Shadow Map Resolution if you have one set.
A better approach for mobile is to use baked shadows for your static objects and only enable dynamic shadows on the player character and important objects. This gives you a good looking result without destroying your frame rate.
You can also use a Scalability Settings console command to reduce shadow quality at runtime. Adding r.ShadowQuality 1 or r.ShadowQuality 0 to your device’s scalability settings can make a big difference on lower end phones.
Step 9: Use the Android Scalability Groups
UE5 has a built-in scalability system that lets you define different quality levels for different device tiers. You should absolutely use this for Android.
Go to Edit > Project Settings > Engine > Scalability and set up your Low, Medium and High presets. Then at runtime you can detect the device’s GPU tier and apply the right preset automatically.
For low end Android devices a good starting point is to set everything to Low or Medium. This includes Shadow Quality, Texture Quality, Effects Quality and View Distance Quality.
You can trigger these settings in Blueprint using the Execute Console Command node. For example running sg.ShadowQuality 0 and sg.EffectsQuality 1 at startup for low end devices will give them a much smoother experience.
Step 10: Profile Your Game with the Unreal Stat Commands
None of the above steps matter if you do not know where your performance problem actually is. Before and after making changes you should profile your game using UE5’s built-in stat commands.
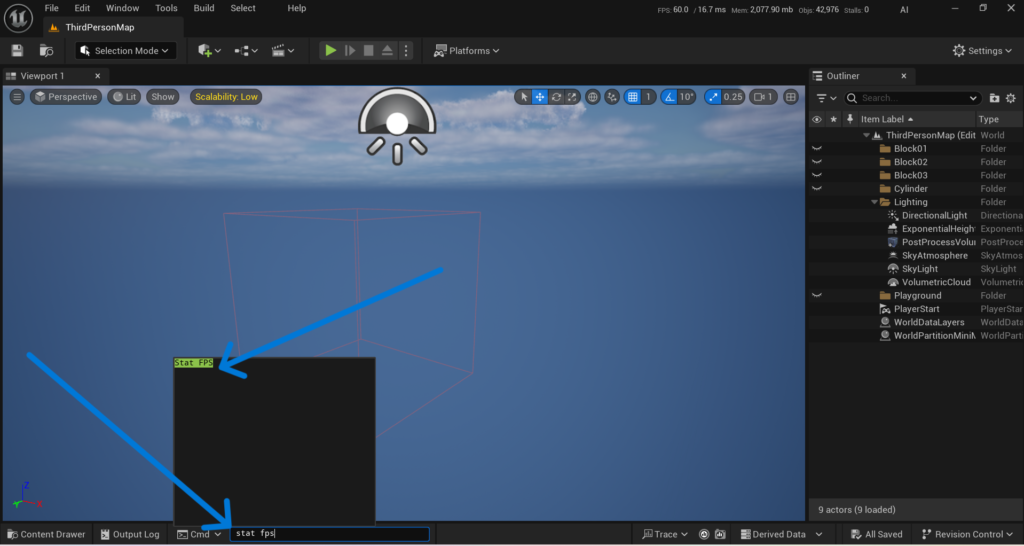
When your game is running on device or in the editor open the console and type these commands:
- stat fps shows your current frame rate.
- stat unit breaks down how long each frame takes on the CPU, GPU and the game thread separately. This tells you whether you are CPU bound or GPU bound which completely changes what you should fix.
- stat scenerendering shows you your draw call count. If this number is very high on Android that is usually the main problem.
- stat memory shows memory usage. If your game is using too much memory it will lag and eventually crash on phones with less RAM.
Use these commands to identify exactly what is causing your low FPS before spending time on optimizations that may not even address your real problem.
Final Thoughts
Optimizing Unreal Engine 5 for Android is not something you do once and forget. It is an ongoing process that involves testing on real devices, profiling, making targeted changes and testing again.
The steps in this article cover the most common and most impactful optimizations. Start from the top and work your way down. Disable Lumen and Nanite first as those two alone can transform performance on mobile.
Then go through the rendering settings, texture settings and LOD setup. If you test your game on an actual Android device after going through all of these steps and it is still running poorly leave a comment or reach out at Admin@KaliPress.fun and I will help you debug it further. Every game is different and sometimes there are project-specific issues that need a closer look.
The goal is to ship a game that runs smoothly on as many Android devices as possible. With the right settings UE5 can absolutely deliver that.

Solo Indie Game Developer and Unreal Engine (UE4 & UE5) Specialist with over 5 years of experience building optimized Android games from scratch.
I specialize in handling the full development pipeline independently taking mobile titles from concept to high-performance, publishing ready APK/AAB builds. Highly focused on rendering optimization for low-to-mid range devices, Blueprint scripting, and custom mechanics.
Through this blog, I share my practical knowledge and tutorials to help aspiring developers master the Unreal Engine mobile ecosystem.