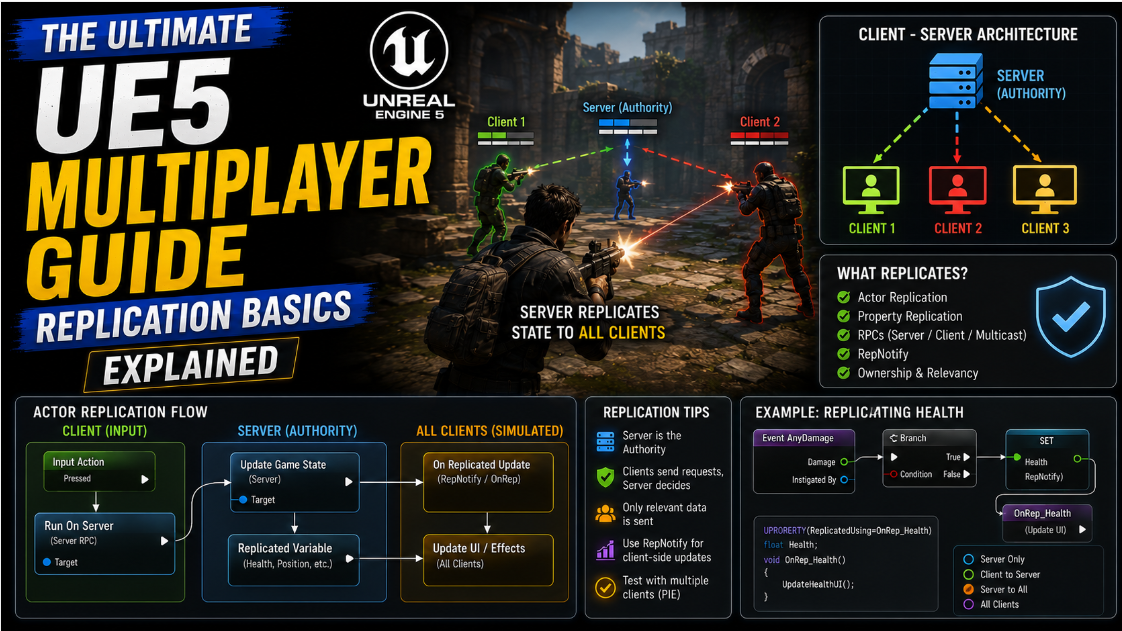
The Ultimate UE5 Multiplayer Guide: Replication Basics Explained
Multiplayer feels intimidating the first time you try it in Unreal Engine. Players moving around. Everyone needing to see the same thing happening at the same time. It sounds like a huge topic to learn all at once. The truth is UE5 handles most of the hard work for you automatically and once you understand a few core ideas the whole system starts to make sense very quickly. In this article I will explain replication from the ground up in the simplest way possible so even if this is your first time hearing the word you will walk away actually understanding it.
What Replication Actually Means
The word replicate simply means to make an exact copy of something. In a multiplayer game replication is the system that keeps every player’s version of the game in sync with everyone else’s. Positions. Animations. Health. The overall state of the game world. All of this needs to match across every single player’s screen at the same time. Replication is the mechanism that makes that happen behind the scenes.
Think of it like this. When one player moves their character forward every other player needs to see that same movement happening on their own screen too. Without replication each player would just be living in their own separate bubble with no idea what anyone else is actually doing.
Setting Up Your Editor to Test Multiplayer
Before testing any of this you need to tell Unreal Engine how many players you want to simulate and how they should connect to each other. Open your Play settings and look for the multiplayer options. Here you can set the number of players. For learning purposes two players is more than enough since you just need to see replication working between at least two instances of the game.
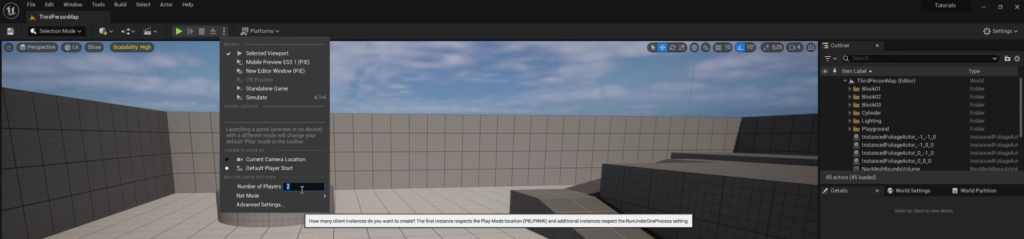
You will also see a setting called networking mode with a few different options.
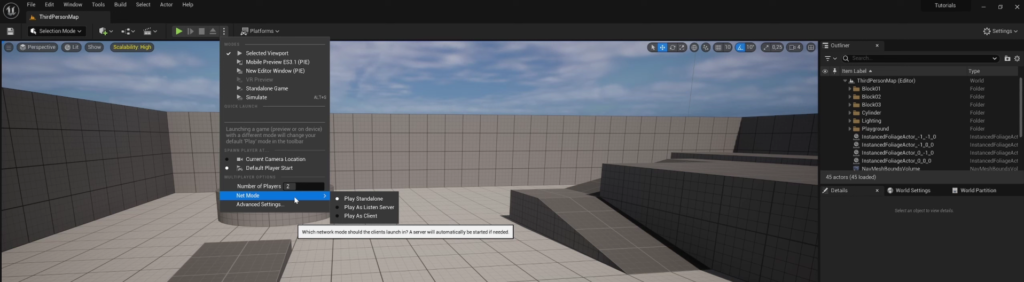
Play Standalone means single player. There is no replication happening at all here since there is only one player and nothing to sync.
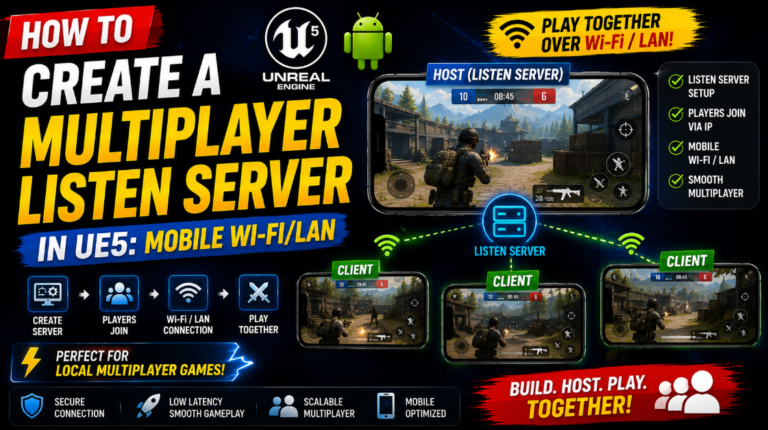
Play As Listen Server means one player acts as both the host and a player at the same time. This single person is running the server logic while also playing the game themselves. This is the most common setup for smaller games and it is the one used throughout this guide.
Play As Client means both players connect into a separate external dedicated server rather than one player also acting as the host. This setup usually involves a proper backend server running somewhere else.
For most learning and even many small multiplayer games Listen Server is the simplest and most practical choice.
Once you pick Listen Server and press play you will get two separate game windows. One of these is the listen server itself meaning the host who is both running the game and playing it. The other is a client that has simply joined into that host’s game.
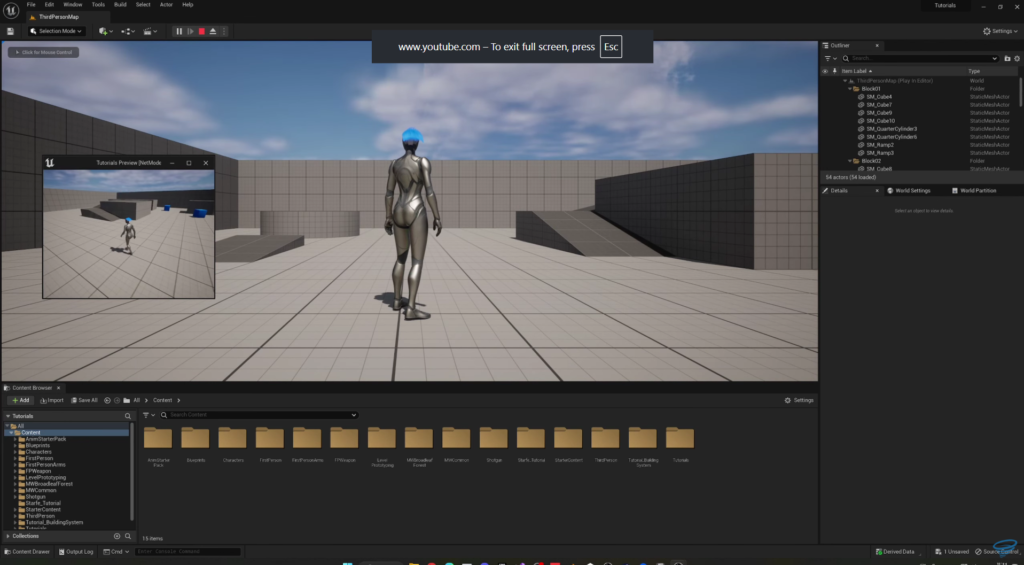
A quick tip here. If your second player fails to spawn properly try duplicating your Player Start actor in the level. Sometimes two player starts overlapping in the exact same spot causes one of them to fail to spawn correctly.
Movement and Animation Replicate Automatically
Here is the good news. Once you have two players running Unreal Engine already replicates movement and animation completely on its own. If one player walks around jumps or plays a basic animation the other player will see all of that happening in real time without you writing a single line of extra logic.
This is a huge time saver. Imagine having to manually sync every tiny movement of every player yourself. Unreal handles this automatically which is one of the biggest reasons building multiplayer games in this engine is so much more approachable than it sounds.
There is one important exception you need to know about early on. Anim Montages do not replicate automatically. An Anim Montage is basically a specific animation you can trigger from a Blueprint such as an attack animation or an emote. If you simply call Play Anim Montage in your Blueprint the animation will only play for the player who triggered it. Everyone else will not see it happening at all unless you specifically set up replication for it yourself. We will fix this later in the article.
Understanding Replication Settings on an Actor
Open your Character Blueprint and go to Class Defaults. Search for replication and you will find a whole section of settings related to how this specific actor behaves across the network.
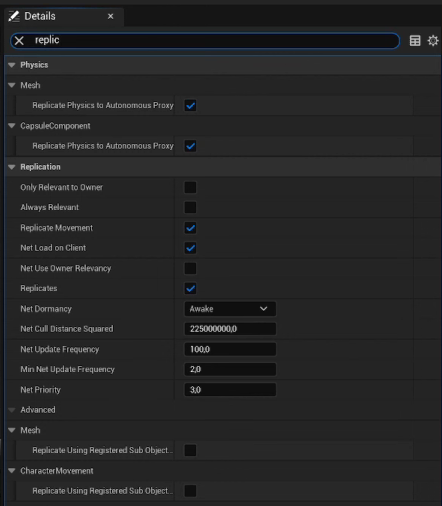
The first important one is called Replicate Movement. This setting controls whether this character’s movement gets synced to other players at all. If you turn this off and test again you will notice that when one player moves the other player simply does not see them moving. The data simply is not being sent anymore.
Right below that is a setting simply called Replicates. This one controls whether the actor itself exists across the network at all rather than just its movement. If you disable this and spawn something like a pickup item or an interactive object you will notice something interesting.
On the server’s own screen the object is there completely normally. But on the client’s screen it simply does not exist at all. This is because the server and the client actually handle actors quite differently under the hood and an actor that is not set to replicate essentially only exists locally on whichever machine spawned it.
For almost anything you want every player to see and interact with consistently you want Replicates turned on.
What Is an RPC
RPC stands for Remote Procedure Call. Do not let the technical sounding name scare you away though because the concept behind it is actually really simple.
Think of an RPC as a message that one player sends to trigger something happening for other players as well. For example if a player shoots a weapon and a bullet spawns that bullet is not automatically going to appear for every other player just because it spawned locally. You need to explicitly send an event telling everyone else that this bullet should also appear on their screen. That message is what an RPC actually is.
Creating Your First RPC
Let us walk through a simple practical example. Say you want a player to press a key and have their character’s material change color for everyone watching.
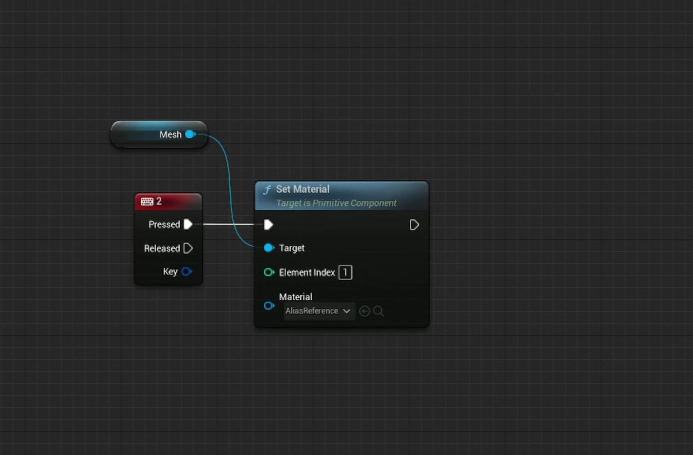
First build the actual logic. Get your character’s mesh component and use Set Material to change it to a different material index. Test this without any RPC involved yet and you will notice the same problem we saw earlier. Pressing the key changes the material only on your own screen. Every other player sees no change at all.
To fix this right click in your Blueprint and create a Custom Event. Name it clearly something like RPC Change Material since naming these clearly matters a lot once you start having several of them in the same Blueprint.
Move your material changing logic inside this new custom event instead of calling it directly from your key press.
Now select this custom event and look for a setting called Replicates. Change it to Multicast. Multicast means this event will run on every single connected player’s machine at once rather than just your own. Now when you press the key and call this multicast event everyone sees the material change correctly.
Why Client to Server Communication Needs an Extra Step
Here is where things get a little more interesting. If you test this multicast setup from the host player everything works perfectly and everyone sees the change. But if you test the exact same button press from the client player instead you will notice something strange. The change happens on the client’s own screen but nobody else sees it including the host.
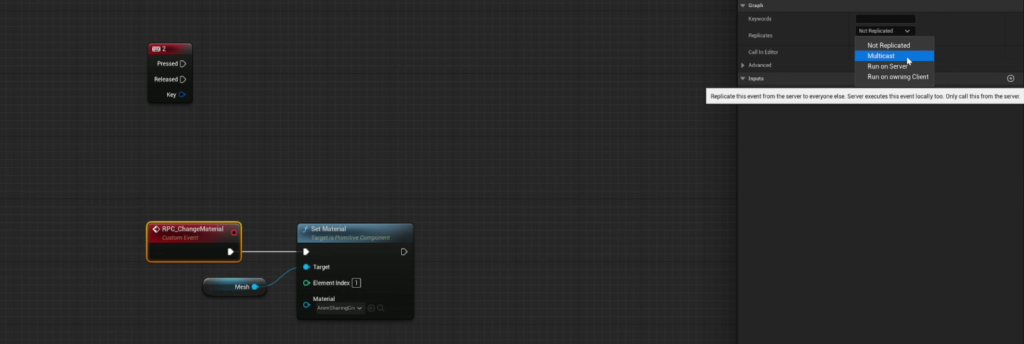
This happens because of an important rule in Unreal Engine’s networking model. The server is always the authority. Clients are never allowed to directly broadcast an event to every other player on their own. This exists specifically to prevent cheating since if any client could freely broadcast anything to everyone a player could easily hack their game and force unfair changes onto every other player in the match.
To fix this the client first needs to send its request to the server and only the server is allowed to then broadcast that change out to everyone through multicast.
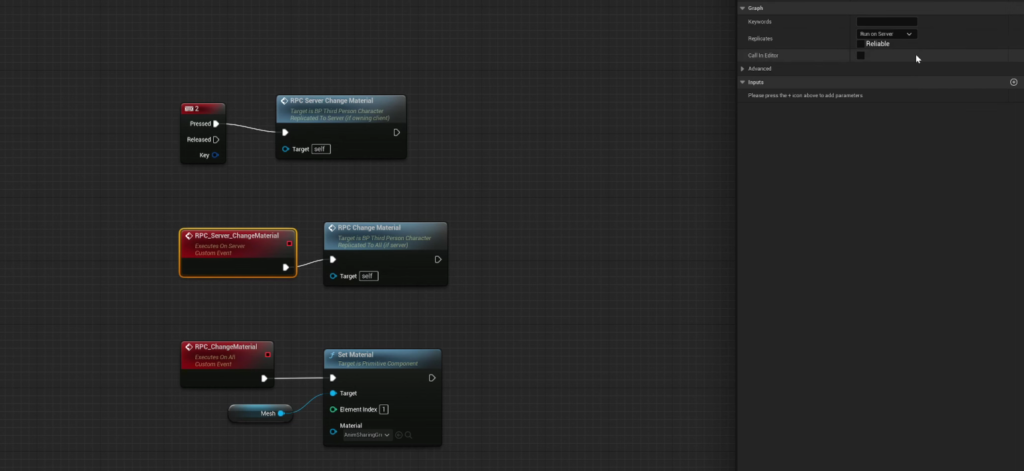
To do this create a second custom event and name it something like RPC Server Change Material. Inside this event call your original multicast event. Then select this new server event and change its Replicates setting to Run On Server instead of Multicast.
Now update your key press logic to call this new server event instead of calling the multicast event directly. What happens now is this. The client presses the key. This calls the server event which travels to the server. The server then calls the multicast event which broadcasts the change out to every connected player including the original client who pressed the key in the first place.
Test this again and now both directions work correctly. Host to client and client to server both properly sync the material change for everyone.
A Word of Caution About RPCs
RPCs are powerful but they are not free. Every RPC call uses network bandwidth to send its message across to other players. If you end up calling an RPC every single frame inside a Tick event for example this can add up into a real performance problem especially compared to something like movement which Unreal Engine already replicates in a much more optimized way behind the scenes.
Use RPCs for meaningful discrete events like an attack a pickup or a state change rather than something that needs to fire constantly every frame.
Replicating an Anim Montage
Remember earlier when we mentioned Anim Montages do not replicate automatically. Now that you understand RPCs fixing this is exactly the same pattern as before.
Set up your Play Anim Montage node as normal inside a new custom event named something like RPC Attack Anim. Set this event’s Replicates setting to Multicast so it plays for every player.
Then just like before create a second event called something like RPC Server Attack Anim which simply calls your multicast event, and set this second event’s Replicates setting to Run On Server.
Bind your key press to call the server event instead of the multicast one directly. Now when either the host or the client presses the key everyone correctly sees the attack animation play at the same time.
Final Thoughts
Once this pattern clicks for you it applies to almost everything you will ever need to do in multiplayer. Movement and basic animation are already handled for you automatically by Unreal Engine. Anything beyond that such as spawning projectiles playing specific animations or triggering visual effects generally needs an RPC. And whenever a client needs to trigger something that everyone should see the flow is always the same. The client calls a server event. The server event calls a multicast event. The multicast event runs on every connected player at once.
This might feel like a lot of new vocabulary all at once but the actual practice of building it is really just repeating this same small pattern over and over for different situations in your game. The more times you set up this client to server to multicast chain yourself the more natural it becomes until you barely even have to think about it anymore.

Solo Indie Game Developer and Unreal Engine (UE4 & UE5) Specialist with over 5 years of experience building optimized Android games from scratch.
I specialize in handling the full development pipeline independently taking mobile titles from concept to high-performance, publishing ready APK/AAB builds. Highly focused on rendering optimization for low-to-mid range devices, Blueprint scripting, and custom mechanics.
Through this blog, I share my practical knowledge and tutorials to help aspiring developers master the Unreal Engine mobile ecosystem.