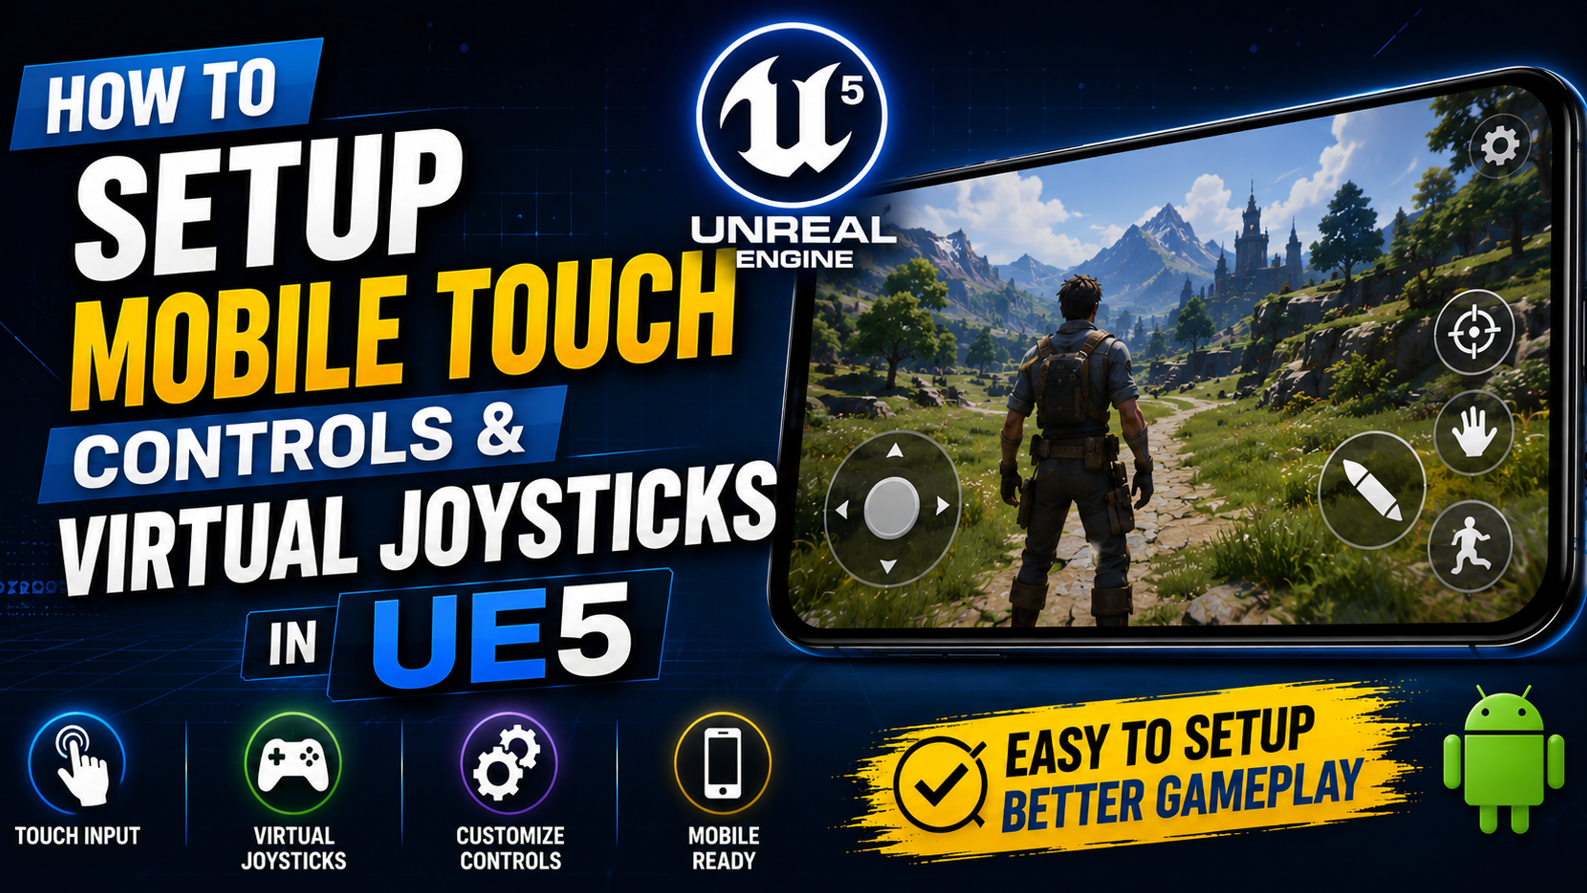
How to Setup Mobile Touch Controls & Virtual Joysticks in UE5
Touch controls and virtual joysticks are something every UE5 mobile developer has to set up at some point and the official documentation does not make it easy. It is either incomplete or it assumes you already know things that most beginners have no idea about.
In this article I will show you exactly how to add touch controls and a fully working virtual joystick to your UE5 Android game step by step.
Understanding How Mobile Input Works in UE5
Before we start setting things up, you need to understand how UE5 handles mobile input because it is different from keyboard and mouse input. On PC your player moves when you press W, A, S or D.
On Android there is no physical keyboard so you need to create virtual buttons and joysticks that appear on screen and feed input into your character’s movement system. UE5 has a built-in system for this called the On Screen Controls system and it works alongside the standard Input system you are already using.
The good news is that if your character is already moving with keyboard controls you do not need to rewrite your movement logic. You just need to bind the same input actions to touch controls and UE5 will handle the rest.
Step 1: Enable Touch Input in Project Settings
The first thing you need to do is make sure touch input is enabled in your project.
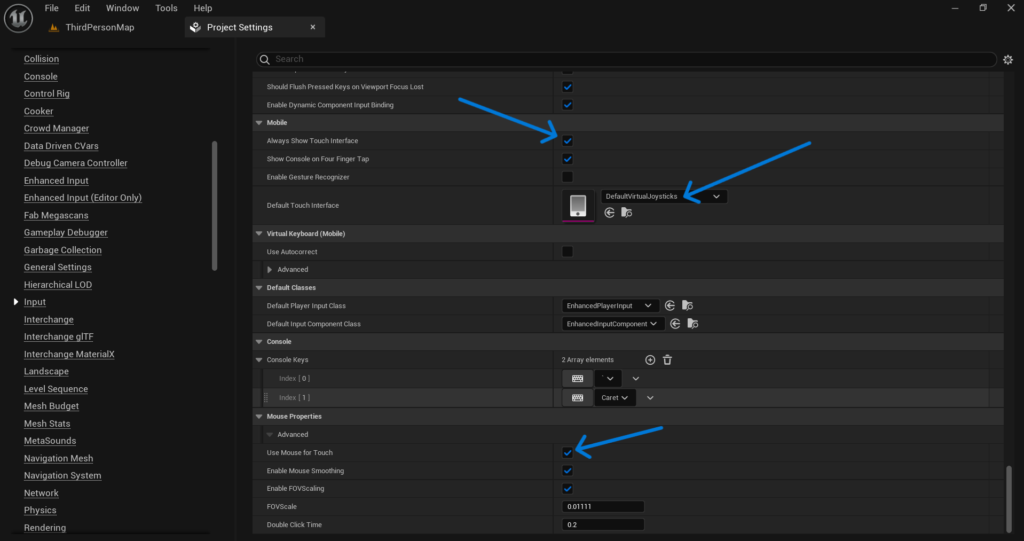
Go to Edit > Project Settings > Engine > Input and scroll down to the Mobile section. Here you will find an option called Default Touch Interface. By default this is set to a touch interface asset that UE5 provides called DefaultVirtualJoysticks. If this field is empty or set to None then no virtual joystick will appear on your device when you run the game.
Make sure DefaultVirtualJoysticks is selected here. This is the built-in touch interface that gives you two joysticks on screen one on the left for movement and one on the right for camera or aiming. It works out of the box for many third person and top down games. Also check that Always Show Touch Interface is enabled if you want to test your touch controls inside the editor without needing a real device.
Step 2: Understanding the Touch Interface Asset
Now that the default joystick is enabled open it up so you can understand what it does and how to customize it. In the Content Drawer go to Engine Content > MobileResources > HUD and you will find the DefaultVirtualJoysticks asset. Double click it to open it. Inside you will see two joystick entries. Each joystick has several important settings that you need to know about.
Thumb Image is the image used for the joystick thumb that the player drags around.
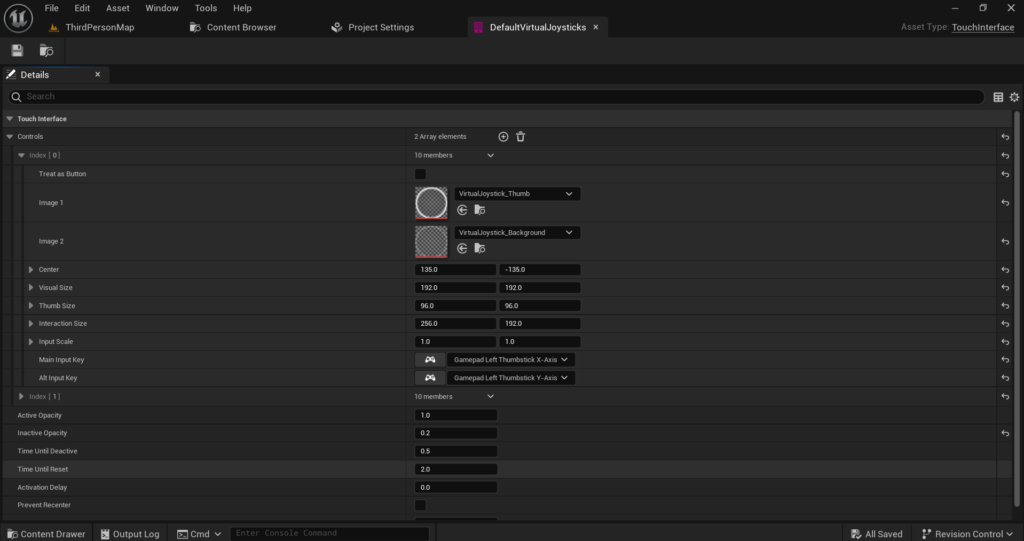
Background Image is the image used for the outer ring of the joystick. Center defines where on screen the joystick appears. The values are in normalized screen coordinates where 0 means the left or top edge and 1 means the right or bottom edge. So a center of 0.1 and 0.7 means the joystick appears on the left side near the bottom of the screen.
Radius controls how large the joystick interaction area is. Input Key is the most important setting. This is what input action the joystick sends to your character. The left joystick by default sends Gamepad Left Thumbstick X-Axis and Gamepad Left Thumbstick Y-Axis. The right joystick sends the right thumbstick axes.
Step 3: Set Up Your Input Bindings Correctly
This is the step where most beginners get confused. Your character’s movement Blueprint or code needs to be listening for the right input events. If it is only set up to receive keyboard input the joystick will do nothing even if it appears on screen.
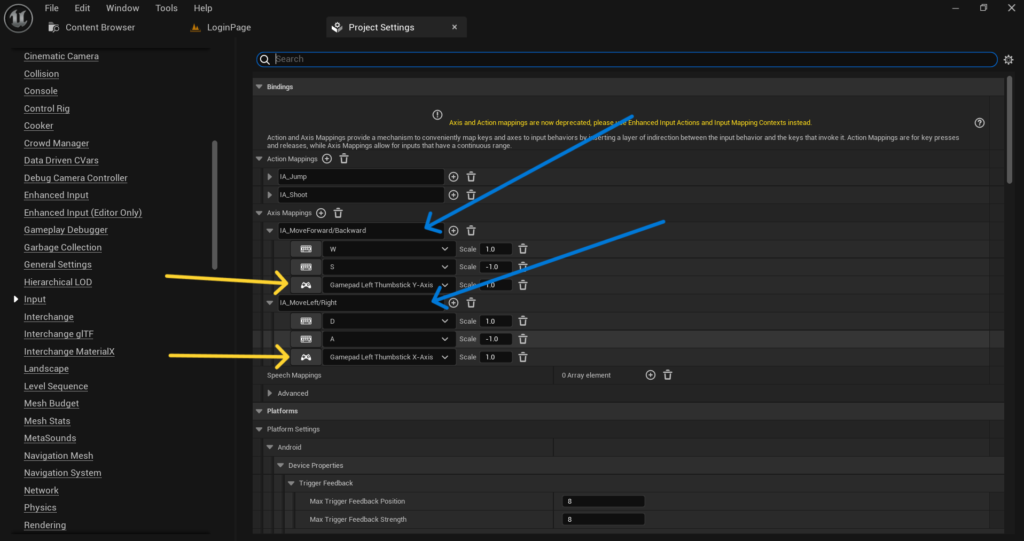
Go to Edit > Project Settings > Engine > Input and look at your Axis Mappings. For character movement you need two axis mappings. One for MoveForward and one for MoveRight. Each of these should have entries for both keyboard keys and gamepad thumbstick axes.
For MoveForward add the following:
The W key with a scale of 1.0 for moving forward. The S key with a scale of -1.0 for moving backward. The Gamepad Left Thumbstick Y-Axis with a scale of 1.0.
For MoveRight add the following:
The A key with a scale of -1.0 for moving left. The D key with a scale of 1.0 for moving right. The Gamepad Left Thumbstick X-Axis with a scale of 1.0.
Once you do this your left virtual joystick will correctly drive character movement because it sends the same input signals as the gamepad thumbstick which you have now mapped to your movement actions.
For camera control do the same with your LookUp and Turn axis mappings and map them to Gamepad Right Thumbstick Y-Axis and Gamepad Right Thumbstick X-Axis.
Step 4: Create a Custom Touch Interface Asset
The default joystick asset works but it is not ideal for every game. If you want to customize the size, position, visuals or add extra buttons like a jump button or fire button you need to create your own Touch Interface asset.
Go to the Content Drawer, right-click and go to User Interface > Touch Interface Setup. Name it something like TI_MyControls. Open it and you will see the same kind of editor as the default joystick. Click Add to add a new control. You can add as many controls as you need.
For each control you add you can choose whether it is a Joystick type control or a Button type control. Joysticks send axis values continuously as the player drags them. Buttons send a single input key press when tapped.
For a basic mobile game a good setup is a left joystick for movement, a right joystick for camera and one or two buttons for actions like jump or attack.
After creating your asset go back to Project Settings > Engine > Input > Default Touch Interface and replace the default with your new TI_MyControls asset.
Step 5: Add a Jump Button or Action Button
Adding a button to your touch interface is straightforward but you need to make sure it is connected to the right input action.
In your TI_MyControls asset add a new control. Set the type to something other than a joystick by leaving the thumb image empty and only setting a background image. Set the Input Key to the key you have mapped to your jump action. If your jump is mapped to the Spacebar in the Input settings then set the button’s Input Key to Spacebar as well.
Position it in the bottom right area of the screen using the Center and Size settings. A center value of around 0.85 horizontal and 0.8 vertical works well for a jump button on most screen sizes.
Compile your project, install it on your device and the button will appear on screen. When tapped it will fire the same input event as the spacebar which triggers your jump.
Step 6: Handling Touch Input Directly in Blueprint
Sometimes you want to do something more custom that the standard touch interface cannot handle. For example detecting a swipe gesture, a double tap or a long press. For these cases you can handle raw touch input directly in Blueprint.
In any Blueprint Actor or Widget Blueprint you have access to the following touch events.
- InputTouchBegin fires when the player first touches the screen. It gives you the finger index and the screen position of the touch.
- InputTouchEnd fires when the player lifts their finger.
- InputTouchMoved fires continuously as the player moves their finger across the screen.
To detect a swipe you would store the starting touch position in a variable on InputTouchBegin and then on InputTouchEnd compare it to the ending position. If the difference is large enough in one direction you know it was a swipe in that direction.
To enable these events in your Character Blueprint go to the Blueprint Class Settings and make sure Block Input is not enabled and your player controller has Enable Touch Events set to true.
Step 7: Test on a Real Device
This step sounds obvious but it is something a lot of developers skip until much later and then run into problems that could have been caught earlier. The editor’s touch simulation is not a perfect representation of how touch controls feel on an actual phone. The joystick sensitivity, the button size and the overall feel can be very different on a real 6 inch screen versus a desktop monitor.
Install your APK on an Android device and test the following things specifically. Check that both joysticks appear and respond correctly. Check that your character moves in the right direction when you push the joystick. Check that buttons are large enough to tap comfortably without accidentally missing them. Check that the joystick dead zone feels right if small unintentional movements cause the character to drift you need to increase the dead zone value in your axis settings.
Step 8: Adjust Joystick Feel with Dead Zone and Sensitivity
Two settings that most developers overlook are dead zone and sensitivity for touch input. Dead zone is the area around the center of the joystick where small movements are ignored. Without a proper dead zone your character will constantly drift slightly even when the player is not touching the joystick. This is a very common complaint in mobile games.
Go to Project Settings > Engine > Input and for each of your gamepad axis mappings you will find a Dead Zone value. Start with a value of around 0.25 and test it on device. Adjust up or down based on how it feels.
Sensitivity controls how fast your camera or character reacts to joystick input. If the camera turns too fast or too slow adjust the scale value on the axis mapping. A scale of 1.0 is default. Try 0.6 or 0.7 for smoother camera movement on mobile.
Final Thoughts
Setting up touch controls in UE5 is not complicated once you understand the connection between the Touch Interface asset. The Input axis mappings and your character’s movement Blueprint. The key insight is that virtual joysticks simply pretend to be a gamepad thumbstick and your input system treats them exactly the same way.
Start with the default joystick setup get your movement working first and then move on to customizing the visuals, positions and adding extra buttons for your specific game.
If you run into any issues or your joystick is not responding the way it should, feel free to reach out at Admin@KaliPress.fun and I will help you figure out what is going wrong. Touch controls are something every mobile developer needs to get right and with the steps in this article you have everything you need to do exactly that.

Solo Indie Game Developer and Unreal Engine (UE4 & UE5) Specialist with over 5 years of experience building optimized Android games from scratch.
I specialize in handling the full development pipeline independently taking mobile titles from concept to high-performance, publishing ready APK/AAB builds. Highly focused on rendering optimization for low-to-mid range devices, Blueprint scripting, and custom mechanics.
Through this blog, I share my practical knowledge and tutorials to help aspiring developers master the Unreal Engine mobile ecosystem.