How to Setup Google Play Games Services in Unreal Engine 5 – Login & Leaderboards
Let me be real with you right away. If you have been trying to get Google Play Games Services working in Unreal Engine 5 and have been hitting wall after wall, you are absolutely not alone. Developers across the Epic forums have spent months, sometimes five or six months, just trying to get a working login flow. The documentation exists but it skips over the parts that actually cause problems. So I am going to walk you through this properly, step by step, and cover the exact spots where things break and why.
By the end of this guide, you will have a working Google Play login and leaderboard system in your UE5 Android game. Let us get into it.
What You Need Before You Start
Before touching a single setting in Unreal Editor, make sure you have these things ready.
You need a Google Play Developer account with a 25 dollar one-time registration fee if you do not already have one. Your game needs to exist as an app in the Google Play Console, even if it is just a shell with a package name. You need a Google Cloud Console account to set up OAuth credentials. And finally, your UE5 project should already be configured to package for Android, meaning you have Android SDK, NDK, and JDK set up correctly through the Android Studio path.
If Android packaging itself is not working yet, sort that out first. Google Play Services will not help you if your APK is not building.
Step 1: Create Your App in Google Play Console
Go to play.google.com/console and create a new app if you have not already. Give it your game’s name and fill in the required details. You do not need a production release for this. An internal testing track is enough to work with during development.
Here is the first thing the official docs will not warn you about. You need to set up Google Play Games Services and publish that configuration before you create any testing track releases. If you upload your APK first and then set up Play Games Services, the SHA-1 fingerprint matching can go wrong and your login will fail silently. The order matters.
In the Google Play Console, go to the Grow section and then find Play Games Services. Click on Setup and Management and then on Configuration. Create a new Play Games Services project and link it to your app.
Step 2: Set Up OAuth Credentials in Google Cloud Console
This is where many developers get confused because the Play Console and the Cloud Console are two separate systems that need to work together.
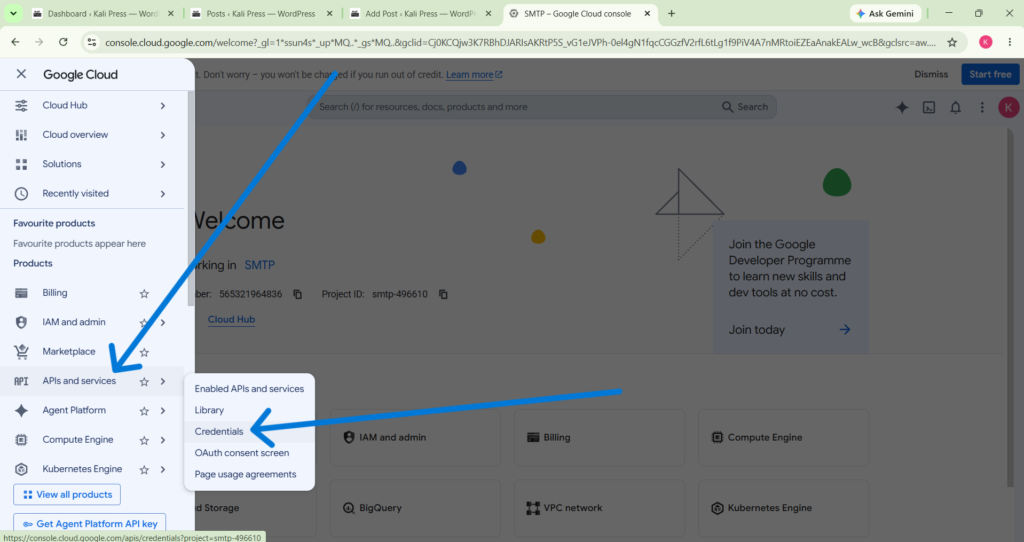
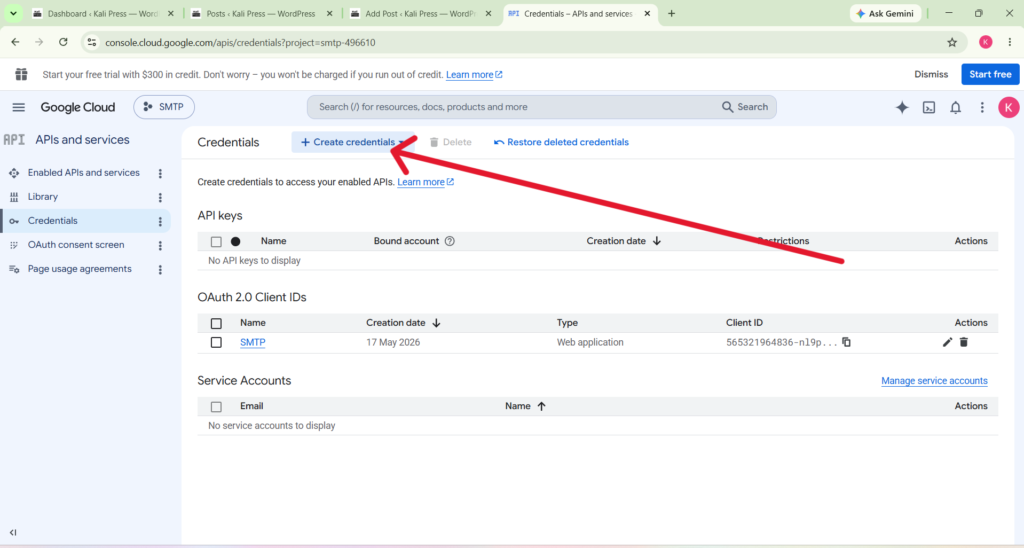
Go to console.cloud.google.com and either find the project that was automatically created when you set up Play Games Services or create a new one. Navigate to APIs and Services and then to Credentials.
You need to create two OAuth 2.0 Client IDs here. First, create an Android client using your app’s package name. If you are using Google Play App Signing which is now the default and strongly recommended, you need to use the SHA-1 fingerprint that Google’s App Signing system generates, not the one from your local keystore. You can find the Google-managed SHA-1 in your Play Console under Setup then App Integrity then App signing. Paste that SHA-1 into the Android OAuth client.
Second, create a Web Application OAuth client. Do not skip this step. The web application client generates a Client ID and Client Secret that the Play Games Services backend uses for server-side token validation. You will need both values later.
Step 3: Configure Play Games Services in the Play Console
Back in the Play Console under Play Games Services, go to Configuration and then Credentials. You need to add both OAuth clients here. Add the Android client and the Web Application client.
Once both are added, hit the Publish button on your Play Games Services project. This publish step is critical. Until this is published, none of the login flows will work even if everything else is correct. After publishing, it typically takes a few minutes for Google’s systems to propagate the changes.
Step 4: Enable the Google Play Plugin in Unreal Engine
Open your UE5 project. Go to Edit and then Plugins. Search for “Google Play” and make sure the Google Play Services plugin is enabled. Restart the editor after enabling it.
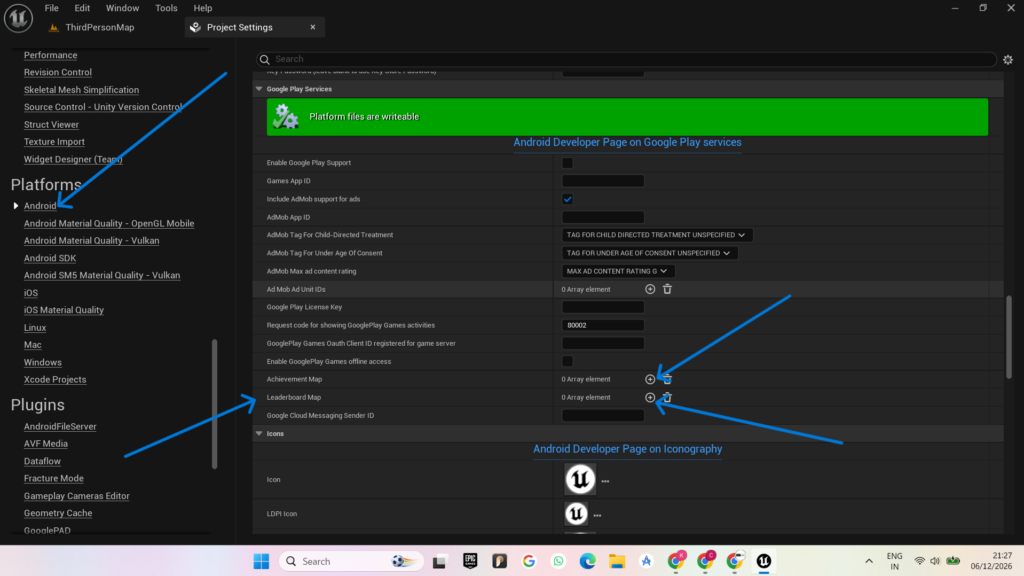
Now go to Edit and then Project Settings. On the left side, navigate to Platforms and then Android. Scroll down until you find the Google Play Services section.
Here is what you need to fill in:
Enable Google Play Support should be checked. The Games App ID field needs the numeric ID from your Play Games Services project. You can find this in the Play Console under Play Games Services in the Configuration section. It will be a long number. Do not include any letters or prefixes, just the number.
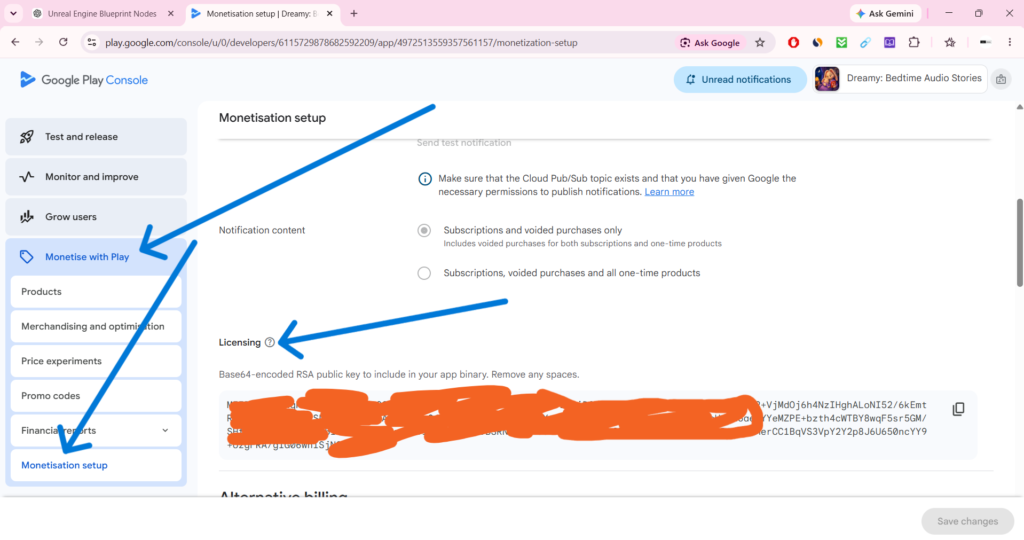
The Google Play License Key field needs the Base64 encoded key from your app. You find this in Play Console under Monetize then Monetization setup then Licensing. Copy the entire long string and paste it in.
Step 5: Set Up the Leaderboard Map
Still in the Google Play Services section of Project Settings, you will see a Leaderboard Map. Click the plus button to add an entry.
Each entry has two fields. The Name field is just an internal alias you define yourself, something like HighScore or TopTime. This is what you will use in your Blueprints. The Leaderboard ID field is the actual ID from Google Play Console. To find it, go to your Play Games Services project, then Leaderboards, create a new leaderboard if you have not already, and copy the ID that looks something like CgkI———–DAAQ.
You can add as many leaderboards as your game needs. Just give each one a unique Name that makes sense inside your project.
Step 6: Handle the Login Flow in Blueprints
Open your Game Instance Blueprint or whichever Blueprint you want to manage the login. At the game start, usually on Event Init or right after the player enters the main menu, you will want to call the Show External Login UI node.
This node is a latent node, which means it has multiple execution output pins. The pass-through pin fires immediately when the node is called. The On Success pin fires when the login completes successfully. The On Failure pin fires if something goes wrong.
Here is the thing about On Success that trips people up. There is a known issue in UE5 where the On Success pin does not always fire even when the player successfully logs in. The login popup appears, the player signs in, but your Blueprint never continues past the login node. This is a documented bug in the UE5 forums, not something you are doing wrong.
A practical workaround is to not rely solely on On Success for your post-login logic. Instead, use a short timer after calling Show External Login UI and then check the login state manually using the Is Logged In node. If it returns true, proceed with your flow. This is not perfect but it is reliable for shipping a game while Epic works on the underlying issue.
Step 7: Writing a Score to the Leaderboard
Once the player is logged in, writing a score is straightforward. In your Blueprint, after a level ends or when a high score is achieved, call the Write Leaderboard Integer node.
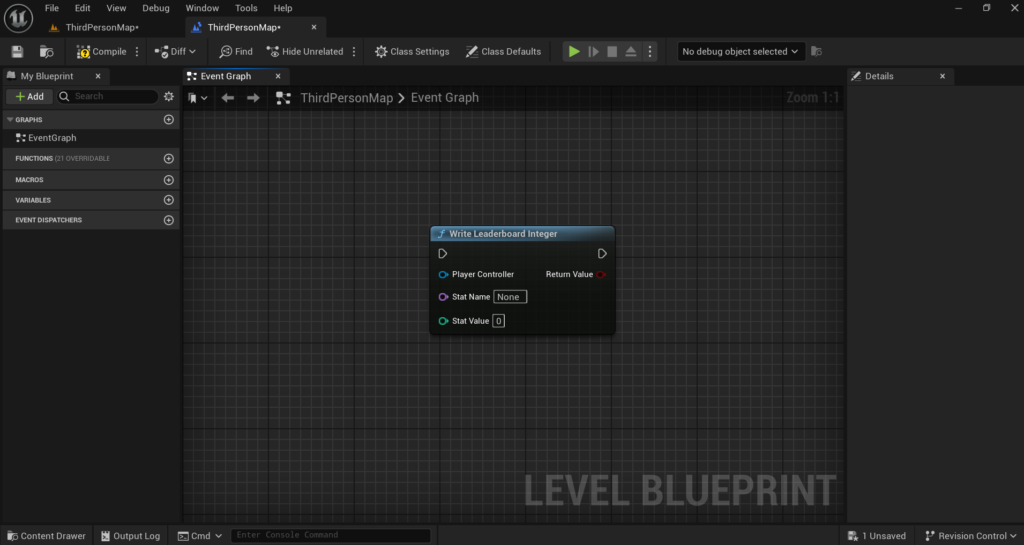
Connect your Player Controller reference to the Player Controller input. In the Stat Name field, type the Name you defined in the Leaderboard Map in Project Settings. In the Stat Value field, connect your score integer.
The Android and iOS leaderboard systems are smart enough to only accept values higher than what is currently stored, so you do not need to do your own comparison before submitting. You can safely call this node every time the player finishes a run and let the system handle whether it is a new high score.
Step 8: Reading from the Leaderboard
To pull the current high score, use the Read Leaderboard Integer node. It works the same way as Write. Give it a Player Controller reference and the Stat Name. It is also a latent node, so the On Success pin fires when the value comes back from Google’s servers.
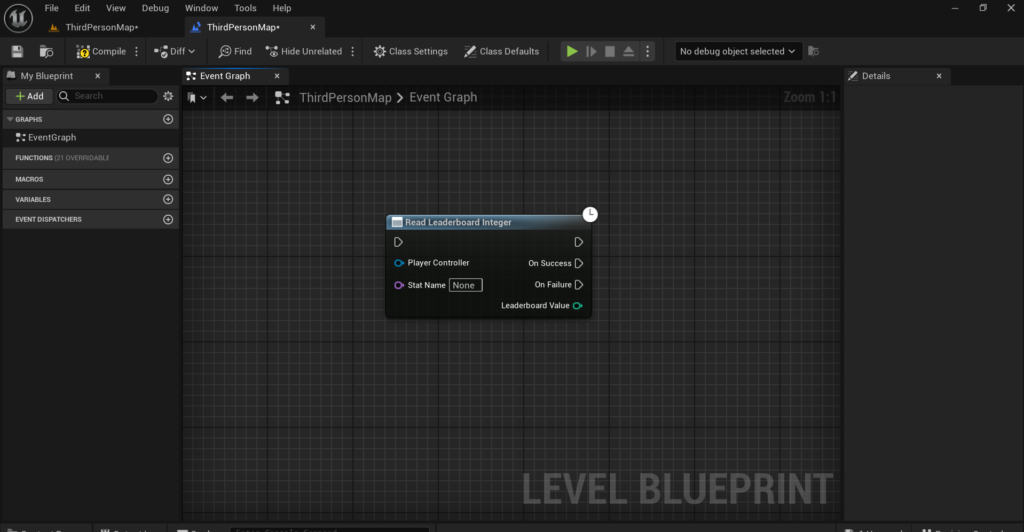
Before On Success fires, the Leaderboard Value output will return 0. Make sure your UI accounts for this instead of displaying 0 to the player while the value is loading.
A good pattern is to call Read Leaderboard Integer right after a successful login and store the result in a Game Instance variable. Then any UI element that needs the score can just read that variable instead of making a live server call every time.
Step 9: Showing the Native Leaderboard Screen
If you want to show the full native Google Play leaderboard popup, which has the player’s rank and surrounding players, use the Show Platform Specific Leaderboard Screen node. Pass in the Category Name, which again is the Name you set in the Leaderboard Map.
This is great to hook up to a Leaderboard button on your main menu or game over screen. One line of Blueprint and Google handles the entire UI for you.
Step 10: Packaging and Testing
For testing, you cannot test Google Play login on a development build that is run directly through USB and Launch. You need to package the game, sign it with your distribution key, and upload it to an Internal Testing track in the Play Console. Then download and install it through the Play Store testing link.
The testers also need to be added to the internal testing group in Play Console. If a test account is not on the tester list, the login will fail.
Target SDK 34 is required for newer Play Store submissions. In your Android Project Settings make sure your Target SDK Version is set to 34. Build tool versions should use the latest available through your Android SDK installation.
Common Mistakes That Break Everything
The SHA-1 mismatch is the most common issue. If you are using Google Play App Signing, always use Google’s SHA-1, not your local one.
Publishing Play Games Services before any testing track uploads is mandatory. Many developers skip this and spend days debugging a configuration that was never active to begin with.
The App ID must be numeric only. No letters, no “app:” prefix.
Testing on a debug APK will not work for Play Services login. Always test with a signed APK from the Play Store testing track.
Not adding your test accounts to the internal testing program is another common blocker. The login will just silently fail.
Final Thought
Google Play Games Services in UE5 has more moving parts than it should. The Google Cloud Console, the Play Console, the OAuth credentials, the UE5 Project Settings and then the Blueprint logic all need to be in sync at the same time. Any one piece being wrong will cause silent failures that are hard to debug.
Go through each step in order, double check the SHA-1 source, publish Play Games Services before your first test build, and test only through the Play Store testing flow. Once it is working it is solid and your players get a smooth native login and leaderboard experience. Good luck with the release.
If Still You Have Problem Connect With me Admin@kalipress.fun.

Solo Indie Game Developer and Unreal Engine (UE4 & UE5) Specialist with over 5 years of experience building optimized Android games from scratch.
I specialize in handling the full development pipeline independently taking mobile titles from concept to high-performance, publishing ready APK/AAB builds. Highly focused on rendering optimization for low-to-mid range devices, Blueprint scripting, and custom mechanics.
Through this blog, I share my practical knowledge and tutorials to help aspiring developers master the Unreal Engine mobile ecosystem.