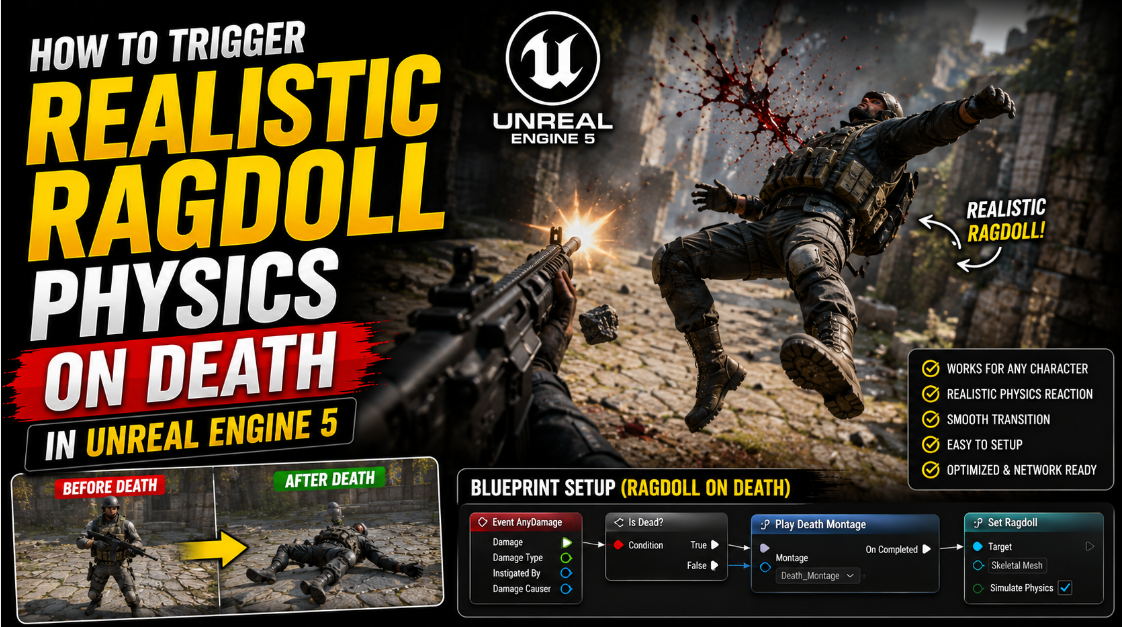
How to Trigger Realistic Ragdoll Physics on Death in UE5
Watching a character collapse and tumble naturally when they die adds a huge amount of impact to any game. This is called a ragdoll effect and it is by far the easiest way to simulate a death or knockdown reaction on your character. You could use custom death animations instead but those take much more effort to create and set up properly.
A ragdoll simply lets physics take over the character’s body so it falls and reacts realistically to whatever it hits, without you needing to animate anything by hand. In this article I will show you exactly how to set this up on your character and trigger it in more than one way.
Step 1: Understand the Physics Asset Behind Your Character
Every skeletal mesh character in UE5 that uses a skeleton comes with something called a Physics Asset. This asset is what actually makes the ragdoll effect possible.
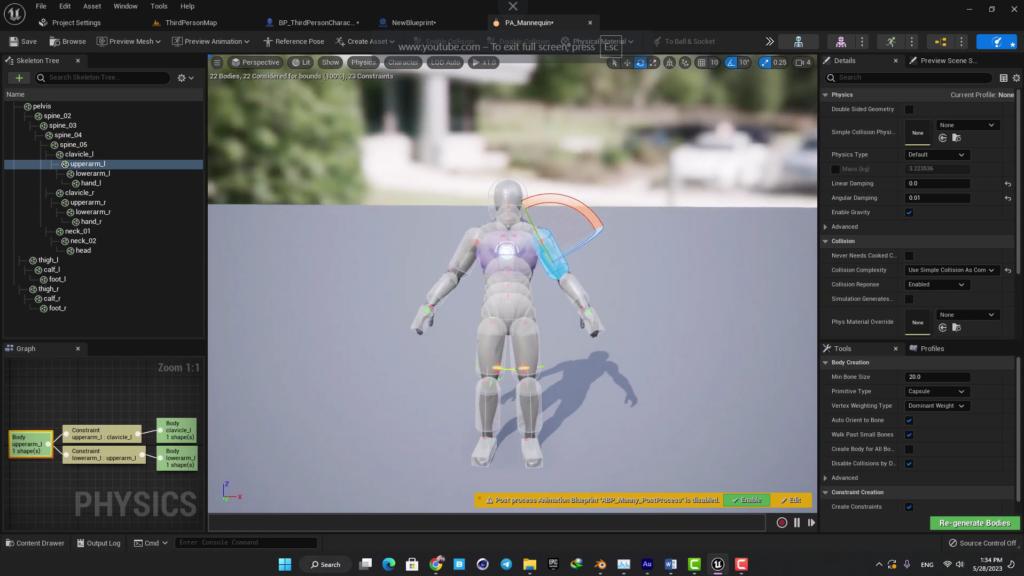
Open your character’s mesh in the Content Browser, in this case the default Mannequin. You will find its Physics Asset already created for you. Open it up and you will see a bunch of capsule and box shapes wrapped around different parts of the skeleton such as the arms legs spine and head. These shapes are what allow collision and physics simulation to actually happen on each individual body part rather than the character behaving as one single solid block.
You do not need to change anything here for a basic setup, but it is worth opening this once just to understand what is actually happening under the hood. If you want you can even hit the Simulate button right inside this Physics Asset editor to preview how the ragdoll will look and behave before ever touching your character’s actual Blueprint.
Step 2: Add the Basic Ragdoll Trigger Logic
Now let us actually make this work on your character. Open your Third Person Character Blueprint.
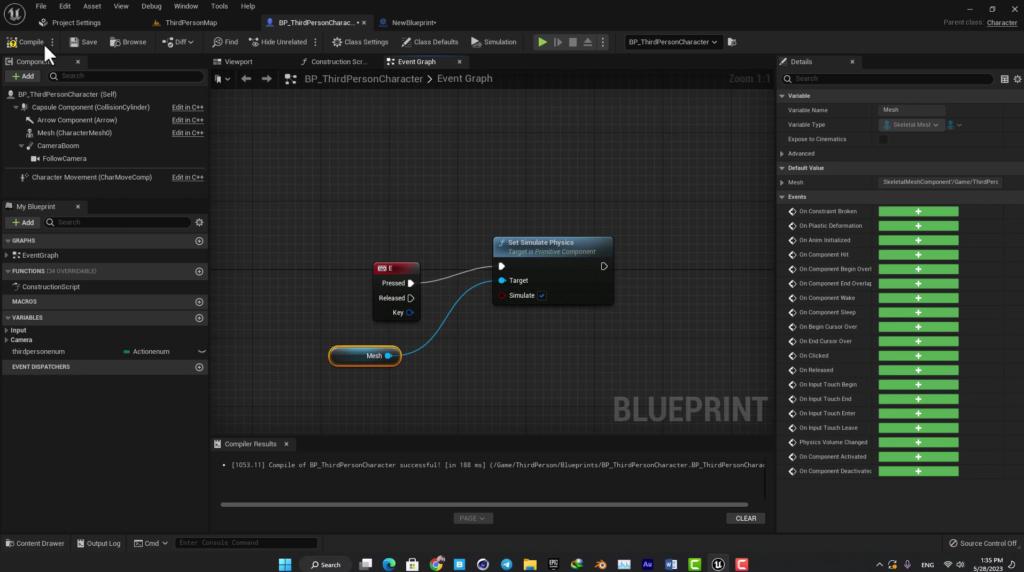
The core thing that turns your character into a ragdoll is a single node called Set Simulate Physics. Add this node and set its Target to your character’s Mesh component. When this runs it tells the engine to stop controlling this mesh through normal animation and instead let real physics take over completely.
To actually trigger this node we need some kind of input event. For testing purposes bind this to a simple keyboard key. Add a Keyboard Event node and choose whichever key you want to use for testing, the letter E works well here. Connect this key press event into your Set Simulate Physics node and make sure the Simulate checkbox on that node is checked to true. Compile your Blueprint.
Step 3: Test and Fix the Initial Result
Press play and try pressing E in game. You should see the character’s physics activate, but at this stage it likely will not look quite right. The body might behave strangely or not collide with the ground and world properly the way an actual ragdoll should.
This happens because of a missing collision setting. Go back to your character Blueprint and select the Mesh component. Scroll down to the Collision section and find the Collision Preset option. Change this to Ragdoll specifically. This preset configures collision correctly for every individual body part so they can interact with the world and with each other the way a proper falling body should.
Compile and save, then press play again and test pressing E. This time the ragdoll effect should look much smoother and far more natural, with the character properly falling and reacting to the ground and any nearby objects.
Step 4: Stop the Player From Moving After the Ragdoll Triggers
If you test this a bit more you will probably notice something strange. Even after the character has completely dropped into a ragdoll state you can still move the character around the scene using your normal movement input, which looks very wrong and breaks the effect.
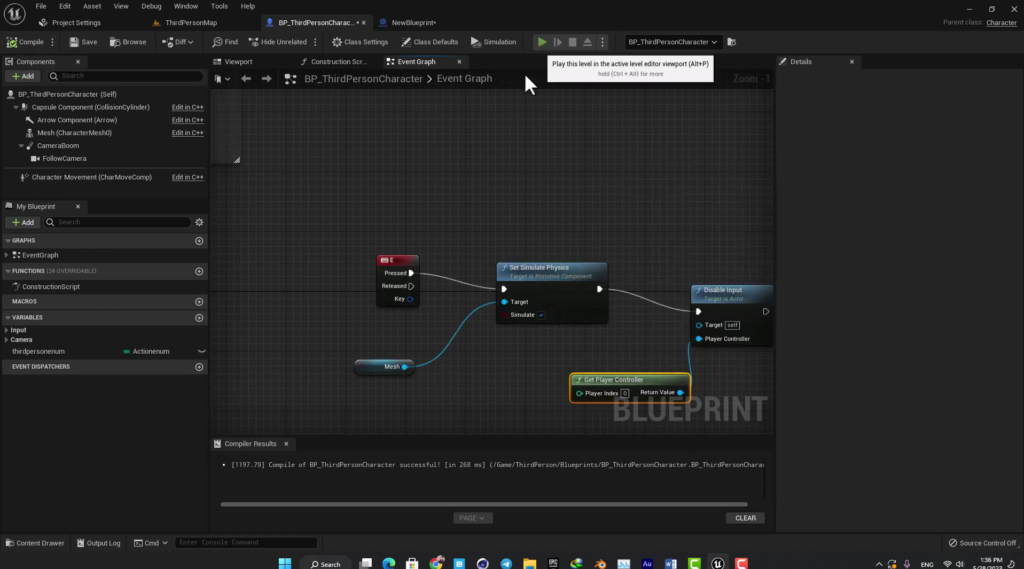
To fix this we need to disable player input the moment the ragdoll triggers. Back in your Blueprint, right after your Set Simulate Physics node, add a Disable Input node. This node needs a Player Controller input, so add a Get Player Controller node and plug its output into that pin.
Now test this again. Press E to trigger the ragdoll and confirm that once the character drops you can no longer move them around at all. This makes the death or knockdown moment feel final and correct rather than the character oddly sliding around the floor while still ragdolling.
Step 5: Trigger the Ragdoll From a Different Source
Using a keyboard key is great for quick testing but in an actual game you will usually want the ragdoll to trigger from something happening in the world itself, such as walking through a trap, getting hit by an attack, or falling from a great height. Let us build an example of this using a simple gate obstacle that kills the player on contact.
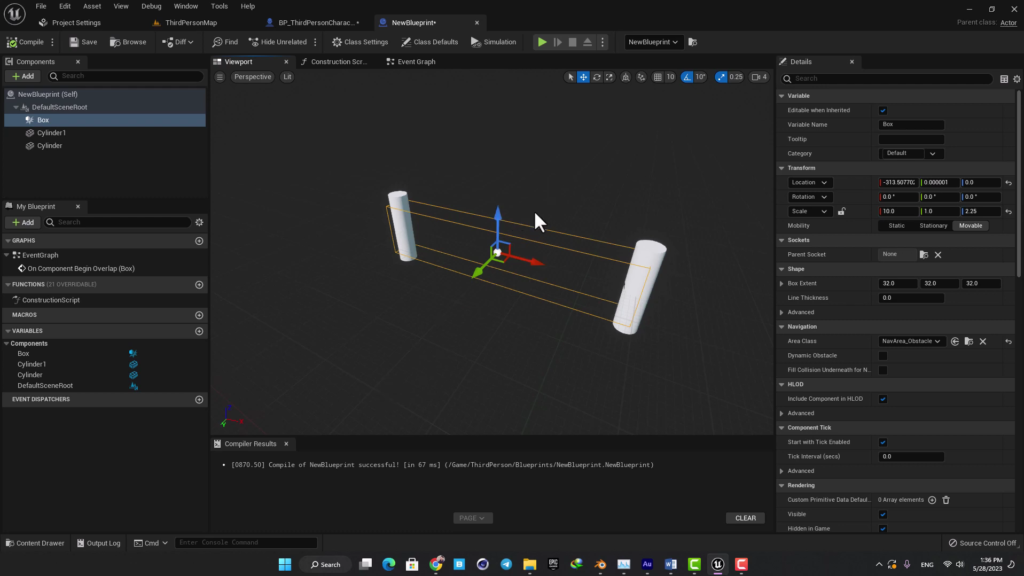
Create a new Blueprint for this gate. Give it a simple visual setup such as two columns with a Box Collision component placed in the empty space between them, representing the area the player needs to walk through.
Step 6: Detect the Overlap and Communicate With the Player
Inside this Gate Blueprint right click on your Box Collision component and add an On Component Begin Overlap event. This fires the moment anything, including the player character, walks into that collision area.
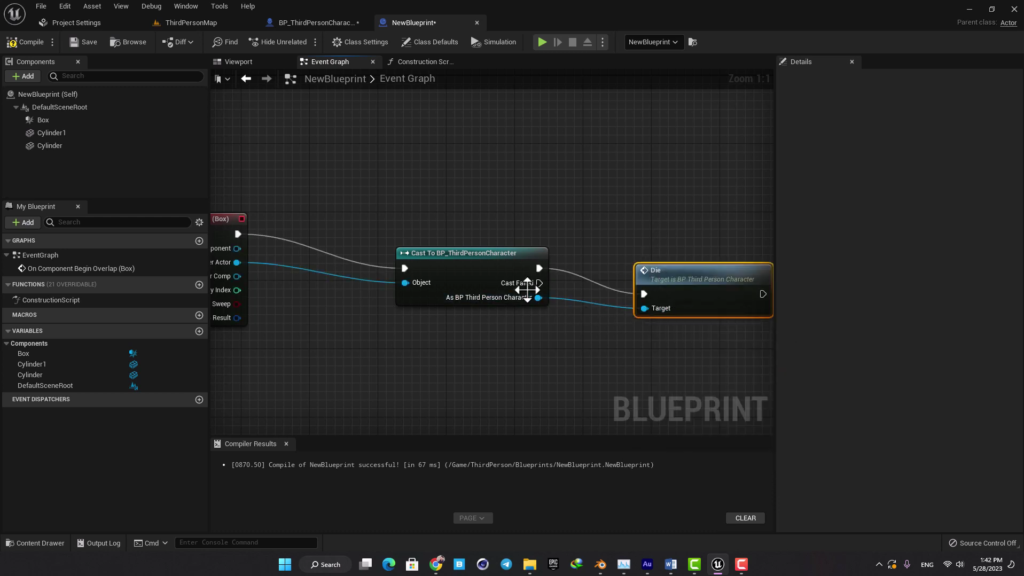
From this event we need to talk to the player’s character Blueprint specifically, so add a Cast to Third Person Character node. Connect the Other Actor pin from your overlap event into the Object input of this cast node. This makes sure that whatever logic runs next specifically targets the player character rather than any other random actor that might overlap this trigger.
Step 7: Create a Reusable Die Event on the Character
Rather than trying to directly call Set Simulate Physics from inside the Gate Blueprint, which would require duplicating logic all over the place for every different trigger source in your game, it is much cleaner to create a single reusable event inside the character itself that any other Blueprint can call.
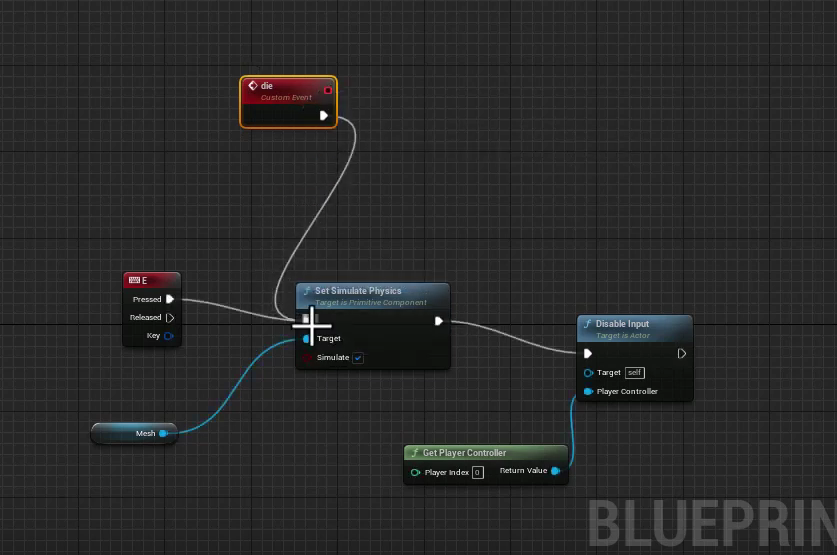
Go back to your Third Person Character Blueprint and right click to add a Custom Event. Name this something clear like Die. Connect this custom event directly into your existing Set Simulate Physics logic, the same setup you already built earlier including the Disable Input node.
Compile this Blueprint so the new custom event is properly registered and available to call from elsewhere.
Step 8: Call the Die Event From the Gate
Go back to your Gate Blueprint where you left off after the successful cast. From the cast node’s output, drag out a wire and search for Die. You should find this custom event listed here exactly because we just created it on the character Blueprint in the previous step. Connect this to the Target pin coming from your successful cast.
Compile and save this Gate Blueprint as well.
Step 9: Test the Complete Trigger System
Place your gate Blueprint somewhere in the level with enough space for the player to walk directly into that Box Collision area between the two columns. Press play and walk your character straight into the gate.
The moment your character overlaps this collision box you should see the exact same ragdoll effect trigger automatically, with the character collapsing and falling naturally, movement input disabled just like before. Try the E key trigger again as well just to confirm both methods still work independently and correctly using the same underlying Die event.
Why Building It This Way Matters
The real benefit of routing everything through a single custom Die event on the character rather than scattering Set Simulate Physics calls everywhere is that you can now trigger this exact same ragdoll behavior from literally anywhere in your game with just one simple function call. A trap, an enemy attack, fall damage, a scripted cutscene moment, or any other system you build later can all call this same Die event on the player and get the exact same correct ragdoll result every single time, without you needing to remember or recreate the full physics and input disabling logic over and over again in different places.
This pattern of building one clean reusable event that other systems call into, rather than duplicating the same logic repeatedly, is something that will make your entire project far easier to maintain and expand as it grows in complexity.
Final Thoughts
A ragdoll effect is one of the simplest yet most satisfying physical reactions you can add to a character in UE5, and as shown here it really only takes a handful of nodes to get working correctly. The two most important details that make it actually look and feel right are setting the correct Ragdoll collision preset on your mesh and disabling player input the moment the effect triggers, since skipping either of these leaves the effect looking broken or unfinished even though the core physics simulation itself is technically working.
From here you could expand this further by adding a respawn system that resets the character’s position and re-enables both movement and normal animation after a short delay, or by triggering different ragdoll force impulses depending on the direction and strength of whatever knocked the character down in the first place, giving each death or knockdown moment a bit more variety and impact.

Solo Indie Game Developer and Unreal Engine (UE4 & UE5) Specialist with over 5 years of experience building optimized Android games from scratch.
I specialize in handling the full development pipeline independently taking mobile titles from concept to high-performance, publishing ready APK/AAB builds. Highly focused on rendering optimization for low-to-mid range devices, Blueprint scripting, and custom mechanics.
Through this blog, I share my practical knowledge and tutorials to help aspiring developers master the Unreal Engine mobile ecosystem.